Water softeners play a crucial role in improving the quality of water in our homes. They help remove minerals like calcium and magnesium, which can cause hard water issues. Whirlpool water softeners are among the popular choices for homeowners looking to enjoy the benefits of soft water. However, to keep your Whirlpool water softener working efficiently, regular cleaning and maintenance are essential. In this comprehensive guide, we’ll walk you through the steps on how to clean a Whirlpool water softener, ensuring it continues to provide you with soft, high-quality water for years to come.
Understanding Your Whirlpool Water Softener
Before we dive into the cleaning process, it’s essential to understand how your Whirlpool water softener operates. This knowledge will help you identify which parts require cleaning and maintenance.
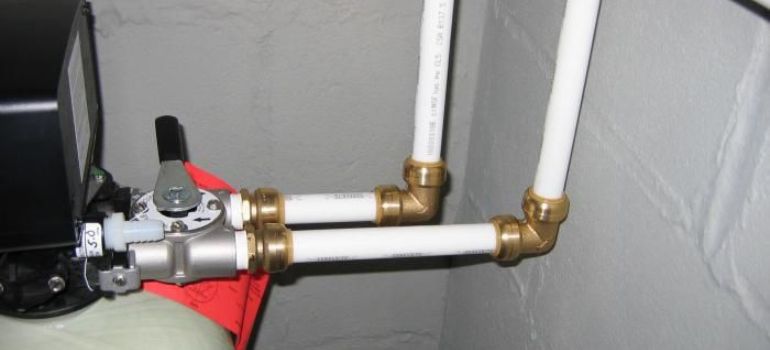
Components of a Whirlpool Water Softener
- Resin Tank: The resin tank is a crucial part of the water softener that contains resin beads. These beads are responsible for removing hard minerals from the water, making it soft.
- Brine Tank: The brine tank stores a brine solution (salt and water mixture). It is used in the regeneration process to recharge the resin beads in the resin tank.
- Control Valve: The control valve is the brain of the water softener. It manages the regeneration cycle and controls the flow of water in and out of the resin tank.
- Resin Beads: These tiny, spherical beads are found inside the resin tank. They attract and trap hard minerals like calcium and magnesium, exchanging them for sodium ions to soften the water.
- Brine Tubing: Brine tubing connects the brine tank to the resin tank. It allows the brine solution to flow into the resin tank during regeneration.
Regular Cleaning and Maintenance
To maintain the efficiency of your Whirlpool water softener, follow these simple cleaning steps:
1. Turn Off the Water Softener
- Locate the control panel or valve on your Whirlpool water softener. This is usually near the top of the unit.
- Look for the power button or switch. It may be labeled as “Power,” “On/Off,” or something similar.
- Switch the power button to the “Off” position or press the “Off” button, depending on the type of control panel your water softener has.
- Ensure that the water softener’s display or indicator lights show that it is powered off.
2. Empty the Brine Tank
- Locate the brine tank, which is typically a separate container connected to your water softener system. It is usually located near the main unit.
- Ensure that your water softener is turned off to prevent it from regenerating or adding more salt during the cleaning process.
- Open the lid or cover of the brine tank. The method of opening may vary depending on your specific model, but it is usually a hinged lid or a removable cover.
- Use a scoop or a small container to remove the remaining salt or brine solution from the tank. Be sure to wear gloves to protect your hands from contact with the salt.
- Dispose of the collected salt or brine solution properly, following local regulations and guidelines for salt disposal.
- After emptying the tank, you may want to wipe down the interior with a damp cloth to remove any remaining residue or salt crystals.
- Once the brine tank is empty and clean, you can proceed with other maintenance or cleaning tasks as needed.
3. Clean the Resin Tank
- Turn Off the Water Softener: Before you begin any maintenance, make sure the water softener is powered off to prevent any accidents.
- Locate the Resin Tank: Identify the resin tank on your water softener. It’s typically a tall cylinder-shaped container.
- Disconnect the Resin Tank: Depending on your water softener model, you may need to disconnect the resin tank from the control valve. Follow the manufacturer’s instructions for this step.
- Empty the Resin Tank: Carefully empty the resin tank of its contents. This may involve removing resin beads or any resin-related media. Be cautious and follow the manufacturer’s guidelines for proper handling.
- Clean the Interior: Use a hose or gentle water stream to rinse the inside of the resin tank thoroughly. Avoid using any harsh chemicals or abrasives, as they can damage the resin beads.
- Inspect the Resin Beads: Examine the resin beads for any signs of damage or deterioration. If you notice any issues, consider replacing them as per the manufacturer’s recommendations.
- Reassemble and Reconnect: Once the interior is clean and the resin beads are in good condition, reassemble the resin tank and reconnect it to the control valve following the manufacturer’s instructions.
- Restart the Water Softener: Turn the water softener back on and allow it to go through a regeneration cycle. This will ensure that the resin tank is properly charged and ready to soften your water.
4. Inspect the Brine Tubing
- Turn Off the Water Softener: Before performing any maintenance, make sure to turn off the water softener to prevent any accidents.
- Locate the Brine Tubing: Identify the brine tubing, which connects the brine tank to the resin tank. It’s usually a flexible tube made of plastic or rubber.
- Visual Inspection: Examine the entire length of the brine tubing for any visible signs of damage, such as cracks, kinks, or leaks. If you notice any issues, it’s essential to address them promptly.
- Check for Blockages: Inspect the tubing for any blockages or obstructions that might impede the flow of brine solution. Clear any blockages carefully if you find them.
- Ensure Proper Connections: Verify that the tubing is securely connected to both the brine tank and the resin tank. Loose or improperly connected tubing can lead to issues with the regeneration process.
- Replace if Necessary: If you encounter significant damage, cracks, or other issues with the brine tubing, it’s advisable to replace it with a new, compatible tube. Consult your water softener’s manual or the manufacturer for guidance on selecting the correct replacement tubing.
- Perform a Test Run: After completing the inspection and any necessary repairs or replacements, turn the water softener back on and allow it to go through a regeneration cycle to ensure that the brine tubing functions correctly.
Deep Cleaning Your Whirlpool Water Softener
Sometimes, your water softener may require a more thorough cleaning. Here’s how to do it:
Resin Bed Cleaning
- Turn Off the Water Softener: Before you begin any maintenance, ensure that the water softener is turned off to prevent any accidents.
- Locate the Resin Bed: Identify the resin bed within the resin tank. The resin bed consists of resin beads that are responsible for softening the water.
- Prepare a Resin Bed Cleaner: You can purchase a resin bed cleaner from a water softener supply store or follow the manufacturer’s recommended cleaning solution. Ensure that the cleaner is suitable for your specific water softener model.
- Disconnect the Resin Tank: Depending on your water softener model, you may need to disconnect the resin tank from the control valve. Follow the manufacturer’s instructions for this step.
- Add the Resin Bed Cleaner: Follow the product instructions to add the appropriate amount of resin bed cleaner to the resin tank. Typically, this involves pouring the cleaner into the resin tank.
- Allow the Cleaner to Work: Let the cleaner sit in the resin tank for the specified duration recommended by the product instructions. This allows it to break down any mineral deposits or contaminants within the resin bed.
- Rinse Thoroughly: After the cleaning period, rinse the resin bed thoroughly with clean water. Use a hose or gentle water stream to remove any residual cleaner and loosened contaminants. Ensure that all the cleaning solution is flushed out.
- Reconnect and Reassemble: Reconnect the resin tank to the control valve and reassemble any parts you may have detached during the process. Follow the manufacturer’s instructions carefully.
- Restart the Water Softener: Turn the water softener back on and allow it to go through a regeneration cycle. This will ensure that the resin bed is properly recharged and ready to soften your water.
- Monitor Performance: Keep an eye on the performance of your water softener over the next few days to ensure that it is effectively softening the water. If you notice any issues, consult your water softener’s manual or consider seeking professional assistance.
Control Valve Cleaning
- Turn Off the Water Softener: Ensure that the water softener is turned off to prevent any accidents during the cleaning process.
- Access the Control Valve: Depending on your water softener model, you may need to remove a cover or access panel to reach the control valve. Follow the manufacturer’s instructions for accessing the valve.
- Disconnect the Valve: Carefully disconnect the control valve from the resin tank. This may involve loosening or removing nuts and bolts, so use the appropriate tools and follow the manufacturer’s guidelines.
- Inspect for Debris: Examine the control valve for any visible debris, dirt, or mineral buildup. These deposits can affect the valve’s performance and need to be removed.
- Clean the Valve Body: Use a soft brush, such as a toothbrush or a small cleaning brush, to gently scrub the exterior and interior of the control valve. Pay special attention to areas where debris is visible.
- Flush with Water: After brushing, flush the control valve with clean water to remove any loosened debris. Use a hose or a container of water for this purpose.
- Check Valve Components: Inspect the individual components of the control valve, such as o-rings, seals, and diaphragms, for signs of wear or damage. Replace any worn-out or damaged parts following the manufacturer’s recommendations.
- Reassemble the Valve: Reconnect the control valve to the resin tank, ensuring that all connections are secure and properly tightened. Refer to the manufacturer’s instructions for the correct reassembly procedure.
- Restart the Water Softener: Turn the water softener back on and allow it to go through a regeneration cycle. This ensures that the control valve is functioning correctly and that water softening can resume.
- Monitor Performance: Keep an eye on the performance of your water softener over the next few days to ensure that it is working efficiently. If you notice any issues, consult your water softener’s manual or consider seeking professional assistance.
Check and Adjust Settings
Review and adjust the settings on your water softener according to your water hardness level and household needs.
Regular Maintenance Schedule
To keep your Whirlpool water softener in top condition, establish a maintenance schedule. Here’s a recommended timeline:
Monthly Check-Up
Inspect the brine tank and brine tubing for any issues.
Quarterly Cleaning
Perform a thorough cleaning of the resin tank and control valve.
Annual Servicing
Consider an annual servicing by a professional to ensure optimal performance.
Conclusion
Maintaining a Whirlpool water softener is essential for enjoying the benefits of soft water in your home. Regular cleaning and maintenance ensure its longevity and efficiency. By following the steps outlined in this guide and establishing a maintenance schedule, you can keep your Whirlpool water softener in excellent working condition for years to come.
FAQs (Frequently Asked Questions)
It’s recommended to perform monthly check-ups, quarterly cleanings, and annual servicing for optimal results.
It’s best to use high-purity water softener salt to prevent potential issues with your system.
Signs include reduced water softening efficiency, salt bridging, and noticeable mineral deposits on fixtures.
Yes, always turn off your water softener to ensure safety while performing maintenance.
You can perform routine maintenance yourself, but consider hiring a professional for annual servicing to ensure thorough inspection and cleaning.


