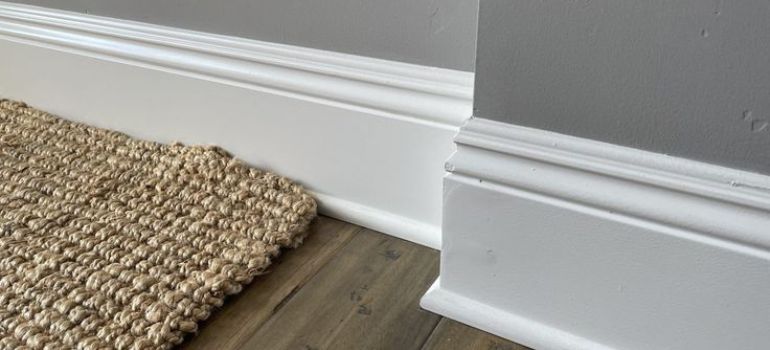
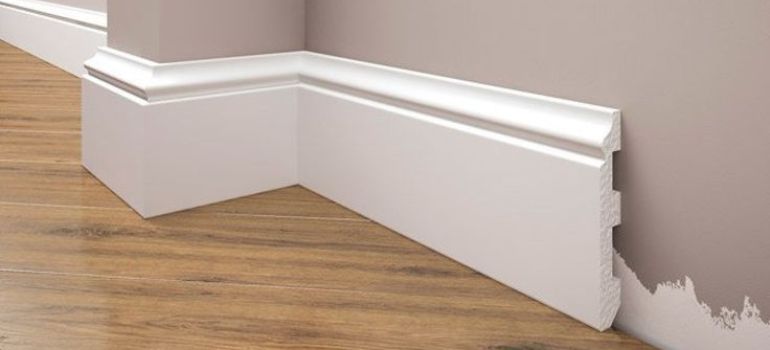
Introduction to Shoe Molding
Shoe molding is a narrow, decorative wood trim typically used where the lower part of a wall meets the floor. Not only does it add an aesthetic touch to your room, but it also serves a practical purpose, protecting the base of the walls from damage.
Tools and Materials Needed
When planning to install shoe molding, especially at a door frame, having the right tools and materials is crucial for a successful and efficient project. Here’s a comprehensive list:
Tools:
- Measuring Tape: Essential for accurate measurement of the door frame and molding lengths.
- Miter Saw: A miter saw is crucial for making precise angled cuts. A manual miter box and saw can be used if you don’t have a power miter saw.
- Hammer or Nail Gun: For securing the molding in place. A nail gun can speed up the process, but a hammer works just as well.
- Coping Saw: Handy for making detailed cuts, especially for inside corners.
- Level: To ensure your molding is perfectly horizontal.
- Chalk Line or Pencil: For marking cutting lines on the molding.
- Safety Glasses: Always important when cutting or nailing to protect your eyes.
- Sandpaper or Sanding Block: For smoothing rough edges after cutting.
Materials:
- Shoe Molding: Choose a style and material that matches your decor. It’s often made of wood, MDF, or PVC.
- Finishing Nails: These are used to attach the molding to the wall or baseboard. The size may vary depending on the thickness of the molding.
- Wood Filler or Caulk: To fill in nail holes or gaps for a seamless appearance.
- Paint or Stain (optional): If you want to match your shoe molding to your existing decor, paint or stain can be used.
- Painter’s Tape: Useful if you’re painting or staining the molding after installation, to protect the surrounding areas.
Additional Tips:
- Always purchase a little more molding than you think you’ll need to account for any mistakes or miscalculations.
- If you’re new to using a miter saw or coping saw, practice on some scrap pieces first.
- When selecting materials, consider the environment of the room. For example, in high-moisture areas like bathrooms, PVC molding might be a better choice than wood.
Preparation Steps
1. Measure the Door Frame:
- Accuracy is Key: Use a measuring tape to measure the length of each side of the door frame where you will be installing the shoe molding. This is crucial for knowing exactly how much molding you need.
- Add Extra for Waste: Always add a little extra to your total measurement (about 10-15%) to account for any mistakes or adjustments, especially for mitered or coped cuts.
2. Choose the Right Shoe Molding:
- Material Matters: Select the shoe molding that best fits your needs. Wood is traditional, but MDF or PVC can be better in moisture-prone areas.
- Style and Size: Consider the style of the room and the baseboard to which you’re matching. The molding shouldn’t overpower the room’s aesthetic.
3. Acquire Materials and Tools:
- Gather Your Tools: Ensure you have all the necessary tools listed in the previous section.
- Purchase Materials: Buy your shoe molding and any other materials like nails, wood filler, and paint or stain.
4. Pre-Cutting Preparation:
- Mark the Molding: Use a pencil and a straight edge or a chalk line to mark where you will need to cut the molding.
- Practice Cuts: If you’re new to using a miter or coping saw, practice on some scrap pieces first.
5. Prepare the Installation Area:
- Clean the Baseboard: Ensure that the area where you’ll be attaching the shoe molding is clean and free from dust or debris.
- Remove Obstructions: If there are any obstacles like old caulking or nails, remove them for a smooth installation.
6. Plan for Miters and Copes:
- Inside and Outside Corners: Determine where you’ll need to make miter cuts (typically for outside corners) and where you’ll need to cope (usually for inside corners).
- Marking for Accuracy: Use your pencil to mark the direction of the cuts on each piece of molding.
7. Safety Precautions:
- Wear Protective Gear: Always wear safety glasses when cutting and gloves to protect your hands.
- Secure Your Work Area: Make sure your workspace is well-lit and free of tripping hazards.
8. Mental Preparation:
- Take Your Time: Rushing through the preparation can lead to mistakes. Give yourself enough time to do the job properly.
- Visualize the Process: Go through the steps mentally to ensure you haven’t missed anything.
Cutting the Shoe Molding
1. Set Up Your Cutting Station:
- Secure Your Miter Saw: Ensure your miter saw or miter box is stable and secure on a flat surface.
- Safety First: Wear safety glasses to protect your eyes from sawdust and wood chips.
2. Measure and Mark the Molding:
- Double-Check Measurements: Use a measuring tape to measure the length you need for each piece of molding, based on your earlier measurements of the door frame.
- Marking the Molding: Clearly mark where you need to cut with a pencil. A square or a straight edge can help in making precise marks.
3. Making Straight Cuts:
- For Straight Sections: When you need a straight cut, align the molding on your saw with the blade positioned where your mark is. Keep the molding firmly against the fence of the miter saw for stability.
- Cutting Through: Lower the blade smoothly and steadily through the molding. Avoid rushing to prevent uneven cuts.
4. Making Mitered Cuts:
- Setting the Angle: For mitered cuts (usually for outside corners), set your miter saw to the appropriate angle (typically 45 degrees).
- Cutting the Angle: Place the molding against the fence and ensure your mark aligns with the blade. Hold the molding firmly and make the cut.
5. Making Coped Cuts:
- For Inside Corners: Coped cuts are often used for inside corners. Start with a 45-degree miter cut.
- Using a Coping Saw: After the miter cut, use a coping saw to follow the profile of the molding. This requires some practice and patience for a clean, precise cut.
6. Test Fitting:
- Check the Fit: After each cut, test fit the molding against the door frame or adjacent piece. This will help you identify if any adjustments are needed.
- Fine-Tuning: If necessary, use your coping saw or sandpaper to make minor adjustments for a perfect fit.
7. Repeat the Process:
- One Piece at a Time: Repeat this process for each piece of molding, ensuring each is cut precisely for its specific location.
8. Safety and Precision:
- Stay Focused: Always keep your hands away from the blade and stay focused on the task.
- Consistent Pressure: Apply consistent pressure when sawing, and don’t force the blade too hard.
9. Keep Your Workspace Clean:
- Clear Sawdust Regularly: Keep your cutting area clean to maintain visibility and safety.
Fitting the Molding to the Door Frame
1. Dry Fit the Molding:
- Test Each Piece: Before securing the molding, place each piece against the door frame to ensure a proper fit. This step is crucial to identify any necessary adjustments.
- Check the Angles: Pay special attention to the angles at the corners. The mitered or coped ends should fit snugly with no gaps.
2. Adjusting for a Perfect Fit:
- Trim if Necessary: If you find any pieces are too long or the angles aren’t quite right, trim them slightly using a miter saw or sandpaper for finer adjustments.
- Patience is Key: This step may require some patience and fine-tuning to get a perfect fit, especially in corners.
3. Aligning the Molding:
- Level and Even: Use a level to ensure each piece of molding is straight and even. Uneven molding can be noticeable and detract from the finished look.
- Flush with the Floor: Ensure the bottom of the molding is flush with the floor for a uniform appearance.
4. Securing the Molding:
- Nailing in Place: Once you’re satisfied with the fit, secure the molding to the door frame or wall using finishing nails. Hammer the nails through the thickest part of the molding into the wall or frame.
- Spacing the Nails: Space nails about every 8 to 12 inches. For longer pieces, start nailing from the middle and work your way towards the ends.
5. Dealing with Joints:
- Seamless Joints: For places where two pieces of molding meet, ensure the joints are tight and seamless. If there’s a slight gap, you can fill it in later with caulk or wood filler.
6. Coping Inside Corners:
- Precision in Coping: When fitting coped joints in inside corners, ensure the coped end fits tightly over the profile of the adjoining piece.
- No Gaps: The goal is to have no visible gaps for a seamless look.
7. Handling Outside Corners:
- Mitered Corners: For outside corners, the mitered ends should meet precisely at the corner. Adjust as necessary to ensure a tight fit.
8. Final Adjustments:
- Last Checks: Once all pieces are in place, do a final check to ensure everything looks aligned and even.
- Minor Corrections: Make any minor corrections as needed before moving on to finishing touches.
9. Cleaning Up:
- Remove Excess: Clean up any excess wood or sawdust to prepare for the next step of securing and finishing the molding.
Securing the Shoe Molding
Nail the molding in place using the right technique. If you prefer, explore alternative methods like adhesive for a nail-free finish.
Finishing Touches
Sanding and painting are key to achieving a polished look. Choose a paint or stain that complements your room’s decor.
Maintenance Tips
Maintaining your shoe molding is easy. Regular cleaning and occasional touch-ups will keep it looking new.
Troubleshooting Common Issues
Encounter a problem? Here’s how to fix common issues with shoe molding installation.
Advanced Techniques
For those with more experience, explore advanced installation techniques for a customized look.
Cost and Budgeting Tips
1. Calculate Material Needs Accurately:
- Measure Twice, Buy Once: Accurately measure the area where you’ll install the shoe molding to determine how much you need. It’s better to buy a little extra than to run short, but avoid buying too much to save costs.
- Consider Waste Factor: Account for a waste factor, especially if you’re new to cutting and fitting molding. A general rule is to add an additional 10-15% to your total measurement for waste.
2. Choose the Right Material:
- Cost vs. Durability: Weigh the cost against the durability and appearance of different materials. While wood may be more expensive, it offers a classic look. MDF or PVC are more affordable and might be suitable for certain areas.
- Compare Prices: Check different suppliers or hardware stores for the best prices. Sometimes, local lumber yards may offer better deals than big box stores.
3. Borrow or Rent Tools:
- Avoid Buying Expensive Tools: If you don’t have the necessary tools, consider borrowing from friends or family. Many hardware stores also rent out tools, which can be a cost-effective option.
- Invest in Tools You’ll Use Again: If you foresee future projects, investing in a good-quality tool might be worth it in the long run.
4. Do It Yourself:
- Labor Costs: One of the biggest savings in DIY projects is labor costs. By doing the work yourself, you can save a significant amount that would otherwise go to a professional installer.
- Learn and Practice: Use online tutorials and practice on scrap pieces to build your confidence and skills.
5. Shop for Deals and Discounts:
- Look for Sales: Keep an eye out for sales or discounts at hardware stores.
- Bulk Purchases: If you have multiple rooms to work on, buying in bulk can sometimes lead to discounts.
6. Reuse and Repurpose:
- Repurpose Old Molding: If you’re replacing old molding, see if it’s feasible to repurpose it elsewhere, either in its current form or with a fresh coat of paint or stain.
7. Plan for the Long Term:
- Quality Over Cheap Fixes: Opt for quality materials that might be a bit more expensive but will last longer. This can save you money in the long run on repairs and replacements.
8. Set a Clear Budget:
- Itemized Budget: Before starting, create an itemized budget that includes materials, tool rentals, and any other expenses. Stick to this budget as closely as possible.
9. Avoid Last-Minute Changes:
- Stick to the Plan: Changing plans mid-project can lead to increased costs. Try to stick to your original plan unless changes are absolutely necessary.
10. DIY Finishing:
- Painting/Staining Yourself: Instead of hiring someone to paint or stain the molding, do it yourself. It’s an easy way to save money and allows for customization.
Environmental Considerations
When working on your shoe molding project, it’s important to consider the environmental impact. Opting for sustainable materials and practices not only benefits the environment but can also add to the overall value of your home. Look for eco-friendly wood or composite materials, and be mindful of the disposal of any waste materials.
Safety Precautions
Your safety should always be a top priority. When cutting or installing shoe molding, wear protective gear such as safety glasses and gloves. Be particularly cautious when using power tools, and ensure your workspace is well-lit and free from hazards.
Comparing Professional vs. DIY Installation
Deciding whether to install shoe molding yourself or hire a professional can be tough. DIY installation can be more cost-effective and rewarding, but it requires time and skill. Professional installation, on the other hand, offers expertise and efficiency but at a higher cost. Consider your skill level, budget, and the complexity of the project before making a decision.
Conclusion and Recap
In conclusion, installing shoe molding at a door frame can significantly enhance the look of your space. This guide has covered everything from the basics of shoe molding, the tools and materials needed, preparation steps, installation techniques, and maintenance tips. Whether you choose to DIY or hire a professional, the key is precision and care to achieve the best results.
FAQs
Yes, but a miter saw ensures more precise cuts. There are alternative methods for those without this tool.
Shoe molding generally has a long lifespan, but it depends on the material and the wear it experiences.
Yes, but consider moisture-resistant materials to prevent damage.
Shoe molding is more flexible and has a less pronounced curve compared to quarter round.
While not necessary, painting or staining can enhance the molding’s appearance and protect it from damage.

