Introduction
What is Vinyl Lattice?
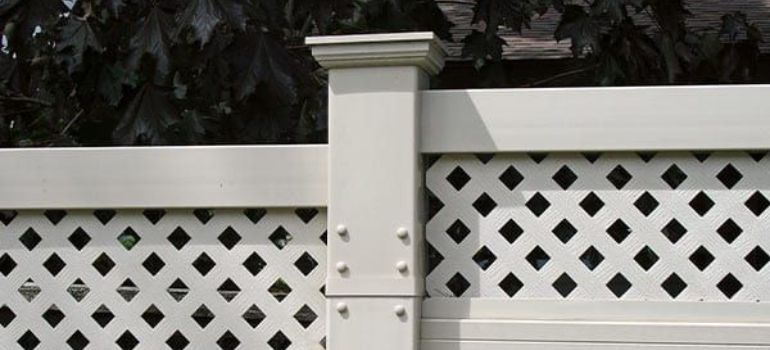
Vinyl lattice is a versatile and durable material made from synthetic polymers. It is commonly used to enhance the appearance and functionality of outdoor spaces. Vinyl lattice comes in various styles and colors, allowing you to choose the perfect design to complement your home.
Benefits of Using Vinyl Lattice
- Low Maintenance: Vinyl lattice requires minimal upkeep compared to wood lattice. It doesn’t rot, warp, or fade, making it a long-lasting choice.
- Enhanced Privacy: You can use vinyl lattice to create privacy screens for your deck, porch, or garden.
- Decorative: It adds an elegant touch to your outdoor areas, instantly improving their aesthetics.
- Customizable: Vinyl lattice is easy to cut and customize, allowing you to create unique designs.
Tools and Materials
Essential Tools
Before you begin, gather the following tools:
- Tape Measure
- Circular Saw
- Screwdriver
- Level
- Safety Glasses
- Gloves
Required Materials
You will need:
- Vinyl Lattice Panels
- Pressure-Treated Wood or Vinyl Posts
- Galvanized Screws
- Hinges (if creating access panels)
- Post Caps (optional)
- Lattice Divider Mouldings (optional)
Preparing for Installation
Measuring and Planning
Measure the area where you intend to install the vinyl lattice panels. Take accurate measurements to ensure you purchase the right amount of lattice. Plan the layout and design, keeping in mind the purpose of the installation.
Safety Precautions
Safety should always come first. Wear safety glasses and gloves when working with tools and materials. Take precautions when using power tools, and follow the manufacturer’s guidelines.
Installing Vinyl Lattice on a Deck

Attaching the Framework
To begin, follow these steps to attach the framework for your vinyl lattice on the deck:
- Position the Posts: Install pressure-treated wood or vinyl posts around the perimeter of your deck where you plan to install the lattice panels. Ensure they are securely anchored and level.
- Spacing: Space the posts evenly to provide adequate support for the lattice panels. A typical spacing of 4 to 8 feet between posts is recommended, depending on the size of the panels.
- Secure the Posts: Use galvanized screws to attach the posts firmly to the deck’s structure. Ensure they are level and plumb to maintain the lattice’s stability.
Securing the Lattice Panels
Follow these steps to securely attach the vinyl lattice panels to the framework:
- Position the Panels: Place the vinyl lattice panels against the installed framework. Ensure they fit snugly within the designated area.
- Attachment Points: Use galvanized screws to attach the lattice panels to the posts and framework. Start at the corners and work your way towards the center for optimal stability.
- Even Spacing: Make sure the panels are level and evenly spaced within the framework. Proper alignment will contribute to a neat and polished appearance.
Trimming and Customizing
If necessary, follow these steps to trim and customize the vinyl lattice panels to your desired size and design:
- Measure and Mark: Measure the area where you need to trim or customize the lattice panel. Mark the specific sections that require cutting.
- Cutting: Use a circular saw or a specialized vinyl-cutting tool to trim the lattice panels according to your marked lines. Ensure smooth and clean cuts for a professional finish.
- Decorative Patterns: Get creative! Experiment with various cutting patterns to add a decorative touch to your lattice design. Common patterns include diagonal, crisscross, or custom shapes.
Installing Vinyl Lattice in the Garden
Creating a Framework
Dig post holes at regular intervals along the garden area where you want to install the lattice. Insert pressure-treated wood or vinyl posts and secure them in place with concrete.
Installing the Lattice Panels
- Attach the vinyl lattice panels to the posts using galvanized screws.
- Ensure the panels are level and aligned.
- Trim any excess lattice as necessary.
Adding Finishing Touches
For a polished look, add post caps to the top of the posts. You can also use lattice divider mouldings to cover any rough edges and create a seamless appearance.
Maintenance and Care
Cleaning Vinyl Lattice
Maintaining the cleanliness of your vinyl lattice is essential to keep it looking its best. Follow these steps for effective cleaning:
- Regular Rinse: Periodically rinse your vinyl lattice with a garden hose to remove dirt, dust, and other debris. Start from the top and work your way down to ensure thorough cleaning.
- Mild Detergent: For stubborn stains or dirt buildup, mix a mild detergent with water. Use a soft brush or cloth to gently scrub the affected areas. Avoid abrasive brushes or harsh chemicals, as they can damage the vinyl surface.
- Rinse Thoroughly: After cleaning with detergent, rinse the lattice panels again with clean water to remove any residue. Ensure there is no soapy film left behind.
- Dry Completely: Allow the vinyl lattice to air dry completely before using or storing any items against it. This will prevent water spots and maintain its appearance.
Preventing Damage
Taking precautions to prevent damage to your vinyl lattice is crucial for its longevity. Here are some tips to keep in mind:
- Avoid Heavy Objects: Do not lean or place heavy objects against the lattice panels, as this can lead to warping or damage over time.
- Mind Lawn Equipment: Be cautious when using lawnmowers, trimmers, or other yard equipment near the lattice. Keep a safe distance to prevent accidental contact and potential damage.
- Check for Loose Fasteners: Periodically inspect the screws or fasteners holding the lattice in place. Tighten any loose ones to maintain the lattice’s stability.
- Clear Debris: Keep the area around the lattice clean and free from leaves, branches, or any debris that might accumulate and cause damage or discoloration.
Conclusion
Installing vinyl lattice is a fantastic way to enhance your outdoor spaces. Whether you’re looking for privacy, style, or both, vinyl lattice offers a durable and attractive solution. By following the step-by-step guide and taking proper care, you can enjoy the benefits of vinyl lattice for years to come.
Frequently Asked Questions (FAQs)
Yes, you can paint vinyl lattice with a suitable vinyl paint. Ensure that the paint adheres to vinyl surfaces for the best results.
To secure vinyl lattice in windy areas, use extra screws to reinforce the attachment points. Consider adding additional support posts for added stability.
Vinyl lattice can last for decades with proper care. It is known for its durability and resistance to rot, making it a long-lasting choice for outdoor projects.
While vinyl lattice is primarily designed for outdoor use, it can be used indoors for decorative purposes. Keep in mind that it may not be as structurally sound as other indoor materials.
To prevent mold and mildew on vinyl lattice, regularly clean it with a mild detergent. Ensure that water drains away from the lattice to avoid moisture buildup, which can lead to mold growth.


