
Are you dealing with a bathtub overflow cover that seems impossible to remove because it lacks screws? Fear not, as we have a step-by-step guide to help you tackle this issue. Whether you need to clean, repair, or replace your overflow cover, we’ll show you how to do it without the need for any screws. So, let’s dive right in!
Understanding the Bathtub Overflow Cover
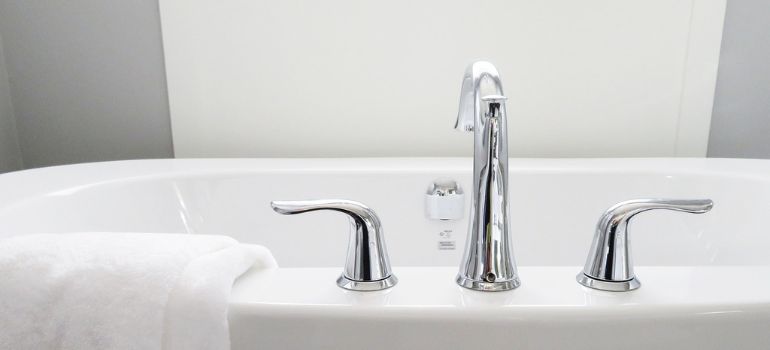
Before we get into the removal process, let’s briefly understand what a bathtub overflow cover is and why it’s essential. The overflow cover is located underneath the bathtub’s faucet and serves as a safety feature to prevent water from overflowing when you fill the tub. Over time, these covers may get dirty, damaged, or simply need replacement.
Materials You’ll Need
Here’s a list of items you’ll require to successfully remove your bathtub overflow cover with no screws:
- Flathead Screwdriver: Even though we’re dealing with a screwless cover, a flathead screwdriver can be helpful in the removal process. It will assist you in prying open the cover.
- Pliers: Pliers are essential for gripping and turning the overflow cover, especially if it’s stubborn and doesn’t come off easily.
- Replacement Gasket: It’s a good idea to have a replacement gasket on hand in case your existing one is damaged or worn out. This ensures a watertight seal when you reassemble the cover.
- Cleaning Supplies: You’ll need cleaning supplies such as a mild cleaner and a cloth or sponge to clean the overflow cover and the area around it.
Step-by-Step Removal Guide
Follow these steps to remove your bathtub overflow cover:
Step 1: Identify the Type
To begin the process of removing your bathtub overflow cover, it’s essential to determine its type. There are two common types of overflow covers:
- With Screws: Some overflow covers are secured in place with small screws. In this case, you’ll need to locate and remove these screws before proceeding with the removal.
- Screwless: Screwless overflow covers, as the name suggests, do not have any visible screws. They are typically held in place by friction or clips and require a different approach for removal.
Step 2: Locate the Notch
After identifying that your bathtub overflow cover is of the screwless type, the next step is to locate the small notch or gap along its edge. This notch is where you’ll insert your flathead screwdriver to begin the removal process.
Take a close look at the perimeter of the overflow cover, paying particular attention to the area where it meets the bathtub’s wall. You should be able to spot a slight indentation or gap that serves as the access point for removal.
Identifying this notch is crucial, as it’s the key to gently prying open the overflow cover and accessing the components underneath. Once you’ve successfully located the notch, you can proceed to the next step of inserting the screwdriver and beginning the removal process.
Step 3: Insert the Screwdriver
Carefully insert the flathead screwdriver into the notch, ensuring it’s securely positioned.
Step 4: Apply Pressure
With the notch located, it’s time to carefully proceed to the next step.
Using your flathead screwdriver, gently insert it into the identified notch or gap along the edge of the screwless bathtub overflow cover. Ensure that the screwdriver is securely positioned in the gap.
Now, apply gentle pressure in a counterclockwise direction. The counterclockwise motion is essential as it loosens the overflow cover from its secured position.
Be patient and avoid using excessive force, as you don’t want to damage the cover or the surrounding bathtub area. The combination of the notch and the counterclockwise pressure should gradually release the cover, making it easier to remove in the following steps.
Step 5: Use Pliers (if necessary)
If the cover doesn’t come off easily, use pliers to grip the edge of the cover and continue turning counterclockwise until it’s completely removed.
Step 6: Remove and Clean
After successfully loosening the bathtub overflow cover, it’s time to remove it from its position.
Gently lift the cover away from the bathtub wall, taking care not to damage it or the surrounding area. If the cover is stuck or doesn’t come off easily, you may need to use pliers in the next step to aid in its removal.
Once the cover is off, set it aside, and take a moment to inspect it for any visible damage or signs of wear. This is also a good time to examine the gasket, which is the rubber or silicone seal around the cover. If the gasket is damaged or deteriorated, it’s advisable to replace it to maintain a watertight seal.
Next, prepare your cleaning supplies, such as a mild cleaner and a cloth or sponge. Thoroughly clean both the removed overflow cover and the area around it. Removing any accumulated dirt, soap scum, or grime will not only improve the appearance but also ensure that the cover fits snugly when reinstalled.
Cleaning the cover and the surrounding area is an essential part of the maintenance process and helps keep your bathtub in excellent condition.
Step 7: Reassemble
Once you’ve completed the cleaning or any necessary repairs, it’s time to reassemble. Simply reverse the removal process, screwing the overflow cover back into place by turning it clockwise.
Additional Tips for Maintenance
Apart from the removal and cleaning process, here are some additional tips to keep your bathtub overflow cover and the entire bathroom in great condition:
1. Regular Inspection
Make it a habit to visually inspect your overflow cover every few weeks. Look for any signs of wear, cracks, or damage. Catching issues early can prevent more extensive problems later on.
2. Cleaning Frequency
To avoid stubborn buildup, try to clean your overflow cover every two to three months, or more frequently if you notice soap scum or dirt accumulating. Regular cleaning keeps the cover looking pristine and ensures its proper functioning.
3. Use Mild Cleaners
When cleaning your overflow cover, opt for mild, non-abrasive cleaners. Harsh chemicals can damage the finish and the gasket, leading to leaks or aesthetic issues.
4. Check for Leaks
Periodically check for leaks around the overflow cover area. If you notice any water seeping out, it might indicate a damaged gasket or a loose cover. Address such issues promptly to prevent water damage.
5. Seek Professional Help
If you encounter any difficulties during the removal or reinstallation process, or if you suspect a more significant issue with your bathtub, don’t hesitate to contact a professional plumber. They have the expertise to handle complex situations and ensure the job is done correctly.
Conclusion
Removing a bathtub overflow cover with no screws may seem challenging at first, but with the right tools and our step-by-step guide, it’s a manageable task. Regular maintenance and cleaning of your overflow cover can help prolong its lifespan and keep your bathtub functioning optimally.
FAQs
Removing the cover allows you to clean, repair, or replace it when needed, ensuring your bathtub functions properly.
Yes, as long as it fits into the notch securely, you can use any flathead screwdriver.
It’s a good practice to clean it whenever you notice dirt or grime buildup, typically every few months.
If it’s exceptionally stubborn, consider applying a lubricant and giving it another try, or consult a professional for assistance.
You can find replacement gaskets at your local hardware store or online retailers.

