
Introduction
Soffit vents are a critical component of your home’s ventilation system. They allow fresh air to enter the attic, preventing moisture buildup and reducing the risk of damage to your roof and insulation. However, there are instances where you might need to remove them, such as during a renovation or if they have become damaged over time.
Before we dive into the removal process, let’s gain a better understanding of soffit vents and why their proper maintenance is essential.
Understanding Soffit Vents
What Are Soffit Vents?
Soffit vents are typically installed in the eaves or underside of the roof overhang. They are designed to provide a pathway for air to flow into the attic space, ensuring it remains well-ventilated. Adequate attic ventilation helps in regulating temperature, reducing energy costs, and preventing the formation of ice dams in colder climates.
Why Might You Need to Remove Them?
There are several reasons why you might need to remove soffit vents:
- Damage: Over time, soffit vents can become damaged due to exposure to the elements, pests, or physical impacts.
- Renovation: If you’re planning to renovate your home or make changes to the roofline, you may need to temporarily remove the soffit vents.
- Upgrades: Upgrading your soffit ventilation system may require removing the existing vents to install newer and more efficient ones.
Now that we understand the basics let’s proceed with the removal process, ensuring safety is a top priority.
Safety Precautions
Before starting any DIY project, it’s crucial to prioritize safety. Here are some safety precautions to keep in mind when removing soffit vents:
- Wear appropriate protective gear: This includes safety glasses, gloves, and a dust mask to protect yourself from debris and potential allergens.
- Use a sturdy ladder: Ensure your ladder is on stable ground and positioned correctly to prevent accidents.
- Check for electrical wires: Before cutting or removing soffit materials, check for any electrical wires that may be hidden behind them.
- Work with a partner: Having someone to assist you can make the process safer and more efficient.
Tools and Materials You’ll Need
To successfully remove soffit vents, you’ll need the following tools and materials:
- Screwdriver
- Pry bar
- Utility knife
- Hammer
- Replacement soffit materials (if required)
- Caulk and caulk gun
- Safety gear
Now that you’re prepared, let’s proceed with the step-by-step removal process.
Step 1: Prepare Your Work Area
Begin by clearing the area around the soffit vents. Remove any obstructions, such as furniture or decorations, to ensure easy access. This will also help prevent any accidents during the removal process.
Step 2: Identify the Soffit Vent Location
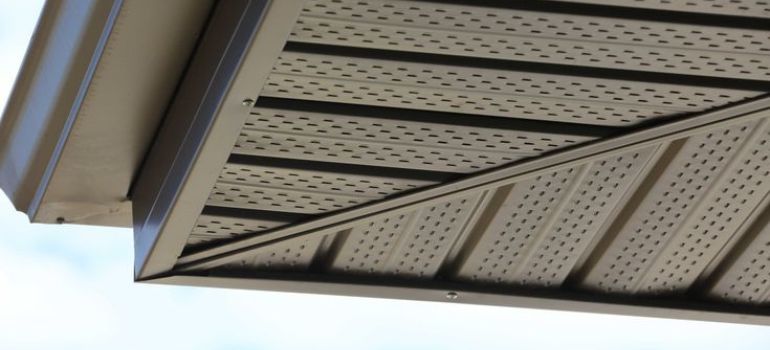
Locate the soffit vents on the underside of your roof overhang. They are usually placed evenly along the eaves. Take note of their positions and the type of fasteners used to secure them.
Step 3: Removing the Soffit Vent Covers
Using a screwdriver, carefully remove any screws or fasteners securing the vent covers in place. Gently pry off the covers, being cautious not to damage the surrounding soffit material.
Step 4: Removing the Soffit Vent
Once the covers are removed, you can access the soffit vent itself. Using a pry bar, carefully detach the vent from the soffit by gently prying around its edges. Be patient and take your time to avoid damaging the surrounding area.
Step 5: Clean and Inspect the Area
After removing the soffit vent, take a moment to clean the area and inspect it for any damage. If you notice any signs of water damage or rot, this may be a good time to address those issues.
Step 6: Repairing or Replacing the Soffit
If the soffit itself is damaged or needs replacement, now is the time to do so. Measure the dimensions of the opening and cut a new piece of soffit material to fit. Secure it in place with screws and apply caulk around the edges for added protection against moisture.
Step 7: Finishing Touches
Finally, reattach the vent covers by screwing them back into place. Ensure they are securely fastened and free from gaps that may allow pests or debris to enter.
Maintenance Tips
- Regularly inspect your soffit vents for damage and signs of wear.
- Clean the vents and surrounding areas to prevent debris buildup.
- Consider upgrading to more energy-efficient soffit vents for improved ventilation.
In conclusion, removing soffit vents can be a manageable DIY project with the right tools and knowledge. By following the steps outlined in this guide, you can ensure that your home’s ventilation system remains in optimal condition. Remember to prioritize safety and take your time during the removal process to prevent any accidents.
The Benefits of Well-Maintained Soffit Vents
Maintaining your soffit vents has several advantages:
- Improved Energy Efficiency: Proper ventilation helps regulate attic temperatures, reducing the strain on your HVAC system and lowering energy bills.
- Prevention of Ice Dams: Adequate ventilation prevents ice dams from forming on your roof, which can lead to costly repairs.
- Extended Roof Lifespan: Well-ventilated attics experience less moisture buildup, reducing the risk of rot and extending the life of your roof.
- Enhanced Indoor Air Quality: Good ventilation prevents the accumulation of mold and mildew, promoting better indoor air quality for your home.
- Pest Prevention: Regular maintenance and inspection of soffit vents help keep pests like insects and rodents out of your attic.
FAQs
Soffit vents can deteriorate due to exposure to weather, pests, and the natural aging of materials.
Yes, with the right tools and materials, you can install new soffit vents as a DIY project.
Alternative ventilation methods include ridge vents and gable vents, but soffit vents are highly effective and commonly used.
Check for signs of damage, such as cracks, holes, or rust, and assess the overall condition of the vents.
It’s possible to reuse them if they are in good condition, but it’s essential to inspect them carefully before reinstalling.

