If you’ve ever taken on a DIY tiling project or hired a professional, you’ve probably heard about the wonders of tile leveling clips. These small, seemingly insignificant tools play a crucial role in ensuring that your tile installation turns out perfectly flat and level. However, one common question that often arises is, “How long should you wait before removing tile leveling clips?” In this article, we will explore this topic in detail, providing you with valuable insights and guidance for a successful tile installation.
Understanding Tile Leveling Clips
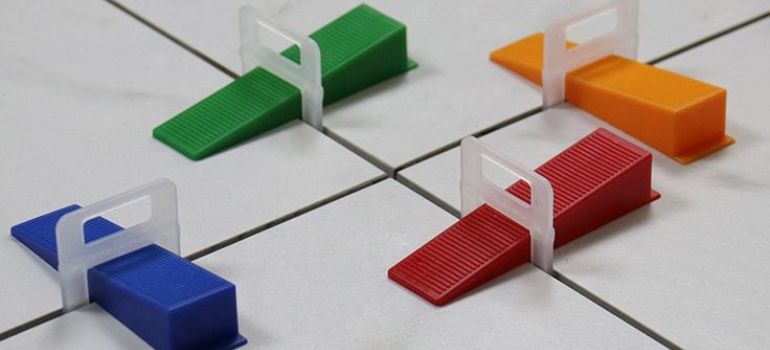
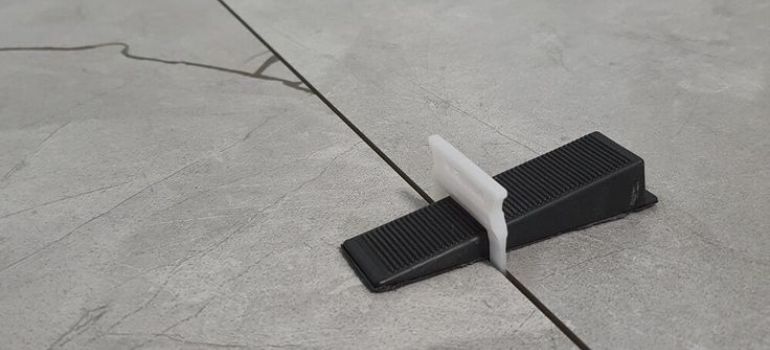
Before delving into the waiting period, it’s essential to understand what tile leveling clips are and how they work. Tile leveling clips are small, plastic spacers designed to hold tiles at an even height and prevent them from shifting during the drying process. They consist of three main components: the clip itself, a wedge, and a tile spacer. Together, they help create a uniform and flat tile surface, which is especially important for larger tiles.
The Importance of Level Tiles
Achieving a level tile surface is not just about aesthetics; it also has functional benefits. Properly leveled tiles ensure a smooth and seamless finish, making it easier to clean and maintain your tiled area. Additionally, it reduces the risk of tripping hazards and improves the longevity of your tile installation.
Factors Affecting Drying Time
Now, let’s discuss the factors that influence how long you should wait before removing tile leveling clips:
Tile Adhesive Type
The type of adhesive you use plays a significant role in drying time. Thin-set mortar, for instance, requires more time to cure compared to fast-setting adhesives. Always refer to the manufacturer’s recommendations for drying times specific to your chosen adhesive.
Tile Size
Larger tiles cover more surface area, which means they may need more time to set properly. The weight of the tile can also influence the drying time. As a general rule, larger and heavier tiles typically require a longer waiting period.
Room Temperature and Humidity
The environmental conditions in the room where you’re installing the tiles can affect drying times. Warmer temperatures and lower humidity levels expedite the drying process, while cooler temperatures and higher humidity levels may slow it down.
Manufacturer Recommendations
Manufacturers often provide guidelines regarding the waiting period for tile leveling clips. Always consult the instructions provided with your specific clips for the most accurate information.
Recommended Waiting Period
In most cases, it’s advisable to wait at least 24 hours before removing tile leveling clips. This allows ample time for the adhesive to set and cure, ensuring a secure bond between the tiles and the substrate. However, as mentioned earlier, factors like adhesive type, tile size, and environmental conditions can influence this waiting period.
How to Remove Tile Leveling Clips
Tile leveling clips are an essential part of achieving a perfectly level and even tile installation. However, once your tiles have had sufficient time to set and the adhesive has cured, it’s crucial to remove these clips properly to ensure a flawless finish. Follow these steps to safely and effectively remove tile leveling clips:
Step 1: Gather Your Tools
Before you begin, make sure you have the following tools ready:
- Pliers or a specialized leveling clip removal tool (recommended)
- Safety gloves (optional but advisable to protect your hands)
Step 2: Start at the Wedge
Begin by locating the tile leveling clips that are holding your tiles in place. You’ll want to start with the wedges as they are the easiest part to remove.
Step 3: Grip the Wedge
Using your pliers or specialized clip removal tool, carefully grip the top part of the wedge. Ensure that you have a firm and secure hold on it.
Step 4: Apply Gentle Pressure
With a controlled and gentle squeezing motion, apply pressure to the wedge. This should cause it to snap or break cleanly away from the tile, leaving behind the spacer and base.
Step 5: Remove the Spacer
Once the wedge is removed, you’ll be left with the tile spacer. Use your pliers to grasp the spacer firmly and gently pull it away from the tile. Take care not to exert too much force to avoid damaging the tile.
Step 6: Eliminate the Base
Finally, you’ll need to remove the base of the tile leveling clip. Using your pliers or clip removal tool, grasp the base close to the tile surface. Apply gentle pressure and snap it off cleanly. Ensure that no part of the clip remains embedded in the adhesive or under the tile.
Step 7: Check for Residue
After removing all the leveling clips, inspect the tile surface for any adhesive residue that may have been left behind. If you find any, carefully scrape it away using a putty knife or a suitable adhesive remover.
Step 8: Clean the Area
Once all the clips and adhesive residue are removed, clean the tiled surface with a damp cloth to ensure it’s free from any debris or residue. This will prepare the tiles for grouting or any additional finishing touches.
Conclusion
In conclusion, the waiting period before removing tile leveling clips is a crucial step in achieving a successful tile installation. While the general recommendation is to wait at least 24 hours, it’s essential to consider various factors that can affect drying times. Always refer to the manufacturer’s guidelines for the specific leveling clips and adhesives you are using. With patience and proper adherence to instructions, you’ll be on your way to a beautifully tiled space.
Frequently Asked Questions (FAQs)
While it’s tempting to speed up the process, removing leveling clips too soon can compromise the integrity of your tile installation. It’s best to follow the recommended waiting period.
You can use pliers or a leveling clip removal tool, which is designed for easy and safe clip removal.
No, tile leveling clips are intended for one-time use. Reusing them may lead to uneven tiles.
If you remove the clips prematurely, the tiles may shift, resulting in an uneven surface. This can be challenging to correct after the fact.
Yes, it’s essential to clean any adhesive residue left behind by the leveling clips before grouting. Failure to do so can affect the final appearance of your tiled surface.

