Introduction
When it comes to tiling, precision is key. From selecting the right tiles to ensuring they are laid correctly, every step matters. But have you ever wondered about the unsung hero of tile installation – thinset? Let’s dive into the world of this essential adhesive and discover just how thick thinset should be under your tiles.
What is Thinset?
Thinset is a blend of cement, fine sand, and a water retention compound that adheres tiles to the surface. It comes in two main types: modified and unmodified. Understanding its composition is crucial for a successful tile installation.
Role of Thinset in Tile Installation
Understanding the role of thinset in tile installation is crucial for both DIY enthusiasts and professionals. Thinset, a specific type of mortar, is not just an adhesive; it plays several vital roles in the successful installation and longevity of tile work. Here are the key functions of thinset in tile installation:
- Adhesion:
- Primary Role: Thinset acts as the primary bonding agent between the tile and the substrate (the surface on which the tile is installed).
- Mechanism: It contains cement, fine sand, and a water-retention compound that, when mixed with water, forms a strong adhesive.
- Support and Weight Distribution:
- Structural Role: Thinset helps in evenly distributing the weight of the tile over the substrate. This is particularly important for larger, heavier tiles.
- Function: It prevents points of weakness where tiles could crack or become loose over time.
- Compensating for Substrate Imperfections:
- Surface Preparation: Thinset can be used to make minor adjustments to the substrate, helping to level out small imperfections and ensure a flat surface for tile installation.
- Limitation: While thinset can manage small irregularities, it is not a substitute for proper substrate preparation.
- Water Resistance and Protection:
- Barrier: In areas exposed to moisture, like bathrooms and kitchens, thinset provides a moisture-resistant layer that protects the substrate.
- Consideration: For high-moisture areas, a waterproofing membrane might be used in conjunction with thinset for added protection.
- Flexibility and Crack Prevention:
- Adaptability: Modern thinset formulations often include polymers that provide flexibility, allowing the tile work to adapt to slight movements in the building structure without cracking.
- Prevention: This flexibility is crucial in preventing cracks in tiles and grout, especially in areas subject to temperature changes or structural movement.
- Grout Joint Formation:
- Spacing: Thinset helps in maintaining consistent grout joints. The thickness of the thinset determines the level of the tile in relation to adjacent tiles, which is crucial for uniform grout lines.
- Aesthetics and Functionality: Even grout joints contribute to the overall aesthetic appeal and structural integrity of the tile installation.
- Thermal Conductivity:
- For Underfloor Heating: In installations with underfloor heating, thinset conducts heat evenly across the tiled surface.
- Efficiency: A well-applied thinset layer ensures no air gaps, allowing for efficient heat transfer and distribution.
Understanding Thinset Thickness
Typically, the standard thickness of thinset is about 3/16 to 1/8 inch. However, this can vary based on factors like the type of tile and the surface being tiled.
How to Measure Thinset Thickness
Measuring the thickness of thinset accurately is a crucial step in ensuring a successful tile installation. The right thickness ensures proper adhesion, level alignment, and long-term durability of the tiles. Here’s a step-by-step guide on how to measure thinset thickness:
- Understand the Recommended Thickness:
- Research: Before starting, it’s important to know the recommended thickness for the type of tile you are using. Typically, thinset is applied at a thickness of 3/16 to 1/8 inch.
- Check Specifications: Refer to the tile and thinset manufacturer’s specifications for guidance.
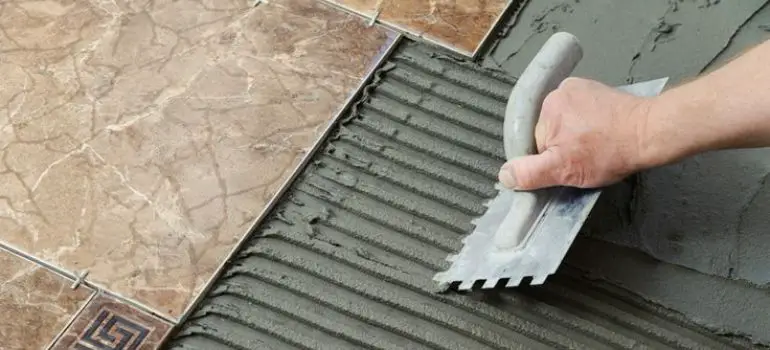
- Select the Correct Trowel:
- Trowel Type: The type and size of the notched trowel you use will largely determine the thickness of the thinset. Trowels are available with different notch sizes and shapes.
- Guideline: As a general rule, larger tiles require larger notches, which result in a thicker layer of thinset.
- Prepare a Test Area:
- Application: Spread the thinset over a small test area using your chosen trowel. Hold the trowel at a consistent angle and apply even pressure to ensure uniform thickness.
- Measurement Tool: Use a ruler or a depth gauge to measure the depth of the thinset in the test area.
- Conduct a Coverage Test:
- Method: After applying the thinset, place a tile onto it, then remove it. Check the back of the tile to see the thinset coverage.
- Assessment: If the thinset is covering 80-100% of the tile’s back (for wet areas, 95-100% coverage is recommended), the thickness is likely appropriate.
- Adjusting the Thickness:
- More Thinset: If the coverage is insufficient, you may need to use a trowel with larger notches to apply a thicker layer.
- Less Thinset: If the thinset is too thick, leading to oozing between tiles or difficulty in placing tiles, switch to a trowel with smaller notches.
- Regular Checks During Installation:
- Consistency: Throughout the installation process, periodically lift a tile to check the thinset thickness and coverage. This ensures consistency across the entire installation.
- Consider Tile Type and Substrate:
- Tile Specifics: Some types of tiles, like large format or heavy tiles, may require a thicker layer of thinset.
- Substrate Condition: On uneven substrates, the thinset thickness may need to be adjusted for level and support.
- Final Verification:
- Level and Alignment: After setting the tiles, use a level to check for uniformity across the surface. This helps in confirming that the thinset thickness is consistent and appropriate.
Thinset Thickness for Different Tile Types
Different tiles demand different thinset thicknesses. For example, ceramic tiles might need a thinner layer compared to heavier porcelain or natural stone tiles.
Thinset Thickness and Tile Size
The size of your tiles also influences the thickness of the thinset. Larger tiles need a thicker layer for proper adhesion and support, while smaller tiles require less.
Impact of Incorrect Thinset Thickness
Understanding the impact of incorrect thinset thickness is crucial in tile installation. Thinset, serving as the adhesive and leveling agent for tiles, needs to be applied at just the right thickness to ensure optimal performance and longevity of your tiled surface. Here’s what happens when the thickness is not right:
- Insufficient Adhesion: If the thinset layer is too thin, it may not provide enough adhesive strength. This can result in tiles not sticking properly to the substrate, leading to loose tiles or, in worst cases, tiles detaching completely after some time.
- Uneven Surfaces: An inconsistently applied thinset, either too thick in some areas and too thin in others, can lead to an uneven tile surface. This not only affects the aesthetic appeal but also creates trip hazards in flooring applications.
- Increased Risk of Cracking: When thinset is applied too thickly, it can cause issues as it dries and cures. Thick layers of thinset may crack as they dry, and this can transfer through to the tiles, causing them to crack as well.
- Grout Problems: Incorrect thinset thickness can lead to problems with grouting. For instance, if the thinset is too thin, tiles may shift during the grouting process, leading to uneven grout lines and a less professional finish.
- Difficulty in Alignment and Spacing: Proper tile alignment and spacing are harder to achieve with incorrect thinset thickness. Tiles need a stable and uniform base for even spacing and alignment, which is challenging if the thinset layer is uneven.
- Compromised Tile Durability: Over time, the issues stemming from incorrect thinset thickness can reduce the overall durability of the tiled area. This means more repairs, higher maintenance costs, and a shorter lifespan for your tile work.
- Moisture and Damage Risks: Especially in areas like bathrooms and kitchens, an uneven or insufficient thinset layer can lead to moisture seeping under tiles, causing mold, mildew, and substrate damage.
Tips for Achieving Optimal Thinset Thickness
Getting the thinset thickness right is all about preparation and technique. Ensure your surface is clean and level, and apply the thinset using the correct notched trowel.
Troubleshooting Common Thinset Thickness Issues
When working with thinset for tile installation, encountering thickness-related issues is not uncommon. However, knowing how to troubleshoot these issues can make a significant difference in the outcome of your project. Here are some common thinset thickness problems and ways to address them:
- Uneven Application:
- Cause: This usually happens due to inconsistent pressure while spreading the thinset or using a trowel with an incorrect notch size.
- Solution: Ensure you’re using the right trowel for your tile size. Apply consistent pressure when spreading the thinset, and regularly check for evenness using a straight edge or level.
- Thinset Too Thin:
- Cause: A layer that’s too thin is often the result of over-spreading or using a trowel with notches that are too small.
- Solution: Switch to a trowel with larger notches and apply more thinset. Remember, the goal is to achieve full coverage on the back of the tile once pressed down.
- Thinset Too Thick:
- Cause: Using a trowel with notches that are too large can lead to an excessively thick layer of thinset.
- Solution: Use a trowel with smaller notches. If the thinset is already applied, use the flat side of your trowel to remove excess thinset and achieve the desired thickness.
- Air Pockets or Voids:
- Cause: These are usually the result of not pressing the tile firmly enough into the thinset or missing spots while spreading.
- Solution: Lift the tile and check the back to ensure complete coverage. Apply additional thinset if necessary, and press down firmly to remove any air pockets.
- Difficulty in Aligning Tiles:
- Cause: This happens when the thickness of the thinset varies across different tiles.
- Solution: Use leveling spacers or a tile leveling system to ensure uniformity. Consistently check the thickness as you go along.
- Tiles Sinking or Shifting:
- Cause: This can occur if the thinset is too wet or too thick.
- Solution: Ensure your thinset has the consistency of peanut butter. If it’s too wet, add more powder; if it’s too dry, add more water. Be cautious not to make the mixture too runny.
- Cracking Thinset:
- Cause: Cracking may occur if the thinset dries too quickly or if it’s applied too thickly.
- Solution: Avoid working in extremely hot or windy conditions as this can cause rapid drying. Stick to the recommended thickness for your specific tile type.
Advanced Thinset Application Techniques
For those looking to elevate their tile installation skills, understanding and mastering advanced thinset application techniques can make a significant difference. These methods not only ensure a more professional finish but also address specific challenges that might arise during the installation process. Here are some advanced techniques:
- Back Buttering:
- Description: This involves applying a thin layer of thinset directly to the back of the tile in addition to the substrate. It’s especially useful for larger, heavier tiles or tiles with irregular backs.
- Benefits: Increases adhesion strength, ensures better contact, and reduces the risk of air pockets.
- Technique: Use a flat trowel to apply a thin, even layer of thinset to the back of the tile before setting it on the already thinset-applied surface.
- Trowel Size Variation:
- Description: Choosing the right trowel size is critical. Larger tiles often require larger notches to provide enough thinset for adequate coverage.
- Benefits: Ensures proper thinset thickness and full coverage, which is essential for larger format tiles.
- Technique: Select a trowel with larger notches for bigger tiles. The general rule is that the larger the tile, the larger the notch.
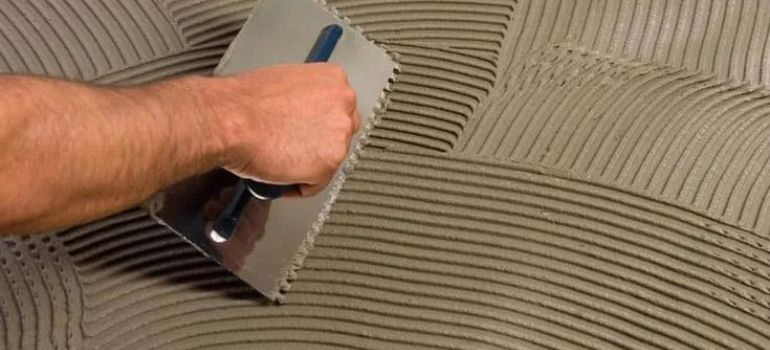
- Directional Troweling:
- Description: This involves combing the thinset in one direction (either horizontally or vertically).
- Benefits: Helps in removing air pockets and ensures a more uniform adhesive bed.
- Technique: Apply the thinset and comb it in one direction. When setting the tile, press down and slightly twist it to collapse the ridges and remove air pockets.
- Spot Bonding:
- Description: This technique, often used for large format tiles on walls, involves applying dabs or spots of thinset on the corners and center of the tile.
- Benefits: Provides strong support for heavy tiles on vertical surfaces.
- Technique: Apply thick dabs of thinset on each corner and the center of the tile. Ensure each dab is adequately sized to support the tile’s weight.
- Butter and Float Method:
- Description: This combines back buttering and trowel application to the substrate for uneven surfaces or tiles.
- Benefits: Helps to achieve a more even surface on irregular substrates or with varied tile thicknesses.
- Technique: Back butter the tile and apply thinset to the substrate, then set the tile, ensuring both thinset layers make contact.
- Slant Notch Troweling:
- Description: Involves holding the trowel at a slanted angle when applying thinset.
- Benefits: Provides better coverage and adhesion, useful for tiles with deeper profiles or textures.
- Technique: Hold the trowel at a 45-degree angle to achieve a thicker, more consistent thinset layer.
- Wet Setting:
- Description: This technique is used in areas with high moisture exposure, like showers or outdoors.
- Benefits: Provides better waterproofing and adhesion in wet areas.
- Technique: Apply thinset to a moistened substrate, ensuring it’s not so wet that water pools.
Maintenance and Longevity
Proper maintenance and understanding the factors that contribute to the longevity of tile work are essential for preserving its beauty and functionality over time. Here are key aspects to consider for maintaining and extending the life of your tiled surfaces:
- Regular Cleaning:
- Importance: Regular cleaning prevents the buildup of dirt, grime, and stains, which can affect both the appearance and the integrity of the tiles and grout.
- Method: Use a mild detergent or a cleaner specifically designed for the type of tile you have. Avoid harsh chemicals that can erode grout or damage the tile surface.
- Sealing Grout and Tile:
- Importance: Sealing helps to protect grout and porous tiles from moisture and staining.
- Frequency: Grout should be sealed after installation and then periodically, depending on the sealer type and the area’s usage. Some tiles, like certain natural stones, also require sealing.
- Method: Apply a quality sealer following the manufacturer’s instructions, ensuring the area is clean and dry before application.
- Managing Moisture:
- Importance: Excessive moisture can lead to mold growth, tile lifting, and grout deterioration, especially in areas like bathrooms and kitchens.
- Prevention: Ensure proper ventilation in moist areas. Address leaks or standing water issues promptly to prevent water from seeping beneath tiles.
- Damage Inspection and Repair:
- Importance: Early detection and repair of any damage, such as cracked tiles or grout, prevent further deterioration and more extensive repairs later.
- Method: Regularly inspect tile surfaces for cracks, chips, or loose tiles. Repair or replace damaged sections promptly to maintain the integrity of the installation.
- Avoiding Harsh Mechanical Forces:
- Importance: Tiles can crack or chip under heavy impact or due to sharp or abrasive tools.
- Prevention: Use protective pads under heavy furniture and avoid dropping heavy objects on tile floors. Clean using soft cloths or mops rather than abrasive pads.
- Proper Installation and Use of Quality Materials:
- Importance: Longevity starts at installation. Using high-quality thinset, tiles, and grout, and ensuring proper application techniques, set the foundation for durable tile work.
- Tip: Invest in quality materials and follow best practices for installation, or hire a professional to ensure optimal results.
- Addressing Environmental Factors:
- Importance: Environmental factors like temperature fluctuations and UV exposure can affect outdoor tiles.
- Prevention: Choose tiles rated for outdoor use in your specific climate. Apply sealants that provide UV protection and are suitable for temperature variations.
Professional Insights
Gaining insights from professionals in the field of tile installation can provide valuable guidance and tips for ensuring the best results. Here are some key professional insights that can help both DIY enthusiasts and professionals in achieving high-quality, long-lasting tile work:
- Importance of Proper Substrate Preparation:
- Insight: One of the most emphasized points by professionals is the preparation of the substrate. A clean, level, and stable surface is crucial for a successful tile installation.
- Tip: Ensure the substrate is free of dust, debris, and any dampness. Use self-leveling compounds if necessary to achieve a flat surface.
- Choosing the Right Materials:
- Insight: The selection of thinset, grout, and tiles suitable for the specific application and environment is vital. For example, areas with high moisture require different materials than dry areas.
- Advice: Research and select materials that are specifically designed for your project’s conditions. Don’t hesitate to ask for advice at tile or building supply stores.
- Understanding Tile Properties:
- Insight: Different types of tiles (ceramic, porcelain, natural stone) have varying properties that affect how they should be installed.
- Recommendation: Familiarize yourself with the characteristics of the tiles you are using. For instance, porous tiles like natural stone may require sealing before and after installation.
- Precision in Tile Laying:
- Insight: Accuracy in laying tiles is not just about aesthetics but also about ensuring the longevity of the installation.
- Technique: Use spacers for consistent joint widths, and always double-check alignments and levels as you go. Remember, making adjustments after the thinset has set is difficult.
- The Significance of Curing Times:
- Insight: Respecting the curing times for thinset and grout is a point often stressed by professionals.
- Guidance: Follow the manufacturer’s instructions regarding drying and curing times. Rushing into the next steps like grouting or walking on the tile can compromise the installation’s integrity.
- Regular Maintenance:
- Insight: Proper maintenance is key to extending the life of the tile work.
- Suggestion: Educate customers or remind yourself about the proper care and maintenance of the tiled surface, including cleaning and periodic sealing of grout and tiles.
- Continuous Learning and Adaptation:
- Insight: Tile installation techniques and materials are constantly evolving. Staying updated with the latest methods and products is essential for professionals.
- Approach: Attend workshops, follow industry publications, and engage with other professionals to stay informed about new techniques and materials.
- Dealing with Challenges:
- Insight: Every installation can present unique challenges, such as irregular room shapes or uneven substrates.
- Strategy: Develop problem-solving skills and adaptability. When faced with a challenge, take the time to evaluate the best approach rather than rushing to a solution.
Conclusion
In conclusion, the thickness of thinset under tiles is more than just a technical detail; it’s a crucial element in ensuring the durability and appearance of your tiled surface.
FAQs
When thinset is applied too thinly, it compromises tile adhesion, leading to loose tiles or even tile failure. It’s essential to maintain the recommended thickness for a secure and lasting installation.
While thinset can help smooth out minor imperfections, it’s not a solution for significantly uneven floors. Proper floor preparation, including leveling, is crucial before applying thinset and tiles.
Generally, wall tiles require a thinner layer of thinset compared to floor tiles. This is because floor tiles, being subject to foot traffic, need a thicker layer for additional support and adhesion.
Signs of improperly applied thinset include loose or hollow-sounding tiles, cracking grout, and visible thinset oozing out from under tiles. These indicate either too much or too little thinset usage.
It’s typically recommended to allow thinset to cure for at least 24 hours before grouting. However, this can vary depending on the type of thinset, humidity, and temperature conditions.


