
Introduction
When it comes to maintaining your deck, one often overlooked but crucial aspect is sanding between the deck boards. Sanding not only improves the aesthetic appeal of your deck but also helps in preventing rot, splinters, and the accumulation of dirt and debris. In this article, we will guide you through the process of sanding between deck boards, step by step, ensuring that your outdoor space remains beautiful and safe for years to come.
Why Sanding Between Deck Boards is Important
Before we delve into the how-to part, let’s understand why sanding between deck boards is essential:
1. Deck Longevity
Deck longevity refers to the ability of a deck to withstand the effects of time and environmental factors while remaining structurally sound and aesthetically appealing. It is a measure of how long a deck can last before requiring significant repairs or replacement.
Several factors contribute to the longevity of a deck, including the quality of materials used, construction techniques, maintenance practices, and exposure to elements such as sunlight, rain, and temperature fluctuations. A well-maintained deck that is built with durable materials can last for decades, providing homeowners with a functional and enjoyable outdoor space.
Regular maintenance tasks, such as cleaning, sealing, and sanding, can help extend the life of a deck by preventing issues like rot, decay, splinters, and discoloration. Additionally, choosing the right type of wood or composite material for your deck and ensuring proper ventilation can also play a significant role in increasing its longevity.
In summary, deck longevity is a crucial consideration for homeowners who want their outdoor decks to remain safe, attractive, and functional for many years. By taking proactive measures and investing in quality materials and construction, you can ensure that your deck stands the test of time.
2. Safety
A smooth deck surface is safer for your family and guests, as it reduces the risk of tripping or getting splinters.
3. Aesthetic Appeal
Sanded deck boards look visually appealing, making your outdoor space more inviting and enjoyable.
Tools and Materials You’ll Need
Tools and Materials You’ll Need
- Safety Gear
- Safety glasses
- Dust mask
- Ear protection
- Power Sander
- Belt sander or orbital sander
- Sandpaper
- 60-grit, 80-grit, and 120-grit sandpaper
- Deck Cleaner
- Deck cleaning solution
- Deck Brush
- Stiff bristle brush
Step-by-Step Guide to Sanding Between Deck Boards
Now, let’s go through the process of sanding between deck boards:
Step 1: Prepare the Deck
- Clear the Deck: Remove all furniture, plants, and any other objects from the deck to create a clean and spacious working area.
- Sweep the Deck: Use a broom or a leaf blower to sweep away loose dirt, leaves, and debris from the deck’s surface. This step ensures that the deck is free from any loose particles that could interfere with the sanding process.
Step 2: Safety First
Put on Safety Gear: Before you begin any sanding work, prioritize your safety by wearing the necessary protective gear.
- Safety Glasses: Protect your eyes from flying debris and dust by wearing safety glasses.
- Dust Mask: Prevent inhalation of dust particles and fumes with a dust mask.
- Ear Protection: Use ear protection to safeguard your hearing from the noise generated by power sanders.
Step 3: Clean the Deck
- Prepare the Cleaning Solution: Mix the deck cleaning solution with water according to the manufacturer’s instructions. This solution will help remove dirt, stains, and contaminants from the deck’s surface.
- Apply the Solution: Using a suitable applicator or sprayer, evenly apply the deck cleaning solution to the entire deck surface. Ensure thorough coverage.
- Scrub the Deck: Use a stiff bristle deck brush to scrub the deck surface vigorously. Focus on areas with stains, mold, or mildew, as well as high-traffic areas that may have accumulated dirt and grime.
- Rinse Thoroughly: After scrubbing, rinse the deck thoroughly with clean water. You can use a hose or a pressure washer to remove the cleaning solution, dirt, and residues from the deck.
- Allow to Dry: Allow the deck to air dry completely before proceeding with sanding. This step ensures that the wood is dry and ready for the sanding process.
Step 4: Choose the Right Sandpaper
- Start with a coarse 60-grit sandpaper to remove any stubborn stains or rough spots.
- Follow up with an 80-grit sandpaper to achieve a smoother surface.
- Finish with a 120-grit sandpaper for a polished look.
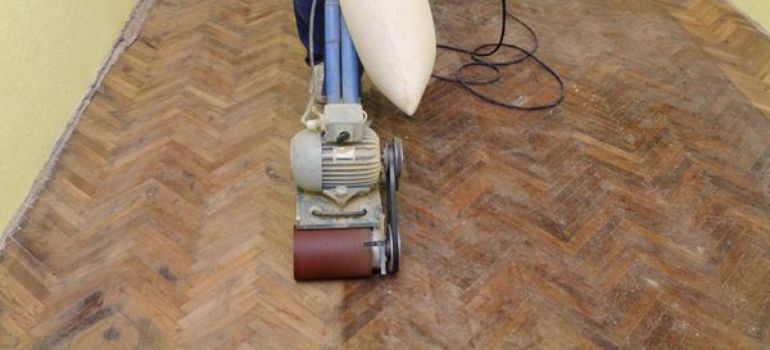
Step 5: Sand Between the Boards
- Carefully sand between the deck boards using a belt sander or orbital sander.
- Ensure even pressure and movement to prevent uneven results.
Step 6: Inspect and Clean
- Inspect the deck for any missed spots or imperfections.
- Clean the deck again to remove any sanding dust.
Step 7: Apply Deck Finish
- To protect your deck, apply a suitable deck finish, such as stain or sealant.
Step 8: Final Inspection
- Walk over the deck to ensure a smooth and even surface.
- Replace furniture and decorations.
Conclusion
Sanding between deck boards is an essential part of deck maintenance that not only enhances the visual appeal of your outdoor space but also ensures its longevity and safety. By following the steps outlined in this guide and using the right tools and materials, you can enjoy a beautiful and well-maintained deck for years to come.
FAQs
It’s recommended to sand between deck boards every 2-3 years, depending on the wear and tear and the type of wood used.
While it’s possible to sand between deck boards by hand, using a power sander will save you time and effort.
Yes, cleaning the deck before sanding is essential to remove dirt and debris that can clog the sander and affect the results.
Spring or early summer is the ideal time for deck maintenance, as the weather is mild, and the deck can dry thoroughly after cleaning and sanding.
Yes, after sanding, you can apply a deck stain or paint to protect and enhance the appearance of your deck.

