
Introduction to Bridge Building
Building a bridge, especially a 30-foot structure over a creek, can be a challenging yet rewarding project. It’s not just about creating a pathway, but also about understanding the landscape, respecting the environment, and ensuring safety and durability. This article will guide you through each step of building your own bridge, from planning to completion.
Planning Your Bridge
Assessing the Location: Before anything else, you must thoroughly assess the location where the bridge will be constructed. Look for any environmental or logistical challenges that could affect your project.
Design Considerations: Your bridge’s design should be both functional and aesthetically pleasing. It must be strong enough to withstand the weight and weather conditions of the area.
Legal Permissions and Safety: Always check with local authorities to obtain necessary permits. Safety is paramount, both during construction and for the eventual users of the bridge.
Materials Needed
When embarking on the project of building a 30-foot bridge over a creek, selecting the right materials is crucial for both the integrity and longevity of the structure. Here’s a detailed look at the materials you will need:
- Structural Materials:
- Wood: Pressure-treated lumber is a popular choice for small bridges, offering a balance between cost, durability, and ease of handling. Cedar or redwood can also be considered for their natural resistance to decay.
- Steel: Steel beams or reinforcements may be necessary for added strength, especially if the bridge will carry heavier loads.
- Concrete: For foundations or footings, concrete is essential for its stability and longevity.
- Decking Materials:
- Wooden Planks: These are commonly used for the walking surface. Pressure-treated, slip-resistant decking boards are ideal.
- Composite Materials: As an alternative to wood, composite decking is durable and requires less maintenance.
- Hardware and Fasteners:
- Galvanized or Stainless Steel Screws and Bolts: These are crucial for assembling the bridge and ensuring the joints are secure.
- Metal Brackets and Connectors: These help in reinforcing joints and providing additional support to the structure.
- Safety Features:
- Railings: Materials for railings could include wood, metal, or even rope, depending on the design and aesthetic preferences.
- Non-slip Strips: For wooden decks, non-slip strips or coatings are important for safety, especially in wet conditions.
- Tools and Equipment:
- Basic Tools: This includes hammers, saws, drills, levels, and measuring tapes.
- Heavy Machinery: Depending on the scale and site conditions, you might need machinery like excavators for foundation work or cranes for placing heavy beams.
- Protective Coatings and Sealants:
- Wood Preservatives and Sealants: These are necessary to protect wooden components from moisture, decay, and insect damage.
- Rust-proof Coatings for Metal Parts: To prevent corrosion, especially in a humid environment.
- Landscaping Materials:
- Stone, Gravel, or Sand: For creating approaches to the bridge and for managing drainage around the foundations.
- Miscellaneous Supplies:
- Safety Gear: Such as helmets, gloves, and safety glasses.
- Marking Tools: For laying out the construction site accurately.
Designing the Bridge
Designing a 30-foot bridge over a creek is a critical step that combines engineering principles with aesthetic considerations. A well-thought-out design ensures safety, functionality, and harmony with the surrounding environment. Here are key aspects to consider in the design process:
- Determining the Load Capacity:
- Assess the maximum load the bridge will need to support. This includes the weight of pedestrians, vehicles (if applicable), and additional loads like snow or equipment.
- Calculate the live load (moving weight) and dead load (weight of the structure itself) to determine the total load capacity required.
- Selecting the Bridge Type:
- Choose a bridge type based on the span, load requirements, and site conditions. Options include beam bridges, truss bridges, or a simple plank bridge for light use.
- The design should also consider the creek’s width and flow, ensuring the bridge is high enough to avoid flooding while maintaining ease of access.
- Structural Design:
- Plan the placement of supports, such as piers or abutments, ensuring they are located on stable ground and provide adequate support.
- Design the trusses or beams to distribute the load evenly across the structure. Use appropriate materials and dimensions to handle the calculated loads.
- Deck Design:
- The deck should provide a flat, stable surface for traffic. Consider using materials like wood planks, composite decking, or metal grating.
- Include non-slip surfaces, especially if the bridge will be exposed to wet conditions.
- Safety Features:
- Incorporate railings or barriers for pedestrian safety. Ensure they are of adequate height and strength to prevent falls.
- If the bridge is accessible to vehicles, consider adding guardrails or bumpers.
- Aesthetic Considerations:
- The bridge’s appearance should complement its surroundings. Consider the visual impact of materials, colors, and architectural styles.
- Integrating elements like lighting, benches, or decorative railings can enhance the bridge’s aesthetic appeal.
- Environmental Impact:
- Design the bridge to minimize its impact on the creek ecosystem. Ensure that construction does not disrupt water flow or local wildlife.
- Use environmentally friendly materials and sustainable construction practices wherever possible.
- Consultation with Experts:
- It’s advisable to consult with a structural engineer or an architect to ensure that the design meets safety standards and building codes.
- Local authorities might have specific requirements or restrictions, so include them in the planning process.
- Creating Detailed Plans and Drawings:
- Produce detailed blueprints and plans, including elevations, sections, and detailed views of critical components.
- These plans should be thorough enough to guide the construction process and to obtain any necessary permits.
Foundation and Supports
The foundation and supports are the backbone of your bridge, ensuring its stability and durability. Properly designing and constructing these elements are crucial, especially for a 30-foot bridge over a creek. Here’s a guide to help you through this phase:
- Assessing Soil and Water Conditions:
- Conduct a soil analysis to understand the ground conditions where the supports will be placed. This determines the type of foundation required.
- Consider the water levels and flow rates of the creek, especially during different seasons, to ensure the supports remain stable and unaffected by erosion or flooding.
- Choosing the Right Foundation Type:
- Shallow Foundations: Suitable for stable, firm soils with low water levels. Options include spread footings or slab foundations.
- Deep Foundations: Necessary for soft, unstable soils or high water levels. This includes piles or caissons that go deep into the ground to reach stable strata.
- Designing the Supports:
- Supports can be designed as piers, abutments, or columns, depending on the bridge type and load requirements.
- The materials for supports could be reinforced concrete, steel, or wood. The choice depends on the load, environmental conditions, and aesthetics.
- Ensuring Structural Integrity:
- Calculate the load distribution to ensure that the supports can handle the weight of the bridge and its load, including dynamic forces like wind or moving vehicles.
- Include factors like bending, shear, and torsion in the design calculations to ensure comprehensive stability.
- Construction of Supports:
- Begin by marking the exact locations for the foundations based on your design plans.
- Excavate the areas for foundations and ensure they are leveled and prepared correctly.
- For deep foundations, use drilling or pile driving methods to install the foundation elements.
- Pour concrete or assemble the pre-fabricated elements for the supports, ensuring proper alignment and leveling.
- Water Management:
- Implement water management strategies to deal with creek flow during construction. This might include temporary dams, diversions, or pumps.
- Design the supports to withstand the erosive forces of water, especially during high flow periods.
- Environmental Considerations:
- Take steps to minimize the environmental impact during construction. Avoid disrupting the creek’s ecosystem and surrounding wildlife habitats.
- Use sustainable materials and construction methods where possible.
- Safety Precautions:
- Ensure that all construction activities, especially those involving heavy machinery and deep excavations, adhere to safety protocols to protect workers and the environment.
- Inspection and Testing:
- Conduct inspections at various stages of construction to ensure compliance with the design specifications.
- Perform load tests if necessary to confirm the structural integrity of the supports.
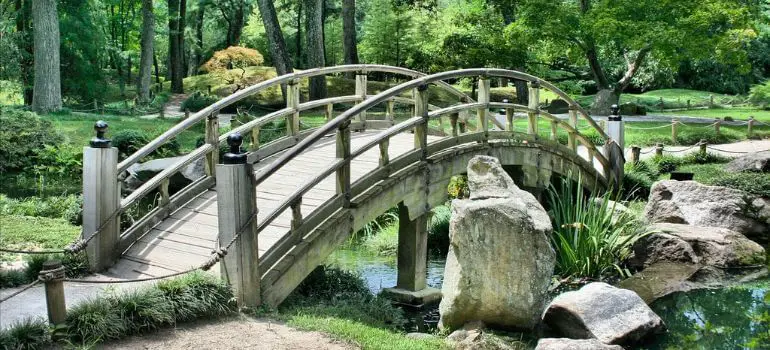
Constructing the Deck
The deck of your 30-foot bridge over a creek is the surface that will be walked or driven on. Its construction is vital for the usability and safety of the bridge. Here are the steps and considerations for constructing the deck:
- Choosing Decking Material:
- Wood: A popular choice for pedestrian bridges, wood provides a natural look and is relatively easy to work with. Pressure-treated lumber, cedar, or redwood are good options.
- Composite Materials: These offer durability and low maintenance, ideal for areas with high traffic or adverse weather conditions.
- Metal Grating or Plates: Suitable for heavier loads, metal decking can provide strength and longevity.
- Preparing the Support Structure:
- Ensure that the beams or trusses supporting the deck are properly installed, aligned, and secured.
- The support structure must be capable of bearing the weight of the deck, along with any additional loads.
- Laying the Deck:
- Start by laying out the decking material on the support structure. Ensure that each piece is precisely cut and fits well.
- Leave appropriate gaps between the decking materials to allow for expansion and contraction due to temperature changes.
- Securing the Deck:
- Fasten the decking materials using appropriate screws or bolts. For wooden decks, use galvanized or stainless steel fasteners to prevent corrosion.
- Ensure that each piece of decking is securely attached to prevent movement or shifting.
- Safety Features:
- Install railings or handrails along the sides of the bridge. The height and design of the railings should comply with safety standards.
- For added safety, especially in wet conditions, consider applying non-slip coatings or installing non-slip strips on the deck.
- Finishing Touches:
- Apply protective sealants or finishes to wooden decks to protect against moisture, decay, and insect damage.
- For metal decks, apply rust-proof coatings to prevent corrosion.
- Quality Checks:
- Once the deck is installed, conduct a thorough inspection to ensure that all components are properly installed and secure.
- Check for any sharp edges, protruding nails, or screws, and make sure the surface is even and safe for use.
- Accessibility Considerations:
- If the bridge is intended for public use, ensure that it is accessible to people with disabilities. This might include ramps, tactile paving, or other accessibility features.
- Environmental Impact:
- Use sustainable practices during construction to minimize the environmental footprint.
- Dispose of construction waste responsibly and avoid contaminating the creek.
Finishing Touches
After constructing the main structure of your 30-foot bridge over a creek, the finishing touches are what will set it apart and ensure its longevity and appeal. Here are the key aspects to focus on:
- Installing Railings and Safety Features:
- Railings are essential for safety, especially on pedestrian bridges. Choose materials that are durable and match the overall aesthetic of your bridge.
- Ensure that the railings are of adequate height and securely installed to withstand pressure.
- Applying Protective Coatings:
- For wooden elements, apply a weather-resistant sealant to protect against moisture, rot, and insects.
- Metal components should be treated with rust-proof coatings to prevent corrosion.
- Aesthetic Enhancements:
- Consider the visual appeal of your bridge. This could include decorative elements, such as lighting, signs, or artistic details.
- Landscaping around the bridge can also enhance its beauty and help it blend with the environment.
- Lighting for Safety and Ambiance:
- Install lights to ensure the bridge is safely navigable at night. This can include path lights, post lights, or even embedded LED lights in the railings or deck.
- Choose lighting that enhances the bridge’s appearance while providing sufficient illumination.
- Accessibility Features:
- If necessary, add features like ramps or tactile paving to make the bridge accessible to everyone, including those with disabilities.
- Quality Inspection:
- Conduct a thorough inspection of the bridge to ensure that all components are properly installed and functioning.
- Check for any loose elements, uneven surfaces, or potential hazards.
- Environmental Restoration:
- After construction, restore any disturbed areas around the creek. This might include replanting vegetation or repairing any damage to the creek banks.
- Installing Signage:
- If applicable, install informational or directional signs. These could include the bridge’s name, weight limits, or historical information.
- Testing and Final Walk-Through:
- Do a final walk-through to ensure everything is in order. It’s a good opportunity to experience the bridge from a user’s perspective.
- Documenting the Project:
- Consider documenting the completed project with photographs or a brief report. This can be useful for future maintenance or as a record of your accomplishment.
Maintenance Tips
Regular Checks: Regular maintenance is crucial to ensure the bridge remains safe over time.
Long-term Care: Plan for long-term care, including checks for wear and tear, especially after extreme weather conditions.
Cost Estimation
Estimating the cost of building a 30-foot bridge over a creek is a crucial step in the planning process. Accurate cost estimation helps in budgeting and ensuring that the project is financially feasible. Here are key factors to consider for a comprehensive cost estimation:
- Material Costs:
- Calculate the cost of all the materials required, such as wood, steel, concrete, fasteners, and protective coatings. Prices will vary based on the quality and type of materials chosen.
- Don’t forget ancillary materials like safety features, lighting, and decorative elements.
- Labor Costs:
- If you’re hiring contractors or laborers, factor in their charges. This will depend on the complexity of the project and the duration of the work.
- Consider the cost of any specialized labor, such as engineers or architects.
- Equipment and Machinery:
- Include the cost of renting or purchasing any heavy machinery needed for the construction, like excavators or cranes.
- Factor in costs for smaller tools, especially if you need to purchase them specifically for this project.
- Permit and Inspection Fees:
- Check with local authorities for any required permits or fees associated with bridge construction.
- Budget for any inspections required during or after construction.
- Site Preparation Costs:
- Include the cost of preparing the site, which may involve clearing vegetation, grading, or creating access paths.
- Contingency Fund:
- It’s wise to set aside a contingency fund, typically 10-20% of the total estimated cost, to cover unexpected expenses or price fluctuations.
- Maintenance and Long-term Costs:
- Consider the long-term maintenance costs, such as regular inspections, repairs, and periodic refinishing or repainting.
- Environmental and Safety Compliance:
- Factor in any costs associated with environmental assessments, erosion control measures, or safety equipment.
- Transportation and Delivery Fees:
- Include the cost of transporting materials to the site, especially for large or heavy items.
- Professional Consultations:
- If you’re consulting with architects, engineers, or environmental experts, include their fees in your budget.
Remember, each bridge project is unique, and costs can vary significantly based on location, design, materials, and labor rates. Getting quotes from multiple suppliers and contractors, and consulting with professionals can help in obtaining a more accurate cost estimation.
Careful budgeting and cost estimation are vital for the successful completion of your bridge project, ensuring that it’s achievable within your financial means while still meeting all necessary safety and quality standards.
Environmental Considerations
Building a bridge, especially over a natural feature like a creek, requires careful consideration of the environmental impact. Responsible construction practices not only protect the ecosystem but can also enhance the longevity and sustainability of the bridge. Here are key environmental considerations to keep in mind:
- Impact Assessment:
- Conduct an environmental impact assessment before beginning the project. This should include studying the local flora and fauna, water quality, and soil conditions.
- Identify any potential negative impacts on the ecosystem and plan mitigation strategies.
- Sustainable Materials:
- Opt for environmentally friendly materials. For instance, choose sustainably sourced wood or recycled materials where possible.
- Consider the life cycle of the materials, including their manufacturing, transportation, and disposal impacts.
- Minimizing Disturbance to the Creek:
- Plan construction activities to minimize disruption to the water flow and aquatic life. This might involve timing construction to avoid breeding seasons or migratory periods.
- Implement measures to prevent sediment and pollutants from entering the creek during construction.
- Erosion Control:
- Use erosion control techniques to protect the creek banks and surrounding land. This could include silt fences, natural buffers, or retaining walls.
- Carefully manage any changes to land grading or drainage patterns to prevent erosion.
- Waste Management:
- Implement a waste management plan to handle construction debris, excess materials, and any hazardous substances.
- Recycle and dispose of waste materials in an environmentally responsible manner.
- Water Quality Protection:
- Take steps to ensure that construction activities do not degrade the water quality of the creek. This includes managing runoff and preventing chemical spills.
- Regularly monitor water quality during and after construction.
- Preserving Natural Habitats:
- Avoid unnecessary removal of vegetation and disruption to wildlife habitats. Where vegetation is removed, plan for replanting or habitat restoration post-construction.
- Consider creating wildlife corridors or passages to allow animals to cross safely.
- Energy Efficiency and Carbon Footprint:
- Aim for energy-efficient construction practices. This includes optimizing machinery use and considering the carbon footprint of materials and construction methods.
- Explore renewable energy sources or low-emission equipment where feasible.
- Community Involvement and Education:
- Engage with the local community to inform them about the project’s environmental aspects. This can foster a sense of stewardship and awareness.
- Provide educational signage on the bridge to inform users about the local ecosystem and the environmental measures taken.
- Long-term Environmental Management:
- Plan for the long-term environmental impact of the bridge. This includes regular monitoring and maintenance to ensure ongoing protection of the ecosystem.
Troubleshooting Common Issues
Dealing with Unexpected Challenges: Be prepared to tackle any unforeseen issues that arise during construction.
Case Study: Successful Bridge Projects
Real-life Examples: Draw inspiration and learn from successful bridge projects.
Expert Advice
Consulting with Professionals: Don’t hesitate to seek advice from experts in the field.
DIY vs Professional Help
Pros and Cons: Weigh the advantages and disadvantages of DIY versus hiring professionals.
Conclusion
Building a bridge over a creek is a complex but achievable task. With proper planning, materials, and execution, you can create a functional and beautiful structure that serves its purpose for years to come.
FAQs
The best material varies depending on factors like budget, location, and aesthetic preference. Commonly used materials include wood, which is aesthetically pleasing and relatively easy to work with, and steel, known for its strength and durability. Concrete is another option, especially for its longevity and low maintenance requirements.
To make your bridge environmentally friendly, consider using sustainable materials, minimize disruption to the local ecosystem during construction, and implement designs that allow for natural water flow and animal crossings.
Key safety considerations include ensuring structural stability, using non-slip surfaces, installing sturdy railings, and regular maintenance checks. Also, consider the load capacity and weather resistance of the materials used.
Maintenance frequency depends on the materials used and environmental conditions. Generally, a yearly inspection is recommended, with more frequent checks in areas with extreme weather conditions or high usage.
This depends on your skill level and the complexity of the project. For a simple footbridge, a DIY approach might be feasible. However, for larger or more complex structures, it’s advisable to consult or hire professionals to ensure safety and compliance with local regulations.


