Introduction to PEX and Galvanized Pipe
Understanding PEX: PEX, or cross-linked polyethylene, is a flexible plumbing material known for its durability and ease of installation. Overview of Galvanized Pipe: Galvanized pipes are steel pipes coated with zinc, historically used in older homes’ plumbing systems.
Benefits of Connecting PEX to Galvanized Pipe
Connecting PEX to galvanized pipe can offer a modern solution to plumbing, blending the reliability of traditional materials with the flexibility of modern technology.
Tools and Materials Needed
When undertaking the task of connecting non-threaded galvanized pipe to PEX, having the right tools and materials is essential for a successful and efficient job. Here’s a comprehensive list of what you’ll need:
- PEX Tubing: Ensure you have the right diameter that matches your existing galvanized pipe.
- Galvanized Pipes: Non-threaded, cut to the required length.
- Pipe Cutters: For cleanly cutting the PEX tubing.
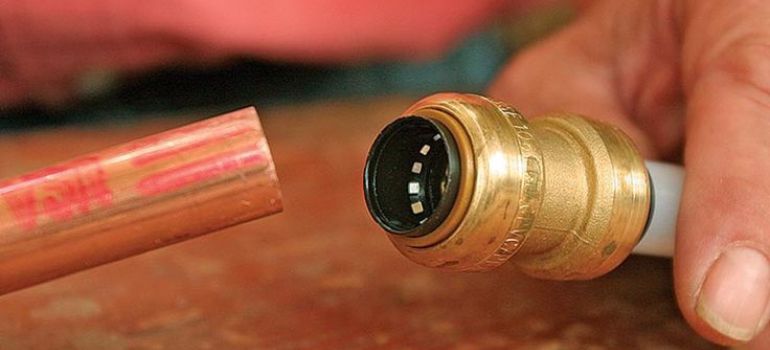
- PEX Fittings: These can include push-fit or compression fittings that are compatible with both PEX and galvanized pipes.
- Adjustable Wrenches: For tightening the fittings.
- PEX Cinch Clamp Tool: If you’re using cinch clamps to secure the connections.
- Cinch Clamps or Crimp Rings: Depending on the type of PEX fittings used.
- Pipe Deburring Tool: To smooth out any rough edges after cutting the pipes.
- Teflon Tape: For ensuring a watertight seal on threaded connections.
- Measuring Tape: For precise measurement of the pipes before cutting.
- Marker or Pencil: To mark the cutting points on the pipes.
- Safety Gear: Including gloves and safety glasses for protection.
- Pipe Support and Hangers: To secure the pipes in place.
- Thread Sealant: For any threaded connections to prevent leaks.
- Emery Cloth or Sandpaper: For cleaning the ends of the galvanized pipe before attaching fittings.
- Transition Fittings: Specifically designed to connect PEX to galvanized pipes securely.
- Pipe Wrench: Useful if you need to hold the galvanized pipe securely.
- Insulation Materials: For insulating the pipes post-installation, if necessary.
- Plumber’s Tape: To help secure insulation or to use as a temporary marking guide.
- Manual or Instructions: Always handy to have the manufacturer’s manual or instructions for the specific type of PEX and fittings you are using.
Step-by-Step Guide to Connection
Connecting non-threaded galvanized pipe to PEX involves a series of steps that require attention to detail and adherence to safety measures. Here’s a detailed guide to help you through the process:
1. Preparation
- Measure and Mark: Measure the length of the PEX tubing and galvanized pipe needed for your project. Mark the cutting points with a marker or pencil.
- Safety First: Wear your safety gear, including gloves and safety glasses.
2. Cutting the Pipes
- Cutting PEX: Use the pipe cutters to cut the PEX tubing at the marked point. Ensure the cut is straight.
- Cutting Galvanized Pipe: If you need to adjust the length of your galvanized pipe, use a pipe cutter designed for metal. Ensure the cut is clean and straight.
3. Preparing the Pipe Ends
- Deburring: Use a deburring tool or sandpaper to smooth the edges of both PEX and galvanized pipes. This step is crucial to prevent leaks and damage to fittings.
- Cleaning: Wipe the ends of both pipes to remove any debris or dirt.
4. Attaching the Fittings
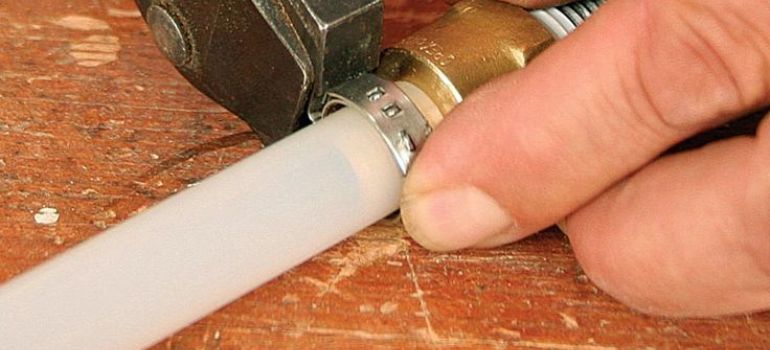
- PEX Fittings: Slide the PEX fitting (push-fit or compression) onto the PEX tubing. If using cinch clamps or crimp rings, place them onto the tubing before inserting the fitting.
- Galvanized Pipe Fittings: Apply thread sealant or Teflon tape to the galvanized pipe threads. Screw on the appropriate fitting securely with a wrench.
5. Making the Connection
- Joining Pipes: Connect the PEX tubing to the galvanized pipe fitting. This could involve pushing the PEX onto a push-fit fitting or tightening a compression fitting with wrenches.
- Securing PEX Connection: If using cinch clamps, position them over the fitting and use the cinch clamp tool to tighten. If using crimp rings, use the crimping tool to secure the connection.
6. Testing the Connection
- Check for Leaks: Once all connections are made, turn on the water to test for leaks. Check each connection point carefully.
- Adjust if Necessary: If you find any leaks, turn off the water, and adjust the fittings. This may involve tightening connections or reapplying sealant.
7. Securing and Insulating
- Pipe Support: Use pipe hangers or supports to secure the PEX and galvanized pipes in place, preventing movement and stress on the joints.
- Insulation: If necessary, insulate the pipes to protect against temperature changes and reduce the risk of freezing.
8. Final Inspection
- Double-Check: Go over the entire length of the connected pipes to ensure everything is secure and there are no signs of leakage.
- Cleanup: Clean up your workspace, putting away tools and disposing of any waste materials appropriately.
Conclusion
- Job Well Done: Congratulations! You have successfully connected a non-threaded galvanized pipe to PEX.
Troubleshooting Common Issues
A guide to diagnosing and resolving common issues that might arise when connecting PEX to galvanized pipe.
Maintenance Tips for a Long-lasting Connection
Practical tips for maintaining the connection to ensure long-term functionality and efficiency.
Legal and Safety Considerations
Important legal and safety considerations to keep in mind while performing plumbing tasks involving PEX and galvanized pipes.
Comparing with Other Plumbing Solutions
When it comes to plumbing, there are various materials and methods available. Comparing the connection of non-threaded galvanized pipe to PEX with other solutions can help you understand its advantages and limitations:
1. PEX vs. Copper Piping
- Ease of Installation: PEX is more flexible and easier to install than copper. It doesn’t require soldering, making it a popular choice for DIY projects.
- Cost: PEX is generally more cost-effective than copper.
- Durability: Copper has a longer lifespan and is more resistant to UV rays if exposed. However, PEX is less prone to corrosion and freezing damage.
- Water Quality: Copper can impart a metallic taste to water and is more prone to corrosion over time, which PEX does not.
2. PEX vs. PVC/CPVC Pipes
- Heat Tolerance: PVC/CPVC pipes cannot tolerate high temperatures as well as PEX, making PEX a better choice for hot water lines.
- Chemical Resistance: PEX is more resistant to chemicals found in the water supply than PVC/CPVC.
- Flexibility: PEX is more flexible than PVC/CPVC, which can make installation easier in tight spaces.
3. Galvanized Pipe vs. Stainless Steel
- Corrosion Resistance: Stainless steel offers superior corrosion resistance compared to galvanized steel.
- Cost: Galvanized pipes are generally more affordable than stainless steel.
- Suitability for Drinking Water: Over time, galvanized pipes can release zinc and lead, whereas stainless steel is generally considered safer for drinking water.
4. Traditional Methods vs. Modern PEX Connections
- Labor Intensity: Traditional methods like soldering copper pipes require more skill and labor compared to installing PEX.
- Adaptability: PEX’s flexibility allows it to be used in a variety of situations where metal pipes would be impractical.
5. Environmental Considerations
- Sustainability: PEX is a plastic product, raising concerns about environmental impact and recyclability compared to metals like copper or steel.
- Energy Efficiency: PEX has better insulating properties, potentially reducing energy costs for hot water heating.
Cost Analysis
When considering a plumbing project, understanding the cost implications is crucial. Below is a cost analysis of connecting non-threaded galvanized pipe to PEX, taking into account various factors:
Materials Cost
- PEX Tubing: The cost of PEX varies depending on the diameter and length. On average, PEX can cost between $0.30 to $2.00 per foot.
- Galvanized Pipes: These are relatively inexpensive, with prices typically ranging from $2 to $8 per foot, depending on size and quality.
- Fittings and Connectors: The cost of PEX fittings, including transition fittings for galvanized pipe, can range from a few dollars for simple connectors to $10 or more for specialized fittings.
- Tools: If you don’t already have the necessary tools, you may need to purchase or rent them. A basic set of plumbing tools can cost around $50 to $100.
Labor Costs
- DIY: If you’re doing it yourself, you save on labor costs. However, factor in the value of your time and any learning curve.
- Professional Installation: Hiring a professional plumber can vary greatly in cost depending on your location and the complexity of the job. On average, plumbers charge between $45 to $150 per hour.
Additional Costs
- Insulation: If you need to insulate the pipes, this will add to the cost. Pipe insulation is relatively inexpensive, typically under $1 per foot.
- Repairs and Preparation: If you need to repair existing pipes or prepare the area for installation, this could increase the total cost.
- Emergency Fees: If the project is an emergency repair, be prepared for higher charges, especially for after-hours services.
Comparative Costs with Other Materials
- PEX vs. Copper: Copper is generally more expensive, both in materials and installation, because it requires soldering and is a more labor-intensive process.
- PEX vs. PVC/CPVC: PVC/CPVC is comparable in cost to PEX but may be less suitable for hot water and certain applications.
Cost-Effectiveness
- Long-Term Savings: PEX may provide long-term savings due to its durability and lower risk of leaks and water damage.
- Energy Efficiency: PEX’s better insulating properties can lead to savings in energy costs, particularly in hot water systems.
Professional Assistance vs. DIY
A discussion on when to call a professional plumber and when it’s feasible to do it yourself.
Impact on Water Quality
Exploring how the connection between PEX and galvanized pipes can impact water quality.
Innovations in Plumbing
A brief look at the latest innovations in plumbing and how they relate to PEX and galvanized pipe connections.
Environmental Considerations
Discussing the environmental impact of using PEX and galvanized pipes in plumbing.
FAQs
Absolutely! With the right tools and a bit of patience, DIY enthusiasts can successfully connect non-threaded galvanized pipe to PEX. It’s important, however, to understand the process thoroughly and follow safety guidelines.
When done correctly, this connection can last for many years. PEX is known for its durability, and when it’s connected properly to galvanized pipe, the joint can withstand typical plumbing pressures and temperatures.
PEX stands out for its flexibility, resistance to scale and chlorine, and its ability to retain heat in hot water lines. Additionally, it’s often more affordable and easier to install compared to traditional materials like copper.
Galvanized pipes were commonly used in the past, but over time, they can corrode and release zinc and lead, potentially contaminating drinking water. It’s generally recommended to replace old galvanized pipes, especially in systems for potable water.
Connecting PEX to galvanized pipe can enhance your plumbing system’s efficiency. PEX’s flexibility allows for fewer fittings and less chance of leaks, while the robustness of galvanized pipe ensures durability where it’s most needed.


