In today’s DIY era, learning how to handle basic plumbing repairs can save you both time and money. One common issue many homeowners encounter is a faulty flush valve in their toilet. Fortunately, replacing it is a straightforward task. In this article, we will walk you through the process of installing a Kohler Flush Valve Kit, ensuring a smooth and efficient flushing system in your bathroom.
Understanding the Kohler Flush Valve Kit
Before we dive into the installation process, let’s briefly understand what a Kohler Flush Valve Kit is and why it’s crucial for your toilet’s performance.
What is a Kohler Flush Valve Kit?
A Kohler Flush Valve Kit is a set of components designed to replace the flush valve in your Kohler toilet. This kit includes a flush valve, a flush valve seal, a flapper, and various other necessary parts. Over time, the flush valve in your toilet may wear out, leading to issues like incomplete flushing or continuous water running. Installing a new flush valve kit can resolve these problems effectively.
Tools and Materials You’ll Need
Before you begin the installation, gather the necessary tools and materials:
Tools:
- Adjustable wrench
- Screwdriver
- Plunger
- Towel or rag
Materials:
- Kohler Flush Valve Kit
- Bucket
Step-by-Step Installation Guide
Turn off the Water Supply
Begin by turning off the water supply to your toilet. Locate the shut-off valve, usually positioned on the wall or floor behind the toilet. Turn the valve clockwise until it’s fully closed to stop the water flow. This step is crucial to prevent any water spillage during the installation.
Flush the Toilet
Flush the toilet to drain the tank and remove most of the water from the bowl. This will minimize water spillage and make the following steps cleaner and more manageable.
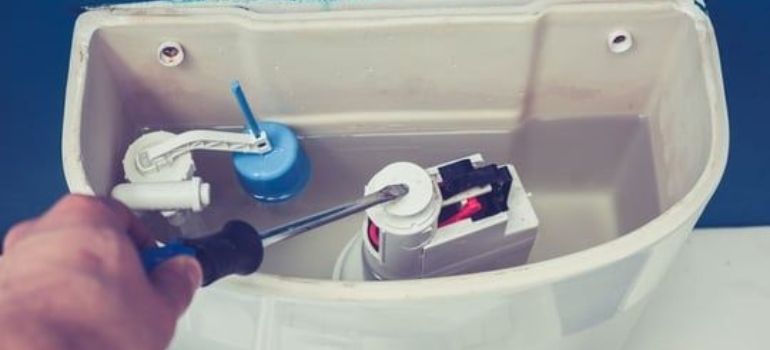
Disconnect the Water Supply Line
Use an adjustable wrench to disconnect the water supply line from the fill valve located on the bottom left side of the toilet tank. Place a bucket or towel underneath to catch any remaining water in the line.
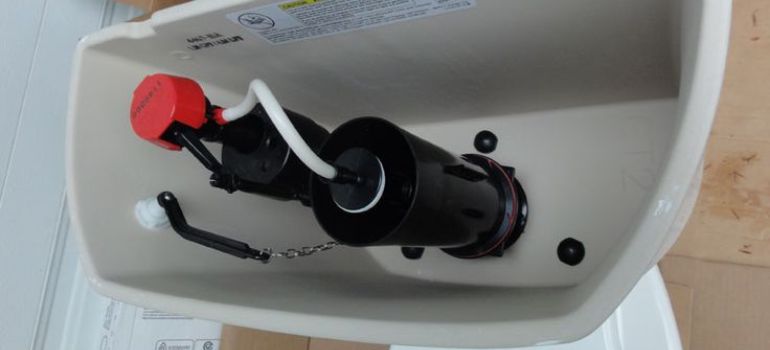
Remove the Old Flush Valve
Locate the nut that connects the old flush valve to the inside of the toilet tank. Using your adjustable wrench, loosen and remove this nut. Lift the old flush valve out of the tank, taking the attached flapper with it. Ensure you remove any remaining water from the tank.
Install the New Flush Valve
Follow the manufacturer’s instructions provided with your Kohler Flush Valve Kit to install the new components. Make sure that all parts are securely in place and that the flush valve seal is correctly positioned. This step is crucial for ensuring a watertight seal.
Reattach the Water Supply Line
Carefully reattach the water supply line to the fill valve on the bottom left side of the toilet tank. Use your adjustable wrench to tighten the nut securely. Ensure there are no leaks around this connection.
Turn on the Water Supply
Slowly turn on the water supply by opening the shut-off valve counterclockwise. This will allow water to flow back into the tank. Keep an eye on the connection points for any signs of leakage.
Test the Flush
Flush the toilet multiple times to ensure that the new flush valve is functioning correctly. Check for any water leaks around the valve or any unusual noises during flushing. If you notice any issues, double-check your installation and make necessary adjustments.
Adjust the Flapper Chain
If needed, adjust the length of the flapper chain to ensure it allows the flapper to close smoothly and completely when you press the toilet handle. Proper adjustment prevents water from continuously running into the bowl after flushing.
Clean Up
After confirming that everything is functioning correctly, wipe down the toilet tank and surrounding areas to remove any water or debris. Dispose of the old flush valve kit and any waste materials properly.
Additional Tips for Toilet Maintenance
Regular maintenance can help prolong the life of your toilet and prevent future issues. Here are some tips to keep in mind:
Check for Leaks
Periodically inspect your toilet for any signs of leaks. These could include water pooling around the base or a constant, subtle sound of running water. Addressing leaks promptly can save you from costly repairs in the long run.
Clean the Flush Valve Seal
Clean the flush valve seal occasionally to prevent mineral buildup and ensure a proper seal. Remove the flush valve and gently clean the seal with a soft cloth and mild detergent. Rinse thoroughly before reinstallation.
Avoid Using Harsh Cleaners
Avoid using harsh chemical cleaners in your toilet tank, as they can damage the flush valve components over time. Stick to mild, non-abrasive cleaners to keep your toilet in optimal condition.
Replace the Flapper
If you notice that your toilet isn’t flushing properly even after replacing the flush valve kit, consider replacing the flapper as well. An old or deteriorated flapper can hinder the flushing process.
Monitor Water Pressure
Excessively high water pressure can put stress on your toilet’s components, including the flush valve. Consider installing a water pressure regulator to ensure that your toilet isn’t subjected to excessive pressure.
Conclusion
By following these simple steps, you can successfully install a Kohler Flush Valve Kit and restore your toilet’s efficient flushing system. DIY plumbing projects like this one can be both satisfying and cost-effective.
FAQs
It’s recommended to replace your flush valve kit every 5-7 years or when you notice issues like incomplete flushing or water running continuously.
While it’s best to use a Kohler Flush Valve Kit for compatibility, some universal kits may work. Consult your toilet’s user manual for recommendations.
Yes, turning off the water supply is crucial to prevent water damage and make the installation process safer.
Check the tightness of all connections and ensure the flush valve seal is properly seated. Tighten any loose nuts or bolts and retest the flush.
You can find Kohler Flush Valve Kits at most home improvement stores or online retailers. Ensure you purchase the correct kit for your toilet model.

