Masonite siding, known for its durability and affordability, is a popular choice for many homeowners. However, like any exterior siding, it can suffer damage over time due to various factors such as weather conditions, moisture, or accidental impact. Patching up damaged Masonite siding is essential to maintain the integrity and aesthetics of your home’s exterior. In this comprehensive guide, we’ll walk you through the process of how to effectively patch Masonite siding, ensuring a seamless repair that prolongs the lifespan of your siding.
Masonite siding can be damaged by a variety of factors including:
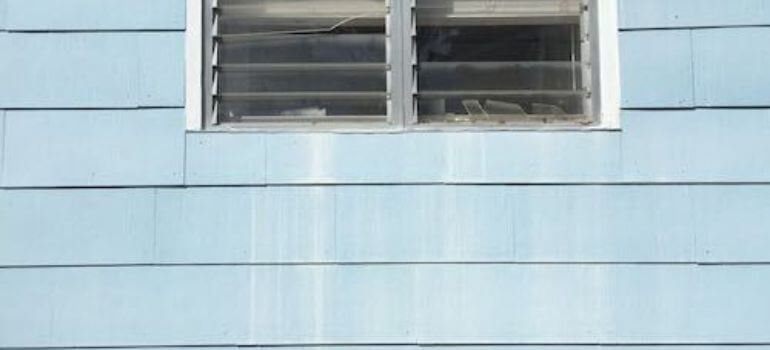
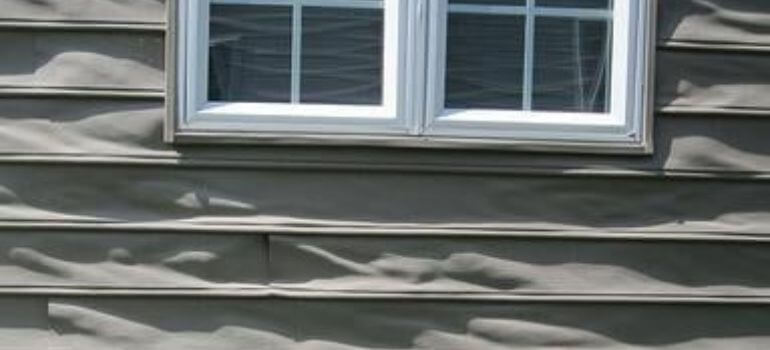
Moisture: Water infiltration can cause swelling, rotting, or warping of Masonite siding.
Impact: Accidental impacts from objects or debris can result in dents, cracks, or punctures.
Age: Over time, Masonite siding may deteriorate due to natural wear and tear.
Signs of Damage
It’s important to inspect your Masonite siding regularly for signs of damage, which may include:
Swelling or bulging
Cracks or splits
Rot or decay
Discoloration or peeling paint
Importance of Patching Masonite Siding
Prevents Further Damage: Addressing minor issues promptly through patching prevents them from escalating into more extensive damage. Cracks, holes, or other forms of damage left unattended can worsen over time, leading to more significant structural issues and costly repairs.
Preserves Curb Appeal: Masonite siding contributes to the overall appearance of your home. Patching damaged areas ensures that your home maintains its visual appeal by keeping the siding looking uniform and well-maintained. This is particularly important if you plan to sell your home, as curb appeal significantly influences potential buyers’ first impressions.
Protects Against Moisture Intrusion: Damaged Masonite siding can allow moisture to seep into the underlying structure of your home, leading to rot, mold, and other moisture-related issues. Patching ensures that the siding remains intact and provides a barrier against water infiltration, safeguarding the integrity of your home’s exterior and interior.
Enhances Energy Efficiency: Holes or cracks in Masonite siding can compromise the insulation of your home, allowing hot or cold air to escape and increasing energy costs. By patching these areas, you can maintain a more consistent indoor temperature and improve energy efficiency.
Extends Siding Lifespan: Regular maintenance, including patching, helps extend the lifespan of your Masonite siding. By addressing damage as soon as it occurs and preventing it from spreading, you can prolong the lifespan of your siding and delay the need for costly replacements.
Maintains Property Value: A well-maintained exterior, including properly patched Masonite siding, enhances the overall value of your property. Potential buyers are more likely to be attracted to a home that has been well cared for and shows minimal signs of wear and tear.
Preparation for Patching
Patching Compound: Choose a high-quality patching compound designed specifically for exterior siding repairs. This compound should be able to adhere well to the Masonite surface and provide a durable finish.
Putty Knife: A putty knife with a flexible blade will help you apply the patching compound smoothly and evenly onto the damaged area.
Sandpaper: Have both coarse and fine-grit sandpaper on hand to smooth out rough edges and uneven surfaces after applying the patching compound.
Primer: Use an exterior primer to prime the patched area before painting. This will help the paint adhere properly and ensure a long-lasting finish.
Paint: Choose a high-quality exterior paint that matches the color of your existing Masonite siding. Opt for a paint with built-in primer for better adhesion and durability.
Safety Gear: Don’t forget to wear safety goggles and gloves to protect your eyes and hands during the patching process.
Additionally, before you start patching, it’s important to take some safety precautions:
Work on a Stable Surface: Set up a sturdy ladder or scaffolding to reach the damaged area safely. Ensure that the ladder is placed on a stable and level surface.
Weather Considerations: Choose a dry and mild day to patch your Masonite siding. Avoid working in extreme temperatures or during rainy or windy conditions, as this can affect the effectiveness of the patching materials.
Clean the Area: Before applying the patching compound, thoroughly clean the damaged area to remove any dirt, debris, or loose particles. Use a mild detergent and water solution, and allow the surface to dry completely before proceeding.
Step-by-Step Guide to Patching Masonite Siding
Cleaning and Preparing the Area: Start by cleaning the damaged area thoroughly to remove dirt, debris, and loose particles. Use a mild detergent and water solution, and allow the surface to dry completely before proceeding.
Applying Patching Compound: Using a putty knife, apply a layer of patching compound to the damaged area, filling in any cracks or holes. Smooth the compound evenly and allow it to dry according to the manufacturer’s instructions.
Smoothing and Sanding: Once the patching compound is dry, use fine-grit sandpaper to smooth out any rough edges or uneven surfaces. Wipe away any dust with a clean cloth.
Painting and Sealing
Choosing the Right Paint: Selecting the appropriate paint is essential for achieving a long-lasting and visually pleasing finish. Opt for a high-quality exterior paint specifically formulated for use on Masonite siding. Consider factors such as color, sheen, and durability when making your choice.
Preparing the Surface: Before painting, ensure that the patched area is clean, dry, and free of any dust, debris, or loose particles. Use a mild detergent and water solution to clean the surface, and allow it to dry completely before proceeding.
Applying Primer: Primer helps to promote adhesion and provides a smooth base for the paint to adhere to. Apply a coat of exterior primer to the patched area, following the manufacturer’s instructions. Allow the primer to dry thoroughly before applying the paint.
Choosing the Right Tools: Use high-quality brushes or rollers suitable for exterior painting to ensure even coverage and a professional finish. Consider using a brush for cutting in and a roller for larger areas to expedite the painting process.
Applying Paint: Once the primer is dry, apply two coats of exterior paint to the patched area, allowing sufficient drying time between coats. Use smooth, even strokes to ensure uniform coverage and minimize brush marks. Pay attention to details such as edges and corners to achieve a neat and polished result.
Sealing the Surface: After the final coat of paint has dried, consider applying a clear exterior sealant to the patched area. This additional layer of protection helps to seal the surface and provides added durability against moisture, UV rays, and other environmental factors.
Regular Maintenance: To prolong the life of the painted and sealed Masonite siding, conduct regular inspections and maintenance. Touch up any areas of paint that show signs of wear or damage, and reapply sealant as needed to maintain protection.
Maintenance Tips for Masonite Siding
To keep your Masonite siding in good condition, consider the following maintenance tips:
Regularly inspect the siding for signs of damage or deterioration.
Keep the siding clean by washing it annually with a mild detergent and water solution.
Trim trees and shrubs to prevent damage from branches or foliage.
Repair any damaged areas promptly to prevent further deterioration.
DIY vs. Professional Help
While patching minor damages to Masonite siding can be a DIY project for homeowners with basic handyman skills, more extensive repairs may require professional assistance. Consider your comfort level and the extent of the damage when deciding whether to tackle the repair yourself or hire a professional.
Conclusion
Patching up damaged Masonite siding is a manageable task that can be completed with the right tools, materials, and know-how. By following the steps outlined in this guide and staying proactive with maintenance, you can ensure your Masonite siding remains in optimal condition for years to come.
FAQs (Frequently Asked Questions)
How long does it take to patch Masonite siding?
The time required to patch Masonite siding depends on the extent of the damage and the drying time of the patching compound and paint. Typically, the process can be completed within a day.
Can I paint over patched Masonite siding?
Yes, once the patching compound is dry, you can paint over it to blend it seamlessly with the rest of the siding.
Is it necessary to hire a professional for patching Masonite siding?
While minor repairs can be done by homeowners, extensive damage may require professional help to ensure proper restoration and structural integrity.
How do I prevent future damage to Masonite siding?
Regular inspection, maintenance, and prompt repairs are key to preventing future damage to Masonite siding. Additionally, consider applying a protective sealant to enhance durability.
What should I do if my Masonite siding is severely damaged?
If your Masonite siding is severely damaged or deteriorated, it may be time to consider replacement. Consult with a professional contractor to assess the extent of the damage and explore your options.

