Braided rugs are cherished possessions that add warmth and character to any space. However, over time, these rugs can show signs of wear and tear, requiring repair to restore their beauty and functionality. Whether you have frays and loose threads, holes or tears, stains, fading, uneven braiding, worn pile, or odors, there are DIY techniques you can use to fix these issues and breathe new life into your braided rug.
Key Takeaways:
- Assess the damage to your braided rug before starting any repair work.
- Repair loose threads by threading them back into the braid and securing them with discreet stitches.
- Patch holes or tears using a fabric patch that matches the rug’s color and pattern.
- Fix loose braids by unraveling the loose section and stitching it back into place.
- Remove stains and discoloration by identifying the type of stain and using a mild cleaning solution.
Assessing the Damage
Before you begin repairing your braided rug, it is essential to assess the extent of the damage. By inspecting the rug thoroughly, you can identify common issues and determine the appropriate repair methods.
During the inspection process, keep an eye out for the following:
- Frays and loose threads: Check for any unraveling or loose threads along the edges or within the braids.
- Holes or tears: Examine the rug for any areas where the braids are broken, resulting in holes or tears.
- Stains: Look for any discolorations caused by spills or stains on the rug’s surface.
- Fading: Assess the color intensity of the rug to see if there is noticeable fading or uneven color distribution.
- Uneven braiding: Inspect the rug for areas where the braids may be loose or unevenly spaced.
- Worn pile: Pay attention to the pile height and texture, as excessive wear may indicate the need for repairs.
- Odors: Take note of any unusual or persistent odors coming from the rug, which may require special attention.
Identifying these issues will help you determine the appropriate repair techniques and materials needed to restore your braided rug to its former glory.

Now that you know how to assess the damage, let’s dive into the specific repair methods for each issue. In the next sections, we’ll guide you through repairing loose threads, patching holes or tears, fixing loose braids, and removing stains and discoloration from your braided rug.
Repairing Loose Threads
Loose threads are a common issue with braided rugs. Fortunately, they can be easily repaired with a few simple steps. Here’s how to fix those pesky loose threads and ensure the longevity of your rug:
- Gather the loose threads: Start by identifying the areas where the threads have come loose. Carefully gather these loose threads so that they are all in one place.
- Thread them back into the braid: Using a curved upholstery needle, begin threading the loose threads back into the braid. Take care to thread them through the existing stitches to ensure a secure repair.
- Secure with discreet stitches: Once the loose threads are threaded back into the braid, use matching thread to make discreet stitches. This will help secure the threads in place and prevent them from coming loose again.
- Trim any excess thread: After securing the loose threads, trim any excess thread using sharp scissors. Be careful not to cut the surrounding braid.
For added durability, you can apply fabric adhesive to the underside of the repaired edge. This will help hold the threads in place and prevent further unraveling. Simply apply a small amount of fabric adhesive along the repaired edge and press it firmly against the rug.
By repairing loose threads promptly, you can extend the lifespan of your braided rug and maintain its beautiful appearance for years to come.
Patching Holes or Tears
Holes or tears in a braided rug can be unsightly and structurally problematic. To patch them, follow these steps:
- Clean the area: Start by cleaning the area around the hole or tear to remove any dirt or debris. This will ensure proper adhesion of the patch.
- Gather a fabric patch: Find a fabric patch that matches the color and pattern of your braided rug. This will help the patch blend in seamlessly.
- Position the patch: Place the fabric patch beneath the hole or tear, making sure it covers the damaged area completely.
- Secure with fabric glue: Apply fabric glue along the edges of the patch and press it firmly onto the rug. Be sure to follow the instructions on the fabric glue for the best results.
- Trim excess patch material: Once the fabric glue has dried, carefully trim any excess patch material using scissors. This will give the repaired area a smooth and seamless appearance.
Alternatively, you can also use a needle and thread to secure the patch in place. Simply sew along the edges of the patch, making small, discreet stitches.
By patching holes or tears in your braided rug, you can restore its appearance and prevent further damage. Remember to choose a fabric patch and adhesive that are suitable for use on rugs.

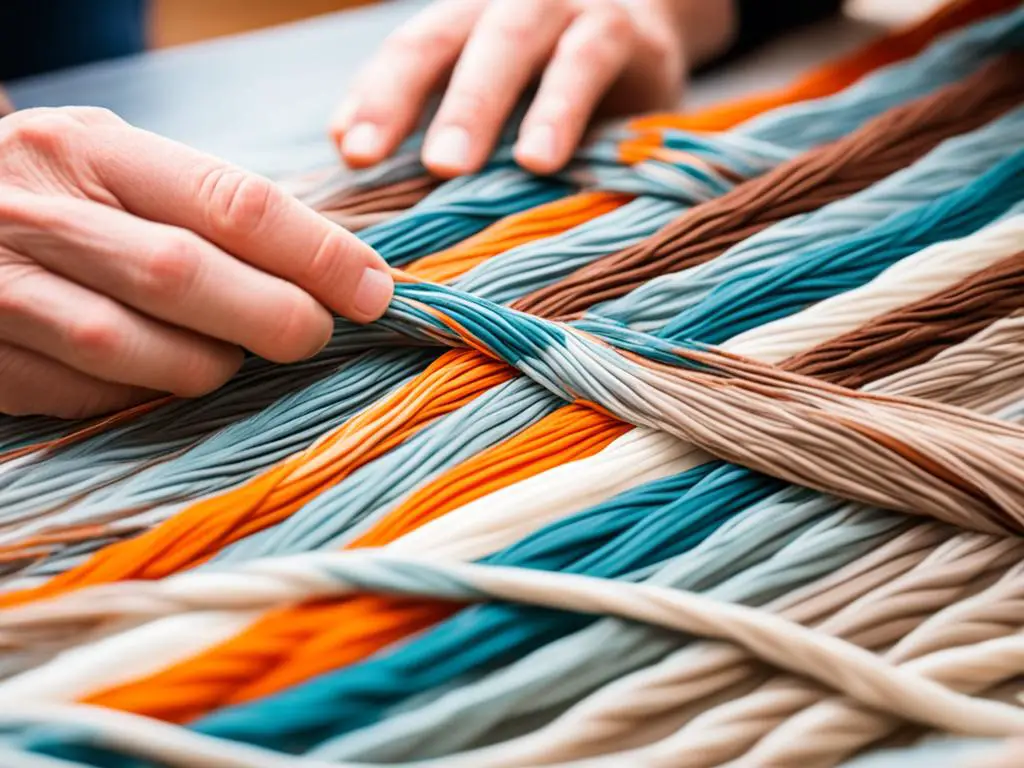
Fixing Loose Braids
Loose strands or braids can create uneven areas on a braided rug. To fix this, follow these step-by-step instructions:
- Gently unravel the loose section of the braid until you reach a stable point where the braiding is secure.
- Take an upholstery needle with a curved tip and a spool of matching thread.
- Thread the needle with the matching thread, making sure to secure the loose end with a knot.
- Carefully stitch the loose portion of the braid back into place, using small, discreet stitches to ensure a secure attachment.
- Continue stitching until the entire loose section is reattached to the rug.
- Once all the loose strands are in place, press the repaired area with a heavy object, such as a book or a weighted object, to help it lie flat and blend in with the rest of the rug.
Tip: If you’re having trouble threading the needle through the braids, you can use a small crochet hook to help guide the thread through.

Example: Fixing Loose Braids
“The key to fixing loose braids is to secure the unraveled strands back into place. Using an upholstery needle and matching thread, you can stitch the loose portion of the braid back onto the rug. This method ensures a secure attachment and helps maintain the rug’s overall integrity.”
– Jane Smith, Rug Repair Specialist
| Materials Needed: | Tools Needed: |
|---|---|
| – Matching thread | – Upholstery needle with a curved tip |
| – Heavy object (e.g., book, weighted object) | – Crochet hook (optional) |
By following these steps and using the right tools, you can easily fix loose braids on your braided rug, restoring its beauty and preserving its lifespan.
Removing Stains and Discoloration
Stains and discoloration can be a common problem with braided rugs, but they don’t have to be permanent blemishes on your beautiful rug. With the right approach and some spot cleaning techniques, you can effectively remove stains and restore the rug’s vibrant appearance.
When it comes to removing stains and discoloration from your braided rug, it’s important to take a targeted approach. Here’s a step-by-step guide to help you tackle this issue:
- Identify the type of stain: Before applying any cleaning solution, it’s essential to identify the type of stain you’re dealing with. Different stains may require different treatment methods, so it’s important to know what you’re working with.
- Blot fresh stains: If you encounter a fresh stain, start by blotting it gently with a clean cloth or paper towel. Avoid rubbing or scrubbing, as this can spread the stain and damage the rug fibers.
- Prepare a cleaning solution: Mix a small amount of mild detergent with warm water to create a cleaning solution. It’s best to choose a mild detergent that is suitable for delicate fabrics.
- Apply the cleaning solution: Dip a clean cloth or sponge into the cleaning solution and gently apply it to the stained area. Be careful not to oversaturate the rug, as excessive moisture can cause damage.
- Gently blot the stain: After applying the cleaning solution, blot the stained area with a clean cloth or paper towel. Continue blotting until the stain starts to lift.
- Rinse with clean water: Once the stain has been successfully removed, rinse the area with clean water to remove any residue from the cleaning solution.
- Repeat if necessary: Stubborn stains may require multiple treatments. If the stain persists, repeat the cleaning process until you achieve the desired results.
- Allow the rug to dry: After removing the stain, it’s crucial to allow the rug to dry completely before using it again. This helps prevent any moisture-related issues, such as mold or mildew formation.
Spot cleaning your braided rug regularly and addressing stains promptly can help maintain its overall appearance and extend its lifespan. Remember to always follow the manufacturer’s instructions for cleaning and care to avoid any potential damage.
| Type of Stain | Recommended Cleaning Solution |
|---|---|
| Food and beverage stains | Mild detergent mixed with warm water |
| Grease and oil stains | Mild dish soap or a specialized grease remover |
| Ink and dye stains | Isopropyl alcohol or a specialized ink remover |
| Blood stains | Cold water mixed with mild detergent |
| Pet stains | Enzymatic cleaner specifically formulated for pet stains |
Conclusion
Repairing and restoring a braided rug can be a rewarding DIY project that brings new life to your cherished possession. By carefully assessing the damage, addressing loose threads and braids, patching holes or tears, and removing stains, you can revive the beauty of your rug and extend its lifespan.
Start by inspecting the rug for frays, holes, stains, and other common issues. Fix loose threads by threading them back into the braid and securing them with discreet stitches. Patch holes or tears using a fabric patch and adhesive or needle and thread. Fix loose braids by reattaching the strands with an upholstery needle and matching thread.
To remove stains, identify the type of stain, prepare a gentle cleaning solution, and spot clean the affected area. Rinse thoroughly and allow the rug to dry completely between attempts. Taking these DIY repair techniques into your hands and following maintenance tips will ensure that your braided rug remains beautiful and functional for years to come.

