Introduction to Granite Transportation
Granite, known for its durability and aesthetic appeal, is a popular choice in construction and interior design. However, its transportation can be a challenge due to its weight and fragility. A sturdy wooden frame is an effective solution for safe and efficient transportation.
Essentials of Wooden Frame Design
Understanding granite’s properties is crucial. It’s heavy yet brittle, requiring a frame that can support its weight and prevent any movement during transit. Choosing the right wood material, such as hardwood, ensures durability and strength.
Tools and Materials Needed
- Tools:
- Measuring Tape: For precise measurement of both granite and wood.
- Circular Saw or Hand Saw: To cut the wooden planks to the required dimensions.
- Drill: For creating holes for screws and assembly.
- Screwdriver: To fasten screws securely.
- Carpenter’s Square: To ensure all angles are perfectly square for stability.
- Sandpaper: For smoothing the cut edges of the wood.
- Clamps: To hold the wood in place during assembly.
- Materials:
- Wooden Planks: Hardwoods like oak or maple, cut according to the size of the granite.
- Screws: Sturdy and long enough to hold the wooden pieces together securely.
- Wood Glue: For additional bonding strength between wood pieces.
- Protective Padding: Foam or rubber padding to protect the granite from scratches and impacts.
- Straps or Lashing: To secure the granite onto the frame during transportation.
- Sealant or Wood Finish: To protect the wood from moisture and wear.
Step-by-Step Guide to Building the Frame
- Measure the Granite
- Begin by accurately measuring the dimensions of the granite slab. This will determine the size of the frame.
- Cut the Wooden Planks
- Based on the measurements, cut your chosen hardwood planks. Remember to allow a little extra space for padding.
- Smooth the Wood
- Use sandpaper to smooth all cut edges of the wood. This prevents splinters and ensures a clean, professional finish.
- Assemble the Base
- Lay out the planks for the base of the frame. Join them using wood glue and reinforce with screws for added strength.
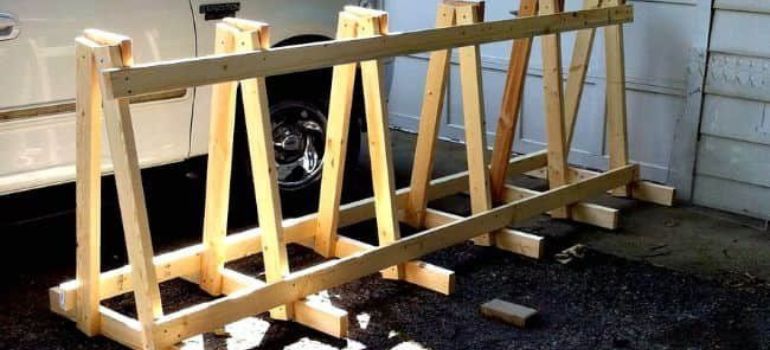
- Construct the Sides
- Attach vertical planks to the base to create the sides of the frame. Ensure they are perpendicular to the base for stability. Use a carpenter’s square to check the angles.
- Secure the Frame
- For each corner where the planks meet, drill holes and then screw them together for a sturdy frame.
- Add Reinforcements
- Depending on the size and weight of the granite, consider adding crossbeams or additional planks for extra support.
- Line with Padding
- Cover the interior surfaces of the frame with protective padding. This can be foam or rubber, ensuring the granite is snug and protected from impacts.
- Final Checks and Adjustments
- Once assembled, check the entire frame for any loose parts and ensure it’s secure. Make any necessary adjustments.
- Apply Sealant or Finish
- To protect the wood from moisture and extend its lifespan, apply a sealant or wood finish.
- Load the Granite
- Carefully place the granite into the frame. It should fit snugly without too much movement.
- Secure the Granite for Transport
- Use straps or lashings to secure the granite within the frame, ensuring it won’t shift during transportation.
Safety Considerations
Dealing with heavy materials requires caution. Ensure that the frame is structurally sound to handle the granite’s weight and use proper lifting techniques to avoid injuries.
Tips for Efficient Granite Transportation
- Proper Loading Techniques:
- Always load granite slabs vertically on edge, as they are less likely to break this way.
- Use suction cups or lifting straps for handling and placing the granite onto the transportation vehicle.
- Secure the Granite:
- Once loaded, secure the granite with straps or clamps to prevent any movement during transit.
- Avoid over-tightening, which might cause cracks or breakage.
- Balance the Load:
- Distribute the weight evenly across the transportation platform to maintain balance and prevent tipping.
- If transporting multiple slabs, space them evenly and use dividers if possible.
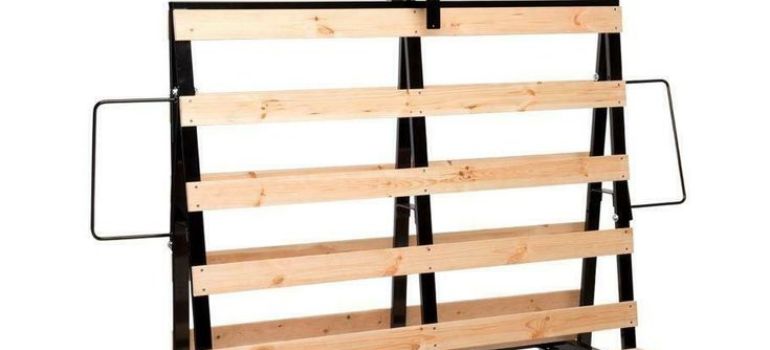
- Use a Sturdy Transportation Frame:
- Ensure that the wooden frame built for transportation is robust and fits the granite snugly.
- Padding within the frame is crucial to prevent scratches and chips during movement.
- Drive Carefully:
- The vehicle driver should be aware of the load’s nature and drive accordingly, avoiding sudden stops, sharp turns, or speed bumps.
- Use routes with smoother roads when possible.
- Regular Inspection:
- Regularly check the straps and the frame during transit for any signs of loosening or wear.
- Adjust and tighten as needed to maintain security.
- Preparing for Unloading:
- Plan the unloading process in advance. Ensure that the destination has the necessary equipment and space for safe unloading.
- Communicate with the unloading team about the handling requirements of the granite.
- Weather Considerations:
- Protect the granite from extreme weather conditions during transit. Use covers to shield from rain, snow, or direct sunlight.
- Training and Awareness:
- Ensure that everyone involved in the transportation process is trained and aware of the best practices for handling granite.
- Emphasize the importance of safety and careful handling.
- Emergency Preparedness:
- Have a plan in place for any emergencies, like road accidents or sudden shifts in the load.
- Keep emergency contact numbers and a first aid kit readily available.
Maintenance and Care of the Frame
Regular check-ups of the frame can prevent potential failures. Store the frame in a dry, sheltered area to protect it from the elements.
Alternative Solutions
Besides wooden frames, there are other methods like metal frames or professional transportation services. Weigh their pros and cons against your specific needs.
Cost Analysis
1. Material Costs:
- Wooden Planks:
- Depending on the type (e.g., oak, maple) and quantity needed, the cost can vary. Assume approximately $2 to $5 per foot.
- Screws and Fasteners:
- A pack of screws might cost around $5 to $10.
- Protective Padding:
- Foam or rubber padding may cost around $20 to $40, depending on the quality and thickness.
- Sealant or Wood Finish:
- A can of sealant or finish could be around $10 to $25.
2. Tool Costs:
- If you already own basic tools (saw, drill, screwdriver), there’s no additional cost.
- Renting tools can be an option if you don’t have them, with rental prices varying based on location and rental duration.
3. Labor Costs:
- If you are building the frame yourself, there’s no direct labor cost.
- Hiring a carpenter or handyman could cost anywhere from $20 to $50 per hour, depending on the region.
4. Transportation Costs:
- If using your own vehicle, consider fuel costs.
- If renting a vehicle or hiring transportation services, prices will vary depending on the service provider and distance.
5. Miscellaneous Costs:
- Additional costs like sandpaper, clamps, or extra fasteners may add up to $10 to $20.
Example Cost Calculation: Assuming you need 20 feet of wood at $3 per foot, $10 for screws, $30 for padding, $20 for sealant, and you do the work yourself using your own tools:
- Materials: (20 ft x $3) + $10 + $30 + $20 = $120
- Labor: $0 (DIY)
- Tools: $0 (owned)
- Miscellaneous: $15
- Total Estimated Cost: $135
Cost Comparison with Commercial Options:
- Purchasing a pre-made frame or hiring professional transportation services can be significantly more expensive, potentially costing several hundred dollars.
Cost-Effectiveness:
- Building your own frame can be a cost-effective solution, especially if you have the tools and can do the work yourself.
- The DIY approach allows for customization to fit specific granite sizes and requirements.
This cost analysis is a general guide and actual costs may vary depending on local prices, the specific materials chosen, and individual requirements. It’s always a good idea to shop around for the best prices and consider the long-term durability and effectiveness of the materials you select.
Conclusion
Constructing a wooden frame for transporting granite is a practical and economical solution. It requires careful planning and execution, but the effort ensures the safe and efficient transportation of this valuable material.
FAQs
Hardwoods like oak or maple are ideal for their strength and durability.
Inspect the frame before and after each use, and perform a thorough check every few months.
Yes, it can be adapted for other heavy materials, provided the dimensions and weight are considered.
Padding is crucial to prevent scratches and damage to the granite during transportation.
Ensure compliance with local transportation regulations, especially regarding weight and securement of the load.

