
Introduction
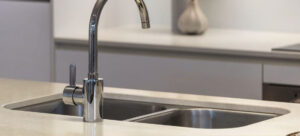
Marble backsplashes can add a touch of elegance and sophistication to your kitchen or bathroom. However, installing one can be a daunting task, especially when it comes to cutting the marble to fit perfectly. In this comprehensive guide, we will walk you through the process of cutting a marble backsplash like a pro. Whether you’re a seasoned DIY enthusiast or a beginner, these steps will help you achieve a flawless result.
Tools and Materials You’ll Need
Before we delve into the cutting process, let’s gather the essential tools and materials required:
Tools:
- Tile Cutter: A manual or electric tile cutter will be your primary tool for cutting marble tiles.
- Safety Gear: Safety glasses, gloves, and a dust mask to protect yourself during the cutting process.
- Marker: To mark the areas where you need to make cuts.
- Measuring Tape: For precise measurements.
- Wet Saw: A wet saw with a diamond blade is essential for cutting marble accurately.
- Clamps: To secure the marble piece in place while cutting.
- Goggles: Additional eye protection if you’re using a wet saw.
Materials:
- Marble Tiles: Ensure you have enough marble tiles for your backsplash project.
- Water: Needed for cooling the wet saw blade and minimizing dust.
- Tile Spacers: To maintain even spacing between tiles.
- Adhesive: Thin-set mortar or adhesive to attach the tiles to the wall.
Step-by-Step Guide
Step 1: Safety First
Wear your safety gear, including safety glasses, gloves, and a dust mask. Marble dust can be harmful when inhaled, so it’s crucial to protect yourself.
Step 2: Measure and Mark
Measure the area where you’ll install the marble backsplash and mark the tiles accordingly. Use a pencil or marker to make precise marks for your cuts.
Step 3: Prepare the Wet Saw
Fill the wet saw’s reservoir with water to keep the blade cool and minimize dust. Adjust the blade depth to match the thickness of your marble tiles.
Step 4: Cutting
Place the marble tile on the wet saw’s platform, aligning it with your marks. Hold the tile securely with clamps, if needed, and gently push it through the saw. Allow the saw to do the work; avoid applying excessive pressure.
Step 5: Bevel Edges (Optional)
If you want beveled edges on your marble tiles, you can use a beveling machine or a grinding wheel to achieve the desired look.
Step 6: Dry Fit
Before applying adhesive, dry fit your marble tiles on the wall to ensure they align correctly and make any necessary adjustments.
Step 7: Apply Adhesive
Spread thin-set mortar or adhesive on the wall using a notched trowel, then press the marble tiles into place. Use tile spacers to maintain consistent spacing between tiles.
Step 8: Grout
Allow the adhesive to set for the recommended time, and then apply grout between the tiles. Wipe off excess grout with a damp sponge.
Step 9: Clean Up
Clean your tools and the work area promptly. Dispose of any marble dust and waste materials properly.
Additional Tips for Success
Choose the Right Marble

Selecting the right type of marble is crucial. Some varieties are harder and more challenging to cut than others. If you’re new to cutting marble, consider starting with a softer marble variety to gain experience before tackling harder ones.
Practice Your Technique
Before you begin cutting your actual backsplash tiles, practice on spare pieces of marble to get a feel for the tools and techniques. This practice will help you refine your cutting skills and reduce the chances of errors.
Use Water Appropriately
When using a wet saw, ensure that the water flow is consistent over the blade. This not only cools the blade but also minimizes dust and friction, resulting in cleaner cuts.
Plan Your Cuts
Plan your cuts strategically to minimize waste. Measure and mark your marble tiles carefully to ensure you get the most out of each piece.
Invest in Quality Tools
Investing in high-quality tools, especially a good wet saw with a diamond blade, will make a significant difference in the ease and precision of your cuts. Quality tools last longer and produce cleaner edges.
Seek Professional Help If Necessary
If you’re working on a complex backsplash design or have limited experience, don’t hesitate to consult or hire a professional marble cutter or tile installer. They can provide guidance, ensure precise cuts, and save you time and potential frustration.
Maintenance Is Key
After completing your marble backsplash, regularly clean and maintain it to preserve its beauty. Use a marble-specific cleaner and avoid abrasive or acidic substances that can damage the surface.
Be Patient
Cutting marble requires patience and attention to detail. Rushing through the process can lead to mistakes and costly errors. Take your time, and the results will be worth it.
Conclusion
Cutting marble backsplash tiles requires patience, precision, and the right tools. By following this step-by-step guide, you can achieve a beautiful and professionally cut marble backsplash that enhances the aesthetics of your kitchen or bathroom. Remember to prioritize safety throughout the process, and take your time to ensure a perfect result.
FAQs
While a regular tile cutter may work for thinner marble tiles, it’s best to use a wet saw with a diamond blade for thicker marble.
No, but it’s essential to familiarize yourself with the tools and practice on scrap pieces before attempting the actual installation.
Ensure your wet saw blade is sharp and cuts slowly. You can also use masking tape on the cut line to minimize chipping.
Cutting curved or intricate shapes in marble is possible but may require advanced tools and skills. Consider consulting a professional for such designs.
If you make a mistake, it’s best to have extra tiles on hand for replacements. Mistakes are common, especially for beginners, so don’t be discouraged.

