In this article, we will explore the common issue of gaps under exterior door thresholds and provide you with a step-by-step guide on how to effectively fill them. A gap under your door threshold not only allows drafts, pests, and moisture to enter your home but can also lead to energy inefficiency and potential structural damage if left unattended. We’ll discuss various methods and materials to help you seal this gap and ensure a more comfortable and energy-efficient living space.
Understanding the Issue
Before we dive into the solutions, it’s essential to understand why gaps under exterior door thresholds occur. These gaps can develop over time due to factors such as settling of your home’s foundation, wear and tear, or improper installation of the door itself. Regardless of the cause, addressing this issue promptly is crucial to maintain the integrity of your home.
Tools and Materials You’ll Need
Before you start filling the gap under your exterior door threshold, gather the necessary tools and materials:
Tools:
- Tape measure: A tape measure will help you accurately measure the width and depth of the gap.
- Screwdriver: You’ll need a screwdriver for removing old weatherstripping or sealant from the gap.
- Utility knife: A utility knife is useful for precise cutting and removing any existing materials from the gap.
- Caulking gun: A caulking gun is essential for applying silicone caulk, ensuring a clean and controlled seal.
- Hammer: You may need a hammer for securing any loose or damaged parts of the threshold.
- Chisel: A chisel can be used to clean out debris, dirt, or old sealant from the gap, ensuring a clean and even surface.
Materials:
- Weatherstripping: Weatherstripping is crucial for creating a tight seal in the gap. Measure and cut it to fit the gap’s dimensions precisely.
- Expanding foam insulation: Use expanding foam insulation for larger gaps. It expands and hardens to effectively fill the space.
- Silicone caulk: Silicone caulk provides excellent weather resistance and durability, making it an ideal choice for sealing gaps.
- Threshold sealant: If your threshold is wooden, consider using a specialized threshold sealant to protect against rot and decay.
- Wood filler: If your wooden threshold has gaps or cracks, wood filler can be used to repair and reinforce it.
Step-by-Step Guide
Now, let’s walk through the process of filling the gap under your exterior door threshold:
Step 1: Measure the Gap
- Before you can effectively fill the gap under your exterior door threshold, it’s crucial to accurately measure its dimensions. This step ensures that you select the right materials and apply them correctly to seal the gap properly. Follow these steps to measure the gap:
- Prepare Your Tools: To measure the gap, you will need a tape measure. Ensure that it’s in good working condition and extended to its full length.
- Locate the Gap: Identify the specific area where the gap exists under your exterior door threshold. Ensure that the area is clear of any debris or obstructions.
- Measure the Width: Extend the tape measure across the width of the gap. Start from one side and measure to the opposite side. Take note of the measurement in inches or centimeters, depending on your preference.
- Measure the Depth: With the tape measure still in place, measure the depth of the gap from the bottom of the threshold to the floor or the ground beneath it. Record this measurement as well.
- Record the Measurements: Write down both the width and depth measurements in a notebook or on a piece of paper. Having these measurements handy will help you choose the appropriate materials and ensure a snug fit when sealing the gap.
Step 2: Remove Old Weatherstripping
- If there is old weatherstripping or sealant in the gap, carefully remove it using a screwdriver and utility knife.
Step 3: Clean the Gap
- Use a chisel or scraper to clean out any debris, dirt, or old sealant from the gap. A clean surface will ensure a better seal.
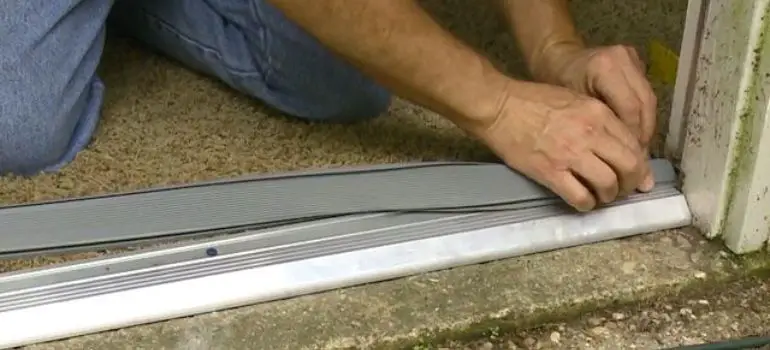
Step 4: Apply Weatherstripping
- If your exterior door threshold has old or damaged weatherstripping, it’s essential to remove it before proceeding with the gap-filling process. Old weatherstripping can prevent a proper seal and hinder the effectiveness of your repairs. Follow these steps to safely and effectively remove old weatherstripping:
- Gather Your Tools: For this task, you’ll need a screwdriver and a utility knife. Ensure that both tools are in good working condition.
- Identify the Weatherstripping: Examine the threshold area to locate the old weatherstripping. It is usually positioned along the edges of the threshold where the door makes contact.
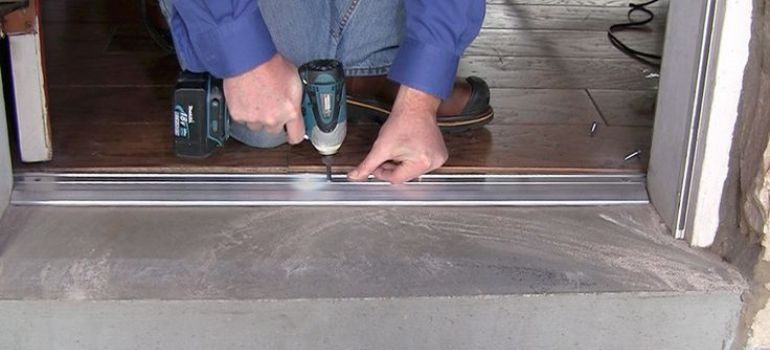
- Remove Screws (if applicable): In some cases, weatherstripping may be secured with screws. Use a screwdriver to carefully remove any screws holding the weatherstripping in place. Keep the screws in a safe location as you may need them later.
- Begin Peeling: Starting from one end of the weatherstripping, gently peel it away from the threshold. Use your fingers to loosen the weatherstripping from the surface.
- Utilize the Utility Knife: If the weatherstripping is particularly stubborn or adhesive, you can use a utility knife to carefully cut it away from the threshold. Exercise caution to avoid damaging the threshold’s surface or injuring yourself.
- Remove All Residue: After removing the weatherstripping, inspect the threshold to ensure that no residue or adhesive remains. If any adhesive is left behind, you can use a mild adhesive remover or rubbing alcohol to clean the surface thoroughly. Allow it to dry before proceeding.
- Dispose of Old Weatherstripping: Properly dispose of the old weatherstripping according to your local waste disposal regulations.
Step 5: Use Expanding Foam Insulation
- If the gap is too large, consider using expanding foam insulation. Fill the gap with foam, allowing it to expand and harden.
Step 6: Seal with Silicone Caulk
- After applying weatherstripping to seal the bottom of your exterior door threshold, the next step is to use silicone caulk to create an additional barrier against drafts, moisture, and pests. Follow these steps to effectively seal the threshold with silicone caulk:
- Prepare the Caulk Gun: Load a tube of silicone caulk into a caulk gun. Cut the tip of the caulk tube at a 45-degree angle to create a small opening. Ensure the caulk gun is ready for use.
- Clean the Surface: Before applying the silicone caulk, ensure that the threshold surface is clean and free from debris, dust, or any remaining residue. Use a brush or rag to clean the area thoroughly.
- Start Caulking: Begin applying the silicone caulk along the edges of the threshold where the weatherstripping meets the threshold. Apply a continuous, even bead of caulk along the entire length of the threshold.
- Smooth the Caulk: After applying the caulk, use a caulk smoothing tool, a wet finger, or a damp cloth to smooth the caulk bead. This step helps ensure a neat and even seal and removes any excess caulk.
- Check for Gaps: Inspect the threshold closely to make sure there are no gaps or breaks in the caulk seal. Pay particular attention to corners and edges, as these areas are prone to gaps.
- Allow to Dry: Allow the silicone caulk to dry according to the manufacturer’s instructions. This typically takes a few hours to set completely.
- Test the Door: Once the caulk is dry, test the exterior door by opening and closing it to ensure that the caulk does not interfere with the door’s operation.
- Clean Up: Clean any excess caulk from your hands, tools, or surfaces using a damp cloth. Be sure to dispose of any used caulk tubes and materials properly.
Step 7: Threshold Sealant
- For wooden thresholds, consider applying a specialized threshold sealant to protect against rot and decay.
Step 8: Wood Filler (If Necessary)
- If your threshold is made of wood and has gaps or cracks, use wood filler to repair and reinforce it.
Step 9: Test the Door
- After you’ve applied weatherstripping and sealed the threshold with silicone caulk, it’s crucial to test the exterior door to ensure that your efforts have not affected its operation. Proper sealing should not interfere with the door’s ability to open and close smoothly. Follow these steps to test the door:
- Close the Door: Start by closing the exterior door gently but firmly. Ensure that it latches securely without any obstructions or resistance.
- Check for Gaps: While the door is closed, inspect the entire perimeter of the door frame, especially where it meets the threshold. Look for any visible gaps or spaces between the door and the frame.
- Listen for Air Leaks: Stand on the inside of your home near the closed door. Pay attention for any whistling sounds or drafts that may indicate air leaks. These are signs that your sealing efforts might need adjustments.
- Inspect the Threshold: Examine the area where the bottom of the door contacts the threshold. Ensure that the weatherstripping and caulk do not interfere with the door’s proper closure.
- Open and Close the Door: Repeatedly open and close the door to confirm that it moves smoothly without any hesitation or obstruction. It should operate as it did before you applied the weatherstripping and caulk.
- Test the Latch: Verify that the door latch engages and disengages without difficulty. Ensure that it securely holds the door in place when closed.
- Check for Light: On a sunny day, turn off the interior lights and inspect the door frame for any visible light coming through gaps. This can help identify any areas that might need additional sealing.
- Make Adjustments if Necessary: If you encounter any issues during the testing process, such as difficulty in closing or gaps, you may need to make adjustments to the weatherstripping or caulk to ensure a proper seal. Trim any excess materials or reapply caulk as needed.
Maintenance Tips for Long-Term Door Threshold Care
Now that you’ve successfully filled the gap under your exterior door threshold, it’s essential to maintain it for the long term. Here are some maintenance tips to ensure your threshold remains in optimal condition:
Regular Cleaning:
- Clean your threshold regularly to remove dirt, debris, and any accumulated moisture. A clean threshold not only looks better but also prevents the growth of mold and mildew.
Inspection:
- Perform periodic inspections to check for any signs of wear and tear. Look for cracks, gaps, or damage to the weatherstripping, caulk, or sealant. Address any issues promptly to prevent further damage.
Reapplication of Caulk:
- Over time, caulk can deteriorate due to exposure to the elements. If you notice that the caulk is cracking or peeling, it’s advisable to reapply a fresh bead of silicone caulk to maintain an effective seal.
Weatherstripping Replacement:
- Weatherstripping can wear out over time, losing its effectiveness. If you notice drafts or air leakage, consider replacing the weatherstripping to ensure a tight seal.
Threshold Sealant Renewal:
- Wooden thresholds benefit from periodic renewal of specialized threshold sealants. This helps protect the wood from moisture, preventing rot and decay.
Lubrication:
- If your door threshold has moving parts, such as a door sweep or hinges, apply lubricant as needed to ensure smooth operation.
Seasonal Adjustment:
- Door thresholds may expand or contract with temperature fluctuations. Make seasonal adjustments to ensure the door closes properly without any gaps.
Common Mistakes to Avoid
While maintaining your exterior door threshold, be mindful of these common mistakes:
Neglecting Maintenance:
- Ignoring regular maintenance can lead to more extensive and costly repairs in the long run.
Using Incorrect Materials:
- Using the wrong type of caulk or sealant may not provide adequate protection against the elements.
Overlooking Wooden Thresholds:
- Wooden thresholds require specific care to prevent decay, so don’t forget to apply threshold sealant as needed.
Incorrect Installation:
- Improper installation of weatherstripping or sealant can lead to gaps and inefficiencies.
Forgetting Seasonal Adjustments:
- Failing to adjust the threshold for seasonal changes can result in drafts and gaps.
By following these maintenance tips and avoiding common mistakes, you can ensure that your exterior door threshold remains in excellent condition, providing effective protection against drafts, moisture, and pests for years to come.
Remember that proper maintenance not only enhances the comfort and energy efficiency of your home but also extends the lifespan of your exterior door threshold. Regular care is an investment in the long-term health of your home’s infrastructure.
Conclusion
Filling the gap under your exterior door threshold is a crucial maintenance task that can improve your home’s energy efficiency and comfort while preventing potential damage. By following the steps outlined in this guide and using the right tools and materials, you can effectively seal the gap and enjoy a more secure and energy-efficient living space.
FAQs
Yes, filling the gap is essential to prevent drafts, pests, and moisture from entering your home, and to maintain energy efficiency.
It’s best to use silicone caulk for sealing the gap, as it provides excellent weather resistance and durability.
Check the gap annually and refill it if you notice any deterioration or gaps forming.
Expanding foam insulation is suitable for larger gaps. For smaller gaps, weatherstripping may be sufficient.
Wooden thresholds require periodic sealing with specialized threshold sealants to prevent rot and decay.

