
Introduction
Have you ever faced the challenge of removing a drawer front that’s been firmly glued in place? Whether you’re refurbishing an old piece of furniture or dealing with a repair, understanding how to tackle this task can save you time and frustration.
Tools and Materials Needed
To successfully remove glued drawer fronts, having the right tools and materials is essential. Here’s a list of what you’ll need:
- Putty Knife: A thin, flexible blade to gently pry the drawer front away from the body.
- Heat Gun or Hairdryer: For softening the adhesive without damaging the wood.
- Protective Gloves: To protect your hands from heat and any chemical adhesive removers.
- Adhesive Remover: To dissolve or weaken the glue, especially if it’s a strong adhesive like epoxy.
- Clean Cloth or Rag: For wiping away any residue or cleaning the surfaces after removal.
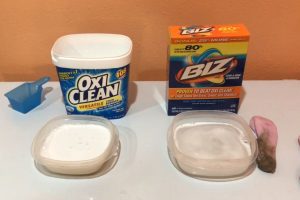
- Mild Solvent (optional): If the glue is particularly stubborn, a mild solvent might be necessary. Always use it in a well-ventilated area.
- Clamps (for reattachment): To hold the drawer front in place while the new adhesive sets.
- Sandpaper: To smooth any rough edges or surfaces post-removal.
- Wood Filler (if needed): To fill in any gouges or chips in the wood.
- Protective Eyewear: To safeguard your eyes from any particles or chemical splashes.
- Paint or Varnish (for finishing touches): If you plan to refinish the drawer front after reattaching it.
- Appropriate Adhesive (for reattachment): Depending on the material of the drawer front, select a suitable adhesive for reattachment.
- Drop Cloth or Newspaper: To protect your working area from spills and drips.
- Utility Knife or Scoring Tool: To score the adhesive gently, making it easier to separate the drawer front.
Preparing Your Workspace
Safety first! Ensure your work area is well-ventilated and free from clutter. Lay down some protective covering to catch any debris or spills.
Understanding the Type of Glue Used
Knowing what kind of glue you’re dealing with is crucial. Is it a water-based adhesive or something stronger like epoxy? This knowledge will guide your removal strategy.
Step-by-Step Removal Process
Removing glued drawer fronts requires patience and careful handling to avoid damaging the furniture. Here’s a step-by-step guide to help you through the process:
- Safety Precautions: Begin by wearing protective gloves and eyewear. Ensure your workspace is well-ventilated, especially if you’re using solvents or a heat gun.
- Initial Assessment: Examine the drawer front to understand how firmly it’s attached. Gently try moving it to gauge the strength of the adhesive bond.
- Applying Heat: Use a heat gun or hairdryer to warm up the adhesive. Start with a low setting and gradually increase the heat. Be careful not to overheat, as this can damage the wood.
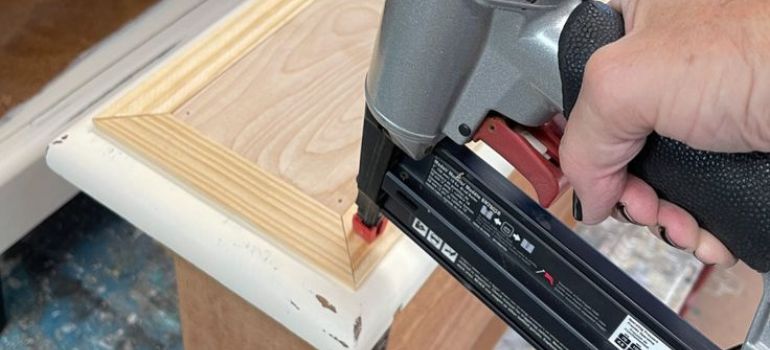
- Inserting the Putty Knife: Once the glue softens, gently insert a putty knife or a similar tool at the edge of the drawer front. Work slowly and cautiously to avoid chipping or cracking the wood.
- Prying the Drawer Front Off: Use the putty knife to pry the drawer front away from the drawer body. Apply steady pressure and leverage, moving along the edges. If the drawer front doesn’t budge, apply more heat and try again.
- Dealing with Stubborn Glue: If some areas are particularly resistant, you may need to apply a mild solvent or adhesive remover. Apply it sparingly and allow it to penetrate the glue before attempting to pry the drawer front again.
- Removing the Entire Drawer Front: Continue working around the edges until the entire front is free. Take your time and maintain steady pressure to avoid sudden movements that could break the wood.
- Cleaning Up Residue: Once the drawer front is off, use a clean cloth and mild solvent (if necessary) to remove any remaining adhesive from both the drawer front and the body. Sand down any rough areas gently.
- Evaluating the Drawer Front: Check the drawer front and the body for any damage. If you plan to reattach the same front, ensure it is clean, dry, and smooth.
- Preparing for Reattachment or Replacement: If reattaching the same drawer front, ensure that both surfaces are prepared properly. If you’re replacing the front, measure and cut the new front to fit, and prepare it for installation.
Tips for Minimizing Damage
Patience is key here. Rushing can lead to damage. If the glue is stubborn, reapply heat and try again slowly.
Cleaning and Preparing the Surface for Reattachment
After successfully removing the glued drawer front, it’s crucial to clean and prepare both the drawer front and the body of the drawer for reattachment. This process ensures a smooth, secure fit when you reinstall the drawer front. Here’s how to do it:
- Remove Adhesive Residue: Start by scraping off any remaining adhesive from both the drawer front and the body. You can use a putty knife or a plastic scraper. Be gentle to avoid scratching the wood.
- Clean the Surfaces: Once the bulk of the glue is removed, clean both surfaces with a mild solvent or adhesive remover. Apply it with a clean cloth, and wipe away the glue residue. Be sure to use a solvent that is safe for the type of wood and finish of your drawer.
- Sanding the Surfaces: After the chemical remover has done its job, use fine-grit sandpaper to sand both surfaces lightly. This step will smooth out any rough spots and ensure a clean, flat surface for reattachment. Be careful not to sand too aggressively, as you don’t want to remove too much material or damage the finish.
- Wiping Down: After sanding, use a damp cloth to wipe down both surfaces. This removes any dust or particles resulting from sanding. Allow the surfaces to dry completely before proceeding.
- Checking for Damage: Inspect both the drawer front and the drawer body for any cracks, chips, or other damage. If you find any, now is the time to make repairs. Use wood filler for minor repairs, and allow it to dry according to the manufacturer’s instructions.
- Final Preparations: If you’re going to repaint or refinish the drawer front, do it before reattaching it. Apply paint or varnish as desired and allow it to dry thoroughly.
- Test Fitting: Before applying any adhesive, do a test fit to make sure the drawer front aligns correctly with the drawer body. Adjust as necessary to ensure a proper fit.
Choosing the Right Replacement or Repair Methods
If you’re replacing the drawer front, consider the style and material of the original piece. This ensures a seamless look.
Reattaching the Drawer Fronts
When reattaching, choose an adhesive that’s suitable for the material. Apply it evenly and clamp the drawer front in place until it’s secure.
Finishing Touches
Check for any misalignments and make adjustments as needed. You might also want to add a fresh coat of paint or varnish for a finished look.
Maintenance Tips
Regular checks and gentle cleaning can keep your drawers in top condition. Avoid using harsh chemicals that can weaken the adhesive.
Common Mistakes to Avoid
Removing glued drawer fronts can be a delicate task, and there are several common pitfalls that you should be aware of to ensure a successful and damage-free process. Here are some key mistakes to avoid:
- Applying Excessive Force: One of the biggest mistakes is using too much force when trying to pry off the drawer front. This can lead to cracking or breaking the wood. Always start gently and increase pressure gradually.
- Overheating the Wood: Using a heat gun or hairdryer can be effective in softening the adhesive, but too much heat can damage the wood, causing discoloration or warping. Use the lowest effective heat setting and keep the heat source moving to avoid concentrating heat in one spot.
- Not Wearing Protective Gear: Skipping safety equipment like gloves and goggles can lead to injuries, especially when working with sharp tools or chemicals. Always protect your hands and eyes.
- Ignoring the Type of Adhesive: Different adhesives require different removal techniques. For instance, water-based glues can be softened with moisture, while stronger adhesives might need a solvent. Not tailoring your approach to the type of glue can make the job harder and potentially damage the drawer.
- Neglecting Surface Preparation: Failing to properly clean and prepare the surfaces for reattachment can result in a weak bond or uneven alignment. Make sure all old adhesive is removed and the surfaces are clean and smooth.
- Rushing the Process: Trying to speed through the removal can lead to mistakes and damage. Take your time, especially when applying heat or solvents to soften the glue.
- Using Inappropriate Tools: Utilizing the wrong tools, like a metal hammer or a screwdriver, instead of a putty knife, can gouge or scratch the wood. Use tools that are appropriate for delicate prying and scraping tasks.
- Not Testing Chemicals on a Small Area First: When using solvents or adhesive removers, always test them on a small, inconspicuous area first. Some chemicals can react with the wood finish or the wood itself.
- Skipping the Test Fit Before Reattachment: Not doing a dry fit before applying adhesive for reattachment can lead to misalignment. Always ensure the drawer front fits properly before securing it in place.
- Ignoring Damages During Removal: If any damage occurs during the removal process, address it immediately. Small cracks or chips can be filled and sanded, but larger issues might require more extensive repairs.
Alternative Methods
There are other methods like using solvents, but these should be approached with caution and proper knowledge.
Professional Help
If you’re not confident in your DIY skills, it might be time to call in a professional. They can ensure the job is done safely and effectively.
Conclusion
Removing glued drawer fronts might seem daunting, but with the right tools and a bit of patience, it’s definitely achievable. Remember to work slowly, be mindful of the materials you’re dealing with, and don’t hesitate to seek professional help if needed.
FAQs
Using a heat gun or hairdryer can effectively soften most types of glue.
Yes, if it’s in good condition and you clean it properly before reattaching.
Small damages can be filled with wood filler and sanded smooth. For major damage, consulting a professional might be best.
It depends on the adhesive used, but generally, 24-48 hours is a good rule of thumb.
It depends on the extent of the damage and the cost of a replacement. Sometimes repair is more cost-effective.

