Introduction
Crown molding, also known as cornice molding, is a decorative element that is installed at the intersection of the wall and ceiling. It has been used for centuries to enhance the visual appeal of rooms and create a polished, finished look. One of the essential aspects to consider when installing crown molding is how far it should stick out from the wall and ceiling.
Understanding Crown Molding
What is Crown Molding?
Crown molding is a type of architectural trim that adds a touch of elegance to interior spaces. It can be made from various materials, including wood, plaster, and MDF (medium-density fiberboard). Crown molding serves both functional and aesthetic purposes, as it helps conceal gaps and imperfections at the junction of the wall and ceiling while also providing a decorative flair.
Historical Significance
The use of crown molding dates back to ancient Greece and Rome, where it was employed in the construction of temples and palaces. Over time, it has evolved in style and materials, but its fundamental purpose of enhancing interior spaces has remained constant.
Determining Crown Molding Projection
Standard Projections
The standard projection for crown molding typically ranges from 2 to 6 inches. This measurement refers to how far the molding extends from the wall to the outermost point of its profile. The choice of projection depends on various factors, including the room’s size and architectural style.
Custom Projections
In some cases, you may want a custom projection for your crown molding. Custom projections allow you to achieve a specific aesthetic or architectural look that complements your interior design. Customization offers endless possibilities, but it’s essential to work with experienced professionals to ensure precise measurements and installation.
Choosing the Right Size
Room Proportions
When it comes to installing crown molding, one crucial factor to consider is the proportions of the room. The size and dimensions of your room will play a significant role in determining the ideal size and style of crown molding to use. Here’s a closer look at how room proportions can influence your crown molding choices:
1. Ceiling Height
The height of your room’s ceiling is a fundamental consideration. Taller ceilings can accommodate more substantial and ornate crown moldings, which can add a touch of grandeur to the space. On the other hand, rooms with lower ceilings may benefit from smaller, less intricate crown moldings to avoid overwhelming the visual aspect of the room.
2. Room Size
The overall size of the room matters as well. Larger rooms can handle wider crown moldings with more complex profiles. These moldings can create a sense of opulence and elegance, making them an excellent choice for spacious living areas or dining rooms. Smaller rooms, such as bedrooms or bathrooms, may call for narrower and simpler crown moldings to maintain proportionality.
3. Architectural Style
Consider the architectural style of your home and the individual rooms within it. Traditional homes with classic design elements often pair well with more elaborate and decorative crown moldings. In contrast, modern or minimalist interiors may opt for sleek, understated crown moldings that align with the overall aesthetic.
4. Wall Space
Take note of the amount of available wall space in the room. If your walls are filled with large windows, doors, or built-in shelving, you may have limited space for crown molding. In such cases, choose a molding size and style that complements the existing elements without overcrowding the room.
5. Visual Balance
Achieving visual balance is essential when selecting crown molding. The molding should enhance the room’s overall appearance without overpowering or diminishing other design elements. Balance can be achieved by carefully choosing the size, profile, and projection of the crown molding in relation to the room’s proportions.
In conclusion, understanding the proportions of your room is essential when choosing the right crown molding. Consider the ceiling height, room size, architectural style, available wall space, and the need for visual balance to make an informed decision. By doing so, you can ensure that the crown molding not only adds elegance but also harmonizes with the unique characteristics of your space.
Aesthetic Considerations
When selecting crown molding for your space, it’s essential to take into account the aesthetics of your room and how the molding can contribute to the overall design. Here are some key aesthetic considerations to keep in mind:
1. Room Style
Consider the style of the room you’re working on. Different crown molding styles can evoke various design aesthetics.
- Traditional: If you have a classic, traditional room with ornate furniture and rich colors, traditional crown molding with intricate patterns and details can complement the overall look beautifully.
- Modern: For contemporary and minimalist spaces, sleek and simple crown moldings with clean lines are often preferred. They add a touch of sophistication without overwhelming the room’s minimalist design.
2. Color and Finish
The color and finish of your crown molding should harmonize with the room’s color palette and decor. You have several options:
- Painted: Most crown moldings are painted to match the room’s trim or wall color. This creates a cohesive and seamless look.
- Stained: If you have wooden crown molding, staining it can bring out the natural grain of the wood and add warmth to the room.
- Contrasting: In some cases, using a crown molding color or finish that contrasts with the walls or ceiling can create a striking focal point.
3. Size and Proportion
The size of your crown molding should be proportional to the room. Consider the height of the ceiling and the available wall space.
- Large Rooms: In larger rooms, you can opt for wider and more ornate crown moldings that make a bold statement.
- Small Rooms: Smaller rooms benefit from narrower moldings that provide a decorative touch without overwhelming the space.
4. Ceiling Height Illusion
Crown molding can be used strategically to create the illusion of higher ceilings. Installing the molding slightly below the ceiling line and painting it the same color as the ceiling can visually extend the height of the room.
5. Overall Cohesion
Ensure that the chosen crown molding complements the other architectural elements in the room. It should work harmoniously with baseboards, door casings, and any other trim elements to create a cohesive and unified look.
6. Personal Preference
Ultimately, your personal preference plays a significant role in selecting crown molding. Choose a style and design that resonates with your taste and enhances your enjoyment of the space. Your home should reflect your unique style and personality.
Installation Tips
Tools and Materials
Tools:
- Miter Saw: A miter saw is the most crucial tool for cutting crown molding at precise angles. It allows for clean and accurate cuts, ensuring that the molding fits together seamlessly at corners.
- Nail Gun: A nail gun is used to secure the crown molding in place quickly and securely. It saves time compared to using a hammer and nails and ensures a firm attachment to the wall and ceiling.
- Level: A level helps ensure that the crown molding is installed straight and level. It’s essential for achieving a polished and professional look.
- Measuring Tape: Accurate measurements are crucial when cutting and placing crown molding. A measuring tape allows you to determine the precise lengths needed for each section.
- Coping Saw: A coping saw is handy for making intricate cuts, especially for inside corners. It allows you to create precise joints that fit snugly with adjacent pieces of molding.
- Caulk Gun: Caulk is used to fill gaps and seams between the molding and the wall or ceiling. A caulk gun helps you apply caulk smoothly and evenly.
- Sandpaper: Sandpaper is essential for smoothing out any rough edges or imperfections on the crown molding, ensuring a clean and polished finish.
- Safety Gear: Don’t forget to wear safety gear, including safety glasses and ear protection, when using power tools like a miter saw or nail gun.
Materials:
- Crown Molding: The crown molding itself is, of course, the primary material. You can choose from various materials like wood, plaster, or medium-density fiberboard (MDF), depending on your preferences and budget.
- Adhesive: A strong construction adhesive is used to adhere the crown molding to the wall and ceiling. Make sure to choose an adhesive suitable for your chosen molding material.
- Nails: You’ll need nails to secure the crown molding to the wall and ceiling after applying adhesive. Use finish nails that are long enough to provide a secure hold but not so long that they penetrate through the molding.
- Caulk: Caulk is used to fill any gaps or seams between the molding and the wall or ceiling. Choose a paintable caulk that matches your paint or stain color.
- Primer and Paint or Stain: If your crown molding is unfinished or if you’re making repairs, you’ll need primer and paint or stain to finish the molding to your desired color.
- Painter’s Tape: Painter’s tape can help protect adjacent surfaces and ensure clean paint lines when finishing the molding.
- Drop Cloth: Lay down a drop cloth to protect your floor and furniture from dust, paint, or caulk drips during the installation process.
Step-by-Step Installation Process
- Measure the room and determine the length of molding needed.
- Cut the molding at the appropriate angles using a miter saw.
- Apply adhesive to the back of the molding and press it against the wall and ceiling.
- Secure the molding in place with nails, ensuring it aligns perfectly with the corners.
- Fill any gaps or seams with caulk and sand the molding for a smooth finish.
- Paint or stain the molding to your desired color.
Common Mistakes to Avoid
While installing crown molding can be a DIY project, there are common mistakes to watch out for, such as improper measurements, uneven cuts, and inadequate adhesion. It’s advisable to seek professional assistance if you’re unsure about the process.
Crown Molding Styles
Traditional vs. Modern
Crown molding styles can vary significantly. Traditional crown moldings often feature intricate patterns and elaborate details, while modern styles are more streamlined and minimalist. Choose a style that complements your home’s architecture and design.
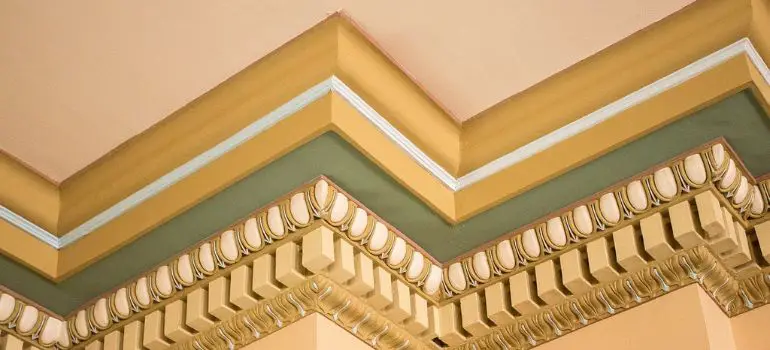
Different Profile Options
Crown moldings come in various profiles, including cove, dentil, and egg-and-dart. Each profile offers a unique look and can contribute to the overall ambiance of your space. Explore different options to find the one that suits your taste.
Benefits of Crown Molding
Aesthetic Enhancement
Crown molding adds a touch of sophistication to any room, creating a finished and polished appearance. It can also visually elevate the height of ceilings, making rooms appear more spacious.
Value Addition
Investing in crown molding can increase the value of your home. Potential buyers often appreciate the attention to detail and craftsmanship that crown molding brings to a property.
Maintenance and Care
Crown molding requires minimal maintenance. Regular dusting and occasional touch-ups with paint or caulk can keep it looking pristine. Ensure that it is well-protected from moisture to prevent any damage.
FAQs
- What is the purpose of crown molding? Crown molding serves both functional and aesthetic purposes. It conceals gaps and imperfections at the wall-ceiling junction while adding a decorative touch.
- Can I install crown molding by myself? While it is possible to install crown molding as a DIY project, it requires precision and skill. Professional installation may yield better results.
- Are there any alternatives to crown molding? Yes, alternatives include baseboards, chair rails, and wainscoting, each serving different design and functional purposes.
- How do I choose the right crown molding profile? Consider your home’s style and your personal preference. Traditional or modern profiles can enhance the overall look of your space.
- What are the different materials used for crown molding? Common materials include wood, plaster, and MDF, each with its own unique characteristics and price points.
Conclusion
Crown molding can significantly enhance the aesthetics and value of your home. By understanding the various aspects, including projection, size, styles, and installation tips, you can make informed decisions when adding this elegant architectural feature to your space. Get started on transforming your rooms with the timeless beauty of crown molding.


