
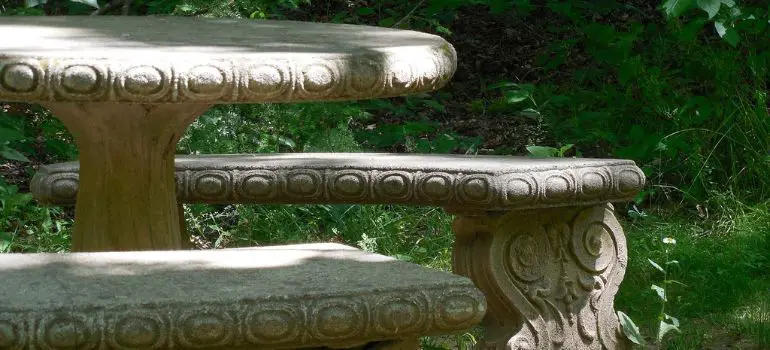
Understanding the Importance of Curved Concrete Forms
Curved concrete forms add aesthetic appeal to architectural designs. They can be used for creating decorative elements, such as curved walls, arches, or curvilinear pathways. Understanding why you need curved forms is the first step in the process.
Gathering the Necessary Tools and Materials
Before you start your project to create curved concrete forms, it’s essential to have all the required tools and materials ready. Being well-prepared will save you time and ensure a smoother construction process. Here’s a list of what you’ll need:
Tools:
- Measuring Tape: To accurately measure dimensions for your curved form.
- Circular Saw: For cutting plywood or lumber to build the formwork.
- Drill and Screws: To fasten the formwork pieces securely.
- Clamps: These are handy for holding curved formwork components in place while assembling.
- Hammer and Nails: For additional reinforcement and stability.
- Screwdriver: To adjust and tighten screws.
- Level and Square: Ensures that your formwork is straight and level.
- Utility Knife: Useful for trimming excess formwork materials.
- Wheelbarrow or Concrete Mixer: For mixing and transporting concrete.
- Concrete Floats and Trowels: To shape and finish the concrete surface.
- Safety Gear: This includes gloves, safety glasses, ear protection, and a dust mask to keep you safe during construction.
Materials:
- Plywood or Lumber: These will be used to create the formwork for your curved concrete. Plywood is a popular choice due to its flexibility.
- Reinforcement Materials: Depending on the size and load-bearing requirements of your project, you may need rebar or wire mesh to reinforce the concrete.
- Concrete Mix: Choose the right type of concrete mix for your project. High-slump concrete is often preferred for curved forms as it flows easily.
- Release Agent: This helps prevent the concrete from sticking to the formwork, making demolding easier.
- Wooden Stakes: These are used to support and anchor the formwork in place.
- Plastic Sheeting or Moisture Barrier: To protect the ground underneath the formwork from moisture.
- Concrete Sealer: Optional but recommended to enhance the concrete’s durability and appearance.
- Curing Compound: Helps in the proper curing of the concrete, preventing cracks and ensuring strength.
- Sandpaper or Grinding Tools: For smoothing and finishing the concrete surface after demolding.
- Paint or Stain (optional): If you want to add color or a specific finish to your curved concrete forms.
Planning Your Curved Form
Proper planning is crucial to ensure the accuracy of your curved concrete form. Carefully sketch out your design, taking into account the dimensions and curves you want to achieve.
Building the Formwork
Formwork is the backbone of your project. This section will guide you through the process of creating a sturdy and flexible formwork that will hold the shape of your curve.
Reinforcing the Formwork
Adding reinforcement to your formwork is essential for structural integrity. Learn how to incorporate rebar or wire mesh into your form to enhance the concrete’s strength.
Mixing and Pouring Concrete
The concrete mix is the heart of your project. Discover the right proportions and mixing techniques to ensure the concrete is suitable for your curved form.
Shaping the Curved Surface
Shaping the curved surface of your concrete form is a crucial step in achieving the desired look and finish for your project. Here’s a step-by-step guide on how to shape the curved surface effectively:
Gather Your Tools:
Before you begin, ensure you have the necessary tools and safety equipment ready:
- Concrete floats (both bull floats and hand floats)
- Concrete trowels (both finishing and edging trowels)
- Rubber gloves
- Safety glasses
- Dust mask
Prepare the Surface:
Make sure the surface of the freshly poured concrete is firm but still workable. If it has become too hard, you may need to use a concrete wetting agent to soften it slightly.
Initial Floating:
- Begin with a bull float, which is a large, flat tool with a long handle.
- Use broad, sweeping motions to level the concrete and remove any excess.
- Start from one end and work your way towards the other, overlapping each pass slightly.
Smoothing with Hand Floats:
- After using the bull float, switch to a hand float.
- Use circular or figure-eight motions to smooth the surface.
- Pay close attention to the curved areas, maintaining the desired shape.
Creating Texture (Optional):
- Depending on your project’s design, you may want to add texture to the curved surface.
- This can be achieved using various tools, such as a texture roller or a texture broom.
- Texture should be applied after initial floating and smoothing but before final finishing.
Final Finishing:
- Use a finishing trowel to achieve a smooth and polished surface.
- Start by edging the curved form’s edges to create defined lines.
- Then, work the trowel over the entire surface, applying firm but controlled pressure.
- Continue this process until the concrete surface is smooth and free of imperfections.
Check for Uniformity:
- Periodically step back and check the surface for uniformity.
- Ensure that the curve is consistent and that there are no depressions or high spots.
Edge the Form:
- Use an edging trowel to round off the edges of your curved concrete form. This not only adds a finished look but also prevents chipping.
Final Touches:
- After achieving the desired finish, you can further refine the surface with sandpaper or a concrete grinding tool if necessary.
- This is the stage where you can make any minor adjustments to the curve’s shape or smooth out any remaining imperfections.
Allow for Curing:
- Once you are satisfied with the shape and finish, allow the concrete to continue curing as per the manufacturer’s recommendations.
- Keep it moist and protect it from extreme temperature fluctuations during this curing period.
Curing and Finishing
Proper curing and finishing techniques will ensure the longevity and durability of your curved concrete form. Learn how to protect your project from cracking and other issues.
Demolding the Curved Concrete
Demolding is a critical step in working with curved concrete forms. It requires care and precision to ensure that your curved form retains its shape and finish. Here’s how to properly demold your curved concrete:
Timing is Crucial:
Timing is Key: Wait for the concrete to cure adequately before attempting to remove the formwork. The exact curing time can vary depending on factors like temperature and humidity, but a general guideline is to wait at least 24 to 48 hours for smaller projects and up to seven days for larger or load-bearing structures.
Gradual and Gentle Removal:
Avoid Force: Do not force or rush the demolding process. Concrete gains strength over time, so attempting to remove the formwork too soon can lead to cracking or deformation.
Loosen Nails or Screws: If you’ve used nails or screws to secure the formwork, gently loosen them, but don’t remove them entirely.
Use a Rubber Mallet: To release the concrete from the formwork, gently tap the sides of the formwork using a rubber mallet. Start from the edges and work your way towards the center.
Remove Formwork in Sections:
Segmented Demolding: If your curved form is complex or large, consider demolding it in sections rather than all at once. This can help prevent stress on the concrete.
Pay Attention to Detail:
Inspect for Resistance: As you demold, pay attention to any areas where the formwork seems to resist removal. If you encounter resistance, stop and investigate to avoid damaging the concrete.
Use Release Agents: Applying a release agent to the formwork before pouring the concrete can help ease the demolding process.
Two-Person Job:
Extra Hands: Demolding a curved concrete form can be a two-person job. Having someone assist you can help ensure a smoother process, especially for larger forms.
Post-Demolding Care:
Handle with Care: Once demolded, handle the curved concrete form with care to avoid any damage. Place it on a clean, flat surface.
Curing Continues: Even after demolding, the concrete continues to cure. Keep it moist and protected from extreme temperatures for an additional curing period, typically up to seven days.
Surface Inspection:
Inspect for Imperfections: After demolding, inspect the surface of the curved concrete for any imperfections, such as air bubbles or inconsistencies. These can often be repaired with patching materials or sanding.
Finishing Touches:
Final Touches: If needed, you can use sandpaper or grinding tools to refine the surface and achieve the desired finish.
Surface Preparation for Further Construction
If your curved concrete form is part of a larger project, you’ll need to prepare the surface for additional construction. We’ll cover the necessary steps to ensure a seamless transition.
Maintenance Tips
Maintenance is essential to keep your curved concrete form looking its best over time. Learn how to care for it and address any potential issues.
Safety Considerations
Safety should always be a top priority. We’ll discuss safety measures and precautions to follow throughout the entire construction process.
Advantages of Curved Concrete Forms
Curved concrete forms offer numerous advantages, from aesthetics to structural integrity. Explore the benefits of incorporating curved elements into your designs.
Common Mistakes to Avoid
Working with curved concrete forms can be a challenging but rewarding endeavor. However, to ensure a successful outcome, it’s essential to be aware of common mistakes that can occur during the process. Here are some pitfalls to avoid:
1. Inadequate Planning:
Mistake: Not thoroughly planning the project, including formwork design, dimensions, and curve specifications.
Solution: Take the time to create a detailed plan, considering all aspects of your curved form. Double-check measurements and design before starting construction.
2. Poor Formwork Construction:
Mistake: Rushing through the formwork assembly, resulting in misalignment or instability.
Solution: Carefully follow your formwork plan, ensuring it’s level, secure, and can withstand the weight of the concrete. Use clamps and supports as needed.
3. Incorrect Reinforcement:
Mistake: Neglecting to use appropriate reinforcement, such as rebar or wire mesh, in curved forms.
Solution: Determine the right type and amount of reinforcement based on your project’s requirements and concrete mix. Proper reinforcement enhances the structure’s strength.
4. Overmixing or Undermixing Concrete:
Mistake: Failing to achieve the correct concrete consistency, either making it too runny or too stiff.
Solution: Follow the manufacturer’s guidelines for mixing ratios and water content. Aim for a mix that is workable and flows smoothly into the form.
5. Neglecting Surface Finishing:
Mistake: Not paying enough attention to shaping and finishing the concrete surface.
Solution: Use concrete floats and trowels to shape the surface precisely as per your design. Smooth out any imperfections to achieve the desired finish.
6. Improper Curing:
Mistake: Neglecting the curing process, which can lead to cracking and reduced strength.
Solution: Cover the concrete with curing compound or wet burlap, keeping it moist for at least seven days. Proper curing is critical for long-term durability.
7. Rushing Demolding:
Mistake: Removing the formwork too soon, which can damage the concrete.
Solution: Follow the recommended curing time before demolding. Be patient, as premature demolding can ruin the shape and finish.
8. Neglecting Safety:
Mistake: Not wearing appropriate safety gear and not following safety protocols.
Solution: Always wear safety glasses, gloves, ear protection, and a dust mask. Follow safety guidelines to prevent accidents.
9. Ignoring Environmental Factors:
Mistake: Not considering weather conditions and temperature when working with concrete.
Solution: Avoid pouring concrete in extreme heat or cold, as it can affect the curing process. Use curing blankets or other methods to protect the concrete from extreme conditions.
10. Lack of Maintenance:
Mistake: Failing to maintain and protect your curved concrete form over time.
Solution: Regularly inspect and clean your curved forms. Apply concrete sealer or paint as needed to maintain appearance and durability.
Conclusion
In conclusion, creating curved concrete forms can add a touch of elegance and uniqueness to your construction projects. By following the steps outlined in this guide, you can confidently tackle your curved form projects with ease and precision.
FAQs
While it’s possible, it’s advisable to have some experience with concrete work or seek guidance from a professional to ensure a successful outcome.
A mix with a higher plasticity, such as a high-slump concrete mix, is ideal for curved forms as it flows more easily into intricate shapes.
Proper curing and reinforcement techniques, as outlined in this article, can help minimize the risk of cracks.
The size of your curved form may be limited by the strength of the formwork and the equipment available. Larger forms may require additional support.
Yes, you can add color pigments or texture to your concrete mix to achieve the desired appearance for your curved forms.

