Introduction
Your home’s rim joist is a critical structural element, supporting the weight of the walls and distributing it to the foundation. Over time, it may weaken due to various factors, necessitating replacement. This guide will provide you with a step-by-step approach to tackle this important task.
Understanding the Rim Joist
Before you begin, it’s crucial to understand what a rim joist is. This horizontal board runs around the perimeter of your home’s framing, connecting the ends of the floor joists. It plays a vital role in maintaining the structural integrity of your house.
Safety Precautions
Safety should be your top priority. Ensure you have the necessary safety gear, such as gloves, safety glasses, and a dust mask, to protect yourself during the project. Additionally, be cautious of any electrical wires or plumbing that may be present near the rim joist.
Tools and Materials
To replace a rim joist, you will need the following tools and materials:
- Circular saw
- Pry bar
- Hammer
- Tape measure
- Level
- New rim joist material
- Joist hangers
- Nails or screws
- Insulation
- Caulk or foam sealant
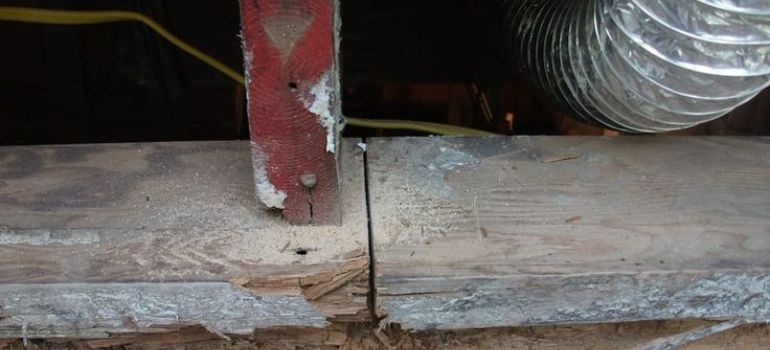
Assessing the Damage
Begin by thoroughly inspecting the existing rim joist. Look for signs of rot, pest damage, or moisture problems. Identify the extent of the damage and determine if a partial or full replacement is needed.
Removing the Old Rim Joist
Carefully remove the old rim joist using a pry bar and circular saw. Be mindful not to damage the surrounding structure. Remove any nails or screws that may be holding it in place.
Cutting and Preparing the New Joist
Measure the dimensions of the old rim joist to cut the new one to the correct size. Ensure it fits snugly in place, making any necessary adjustments.
Installing the New Rim Joist

Attach the new rim joist using joist hangers for added support. Ensure it is level and securely fastened to the existing structure.
Securing and Fastening
Secure the new rim joist in place using nails or screws. Make sure it is tightly fastened to prevent any movement.
Insulating and Sealing
Add insulation to the rim joist area to improve energy efficiency. Seal any gaps with caulk or foam sealant to prevent drafts and moisture infiltration.
Finishing Touches
Inspect the surrounding area for any additional repairs or improvements needed. Make any necessary repairs before completing the project.
Post-Installation Inspection
Once the replacement is complete, inspect the entire area for any missed details. Ensure everything is secure and properly sealed.
Maintenance Tips
- Regular Inspections: Make it a habit to inspect your rim joist and the surrounding areas periodically. Check for any signs of moisture, mold, or pest infestations. Early detection can prevent larger problems down the road.
- Foundation Maintenance: A healthy foundation is essential for the stability of your home. Ensure that your foundation is well-maintained and free from cracks or settling issues that could affect your rim joist.
- Proper Ventilation: Adequate ventilation in your crawl space or basement is crucial to prevent moisture buildup. Consider installing vents or a dehumidifier to maintain the right humidity levels.
- Gutter Maintenance: Gutters play a significant role in directing water away from your home’s foundation. Keep them clean and free from debris to prevent water from seeping into the rim joist area.
- Trim Vegetation: Trim any trees or shrubs near your home to prevent roots from growing into your foundation and potentially causing damage to the rim joist.
- Sealing Gaps: Periodically check for any gaps or cracks in the rim joist area and seal them with caulk or foam insulation to maintain energy efficiency and keep out pests.
- Professional Inspection: If you ever notice any unusual issues or have concerns about the condition of your rim joist, don’t hesitate to consult a professional. They can provide expert advice and solutions.
Sustainability and Eco-Friendly Options:
- If you’re environmentally conscious, consider using eco-friendly materials for your rim joist replacement. Look for sustainable wood options or recycled materials that reduce the environmental impact of your project.
Local Building Codes and Permits:
- Before you begin any structural work, check with your local building department to understand the specific codes and permitting requirements in your area. Compliance with these regulations is crucial to avoid legal issues in the future.
Long-Term Benefits:
- Remember that replacing a rim joist is an investment in your home’s long-term health and value. A well-maintained rim joist ensures your home remains safe, stable, and energy-efficient.
Regular Home Inspections:
- To catch issues with your rim joist early, include it in your routine home inspections. This practice can help you identify and address problems before they become major concerns.
Maintenance Beyond the Rim Joist:
- While focusing on the rim joist is essential, remember that overall home maintenance is crucial. Address other structural and maintenance needs to ensure your entire home remains in excellent condition.
Consultation with Experts
- If you are uncertain about any aspect of your rim joist replacement project or encounter unexpected challenges, don’t hesitate to consult with experienced contractors or carpenters. Their expertise can be invaluable in achieving the best results.
FAQs
It’s advisable to inspect your rim joist at least once a year, especially during seasonal changes.
If you have experience with basic carpentry and construction, you can replace a rim joist yourself. However, if you are unsure or the damage is extensive, it’s best to consult a professional.
Look for signs of rot, pest infestations, or moisture damage, such as sagging floors, mold, or water stains.
Closed-cell spray foam insulation is a popular choice for rim joists, as it provides an effective air barrier and insulation in one.
The time required for a rim joist replacement can vary depending on the extent of the damage and your experience level. It can range from a few hours to a full day.
Conclusion
Replacing a rim joist is a critical home maintenance task that ensures the stability and longevity of your house. By following this step-by-step guide and taking necessary precautions, you can successfully complete the project and enjoy a structurally sound home.


