
Introduction
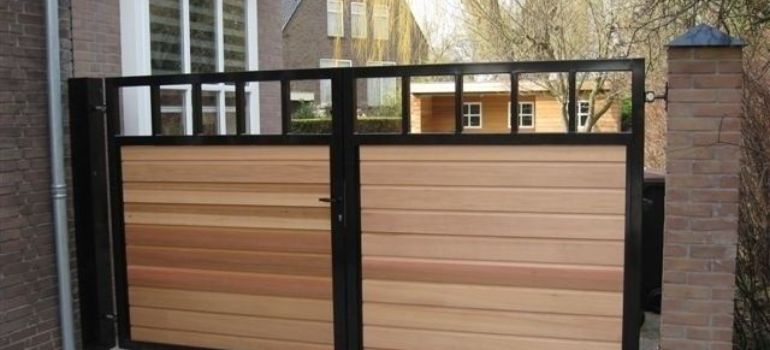
A metal gate with wood slats is not only a functional addition to your property but also an attractive one. It provides security, privacy, and a warm, welcoming aesthetic. In this guide, we’ll take you through each step of the process, from planning and design to installation and maintenance. By the end, you’ll have the knowledge and confidence to create a stunning metal gate with wood slats that enhances the overall appeal of your home.
Materials You’ll Need
Before diving into this DIY project, it’s essential to gather all the necessary materials. Here’s a list of what you’ll need:
- Metal frame (steel or aluminum)
- Wood slats (cedar or redwood recommended)
- Welding equipment
- Measuring tape
- Saw
- Screwdriver
- Screws and bolts
- Wood glue
- Sandpaper
- Paint or stain
- Protective finish
- Hinges and a latch
- Level and plumb bob
- Safety gear (gloves, goggles, and ear protection)
Planning and Design
Choosing the Right Location
The first step is to decide where you want to install your metal gate. Consider factors such as security, privacy, and aesthetics when choosing the location.
Determining Gate Dimensions
Choosing the right dimensions for your metal gate with wood slats is a crucial step in the planning process. The gate’s dimensions should not only fit the intended opening but also match the overall aesthetics of your property. Here’s how to go about it:
- Measure the Width of the Opening: Start by measuring the width of the entrance or opening where you intend to install the gate. Use a measuring tape to get an accurate measurement from one side to the other. Record this measurement as it will be the primary factor in determining the gate’s width.
- Consider the Height: While width is the most critical dimension, you should also consider the gate’s height. The height should provide adequate security and privacy while still maintaining a harmonious look with the surrounding area. A standard gate height ranges from 4 to 6 feet, but you can adjust it based on your preferences and local regulations.
- Allow for Clearance: Ensure that your gate design allows for clearance when it swings open and closed. You need enough space for the gate to function smoothly without obstruction. Typically, you’ll want to add a few inches of clearance on both sides of the gate’s width.
- Account for Posts and Hinges: Don’t forget to factor in the space required for gate posts and hinges. Gate posts should be securely anchored into the ground or existing structures, and hinges should be appropriately spaced to ensure the gate opens and closes smoothly.
- Consider Sloping Terrain: If your property has sloping terrain, take this into account when determining gate dimensions. You may need to adjust the height of the gate or install it in a way that accommodates the slope.
- Check Local Regulations: Depending on your location, there may be local regulations or homeowner association rules that dictate gate dimensions and styles. Be sure to check with your local authorities or association to ensure compliance.
- Customization: Remember that you have the flexibility to customize the gate’s dimensions to match your design preferences. You can create a gate that’s tall and imposing for added security or one that’s shorter for a more open and welcoming appearance.
Gathering Tools
To ensure a successful and efficient construction process for your metal gate with wood slats, it’s essential to have the right tools at your disposal. Here’s a list of the necessary tools you’ll need for this DIY project:
- Welding Equipment: If you’re planning to build a metal frame for your gate, welding equipment is crucial. This includes a welding machine, welding mask, welding gloves, and welding electrodes. If you’re not experienced in welding, it’s advisable to seek professional help for this part of the project.
- Measuring Tape: Accurate measurements are vital for a precise fit. A good-quality measuring tape will help you ensure that your gate is the right size and that all components align correctly.
- Saw: You’ll need a saw to cut both the metal frame and the wood slats to the desired dimensions. A circular saw or a miter saw can be particularly useful for making clean, straight cuts.
- Screwdriver: A screwdriver is essential for attaching the wood slats to the metal frame securely. Make sure you have various types and sizes of screwdrivers, including Phillips and flathead.
- Screws and Bolts: Choose screws and bolts that are suitable for the materials you’re working with. Stainless steel screws are an excellent choice for outdoor projects, as they resist rust and corrosion.
- Wood Glue: Wood glue is used in addition to screws to bond the wood slats to the metal frame, providing extra stability and strength.
- Sandpaper: Sandpaper in various grits will help you smooth out rough edges and surfaces, ensuring a professional finish on your wood slats.
- Paint or Stain: Depending on your design preferences, you may want to paint or stain the wood slats. Ensure you have the appropriate brushes or rollers for this task.
- Protective Finish: To extend the life of your wood slats and protect them from the elements, a protective finish like polyurethane or wood sealer is essential.
- Hinges and a Latch: These hardware components are vital for the functionality of your gate. Select heavy-duty hinges and a secure latch system that matches the style of your gate.
- Level and Plumb Bob: These tools help ensure that your gate is installed perfectly level and plumb. This is crucial for both appearance and functionality.
- Safety Gear: Safety should be a top priority. Wear gloves, safety goggles, and ear protection when working with tools and equipment to prevent injuries.
Preparing the Frame
Once you have determined the dimensions of your gate and gathered the necessary materials and tools, the next significant step in your project is preparing the metal frame. The frame serves as the structural foundation for your gate, providing stability and support for the wood slats. Here’s a step-by-step guide on how to prepare the frame:
1. Measuring and Cutting the Metal Frame:
- Begin by measuring and marking the metal frame according to the width and height determined earlier. Use a measuring tape and a pencil to make precise measurements and marks on the metal.
- If your gate has a decorative top or a specific design, make sure to mark those features accurately on the metal frame as well. This step is crucial to ensure your gate’s final look matches your design vision.
- Use a saw, preferably a metal-cutting saw or a reciprocating saw with a metal-cutting blade, to cut the metal frame along the marked lines. Ensure that the cuts are clean and accurate, as this will affect the gate’s overall appearance and stability.
- Take your time with the cutting process, and wear appropriate safety gear, including safety glasses and gloves, to protect yourself from sharp edges and metal shards.
2. Assembling the Frame:
- Lay out the cut metal pieces on a flat, stable surface to begin assembling the frame. Ensure that all the pieces fit together correctly.
- Use welding equipment (if you have welding skills) or bolts and nuts (if you prefer a bolted frame) to secure the frame’s corners and joints. Welding provides a more seamless and robust connection, while bolts allow for disassembly if needed.
- Check the frame’s squareness by measuring diagonally from one corner to the opposite corner. The measurements should be equal, ensuring that the frame is square and properly aligned.
- Double-check the frame’s dimensions against your initial measurements to ensure it matches the desired size and design.
3. Finishing the Frame:
- After the frame is assembled, use an angle grinder with a grinding disc to smooth out any rough edges, sharp corners, or excess weld material. This step not only enhances the frame’s appearance but also ensures safety during handling and installation.
- If you prefer a decorative finish or additional rust protection, you can apply paint or a rust-resistant coating to the metal frame at this stage. Be sure to choose a paint or coating suitable for outdoor use.
- Allow the paint or coating to dry thoroughly before proceeding to the next steps in your project.
Adding Wood Slats
Select the wood slats that best suit your design preferences and attach them to the metal frame evenly.
Finishing Touches
Smooth out any rough edges by sanding and apply a protective finish to the wood to enhance its longevity.
Installation
Mount the gate in its designated location and install the hinges and latch for functionality and security.
Maintenance and Care
After you’ve successfully built and installed your metal gate with wood slats, it’s important to perform regular maintenance and care to ensure its longevity, functionality, and continued visual appeal. Here are some essential maintenance and care steps to follow:
1. Cleaning and Repainting:
Regularly clean the metal components of your gate, especially if it’s exposed to outdoor elements. Use a mild detergent and water to remove dirt, dust, and grime. Avoid abrasive cleaning materials that could scratch the metal or wood.
Inspect the paint or finish on both the metal frame and wood slats. If you notice any chipping, peeling, or fading, it’s time to consider repainting or re-staining. Properly prepare the surfaces by sanding and cleaning before applying a fresh coat of paint or stain. Ensure that you choose a paint or stain suitable for exterior use and follow the manufacturer’s recommendations for application.
2. Checking for Wear and Tear:
Regularly inspect your gate for signs of wear and tear. Pay close attention to the hinges, latch, and other hardware components. Ensure that all fasteners are tight and secure. If you notice any loose screws or bolts, tighten them promptly to prevent further damage.
Examine the wood slats for cracks, warping, or rot. Replace any damaged slats to maintain the gate’s structural integrity and appearance. It’s a good practice to keep extra wood slats on hand for such replacements.
3. Lubricating Hardware:
Apply a lubricant, such as a silicone-based or graphite lubricant, to the hinges and latch to keep them operating smoothly. Lubrication prevents rust and ensures that the gate opens and closes without resistance.
4. Seasonal Inspections:
Perform seasonal inspections to address weather-related issues. In colder climates, check for ice buildup around the gate’s moving parts, as it can impede functionality. In areas with extreme heat, monitor the wood slats for signs of drying out or cracking due to prolonged sun exposure.
5. Rust Prevention:
If your gate is made of steel or other ferrous metals, take precautions to prevent rust. Consider applying a rust inhibitor or protective coating to the metal components. Regularly inspect the metal for any signs of rust and address it promptly by sanding the affected area and applying an appropriate rust treatment.
6. Gate Opener Maintenance (If Applicable):
If your gate is automated with a gate opener, follow the manufacturer’s maintenance guidelines for the opener system. Ensure that safety features like sensors and reversing mechanisms are functioning correctly to prevent accidents.
7. Regular Cleaning of Wood Slats:
Keep the wood slats clean by periodically washing them with a mild wood cleaner and water. Avoid harsh chemicals that can damage the wood’s finish. Additionally, consider applying a fresh coat of wood sealer or stain every few years to protect against moisture and UV exposure.
Enhancements and Customization
Consider adding decorative elements or painting/staining the wood to match your property’s aesthetic.
Benefits of Metal Gates with Wood Slats
Metal gates with wood slats offer numerous advantages, including durability, security, and a timeless aesthetic that complements various architectural styles.
Frequently Asked Questions (FAQs)
Yes, but cedar and redwood are recommended for their durability and resistance to decay.
While it’s helpful, you can hire a professional welder if you’re not confident in your welding skills.
It depends on your climate, but typically every 2-3 years is a good guideline.
Yes, you can add an automatic gate opener for convenience.
Costs vary depending on materials and gate size, but budget for around $300-$500.
Conclusion
Building a metal gate with wood slats is a rewarding DIY project that can enhance the security and beauty of your home. With the right materials, tools, and our step-by-step guide, you can create a custom gate that adds value and charm to your property. So, roll up your sleeves, get creative, and enjoy the process of constructing your very own metal gate with wood slats.


